
Misting Mushroom Growing Kits: How Much Water Each Variety Actually Needs
Misting Mushroom Growing Kits: How Much Water Each Variety Actually Needs
Misting is the single most important daily task when growing mushrooms from a kit. Get it right and the kit fruits quickly and reliably. Get it wrong, too much, too little, or in the wrong place and the grow stalls, dries out, or develops problems that are hard to reverse.
The challenge is that different mushroom species have different moisture needs. A watering routine that works perfectly for an Oyster mushroom kit can damage a Lion's Mane kit. This guide breaks down exactly what each variety needs, so you can water with confidence from day one.
Why misting matters more than any other part of mushroom care
Mushrooms are roughly 90 percent water. Unlike plants, they have no traditional roots to draw moisture, however they do have Hyphae, these filamentous mycelium structures form the same basis of absorbing water from the environment, in this case the growing substrate. Mushrooms do not have a plant like waxy skin to prevent moisture loss. so they require a humid environment to minimise any water loss.
Misting serves two purposes. First, it keeps the growing surface moist, which the compost or substrate requires. Secondly, it raises the humidity in the air immediately around the kit, which is what the mushrooms actually need to develop. A fine mist from a clean spray bottle does both at once, without flooding the block or creating pools of standing water.
The reason misting goes wrong is usually not laziness, it is applying the same technique to every variety. Each mushroom growing kit has its own relationship with water, and understanding those differences is the fastest way to improve your results.
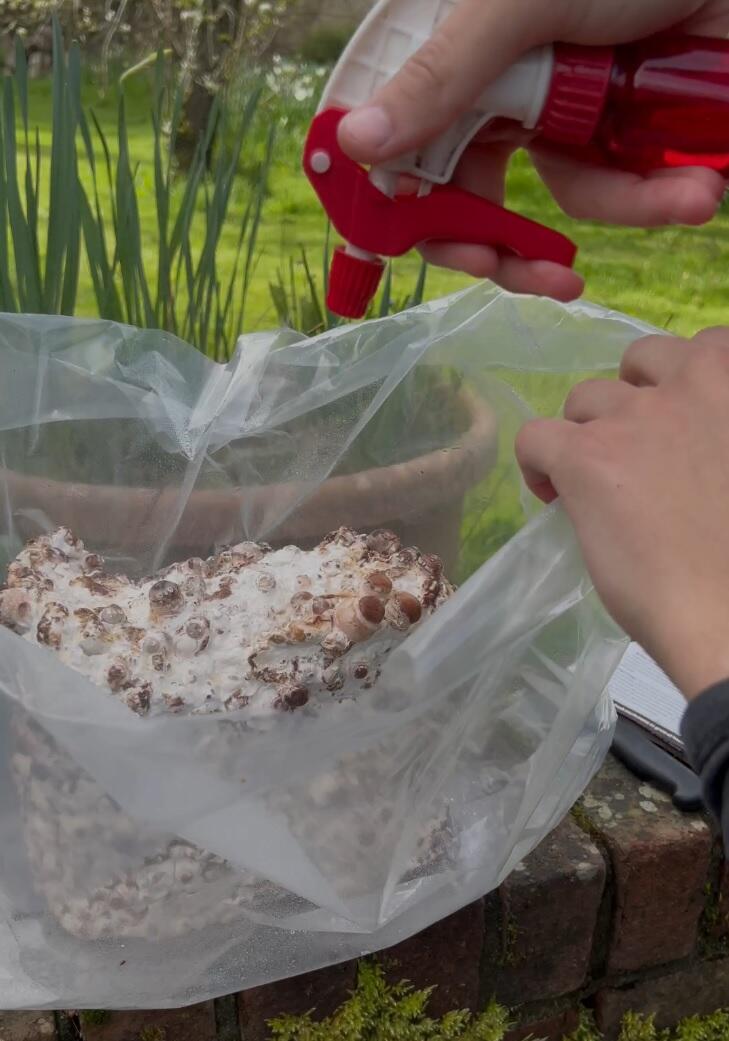
A fine, even mist is always better than a heavy spray the goal is dampness, not pooling
Oyster mushroom kits: spray the compost twice a day
Oyster mushrooms are the most straightforward variety to water. They need direct misting onto the compost around the growing holes, twice a day — once in the morning and once in the evening. The aim is to keep the compost visibly moist without water sitting on the surface or running down into pools at the base of the kit.
With King Oyster and Pink Oyster kits, the compost absorbs moisture readily and dries fairly evenly. Twice-daily misting is usually enough to keep conditions right, though in warmer or drier rooms you may need a third spray during the afternoon.
Yellow Oyster kits need a little more care. Yellow Oyster mycelium is noticeably thicker and denser than other Oyster varieties, and this heavy mycelium layer can prevent water from absorbing into the compost properly. Instead of soaking in, the water pools on the surface and pooling water is one of the fastest ways to stall a mushroom kit. If you notice water sitting rather than absorbing, ease off the volume per spray and urgently dab away any excess water with paper towel. Several lighter mists are better than one heavy one and it is better not to water if the compost is already moist.
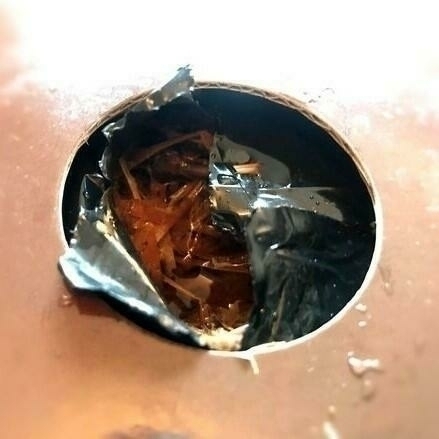
If pooling water is seen, it should be dabbed away with paper towel.
Oyster kit misting summary: Spray the compost directly, twice a day. Keep it moist, never waterlogged. Watch Yellow Oyster kits for pooling caused by thick mycelium reduce volume per spray and blot any standing water with paper towel.
Lion's Mane kits: never spray the compost or the mushrooms directly
Lion's Mane is the variety that trips people up most often, because the watering method is completely different from every other kit. Direct water on the compost or the mushrooms themselves can cause problems, such as bacteria and or browning of the mushroom from evaporation. the developing fruit bodies do not respond well to being sprayed, and wet compost around the growing holes creates conditions where the mycelium can struggle and bacteria thrive.
Instead, Lion's Mane needs ambient humidity. The kit comes with a humidity bag for exactly this purpose. The method is to place folded paper towels inside the bag on either side of the kit not touching it and keep those paper towels damp by spraying them rather than the kit itself. As the moisture evaporates from the paper towels, it raises the humidity inside the bag to the 80 to 90 percent range that Lion's Mane thrives in.
This approach gives the mushrooms the moisture they need without any direct water contact. The humidity bag also protects the kit from draughts while still allowing fresh air exchange through its open top, which prevents the coral-like growth that Lion's Mane produces when it does not get enough airflow. Full setup details are covered in the Lion's Mane growing instructions.
Lion's Mane misting summary: Never spray the compost or the mushrooms. Spray the paper towels inside the humidity bag to maintain ambient humidity at 80 to 90 percent. Keep paper towels damp at all times — check at least twice a day.
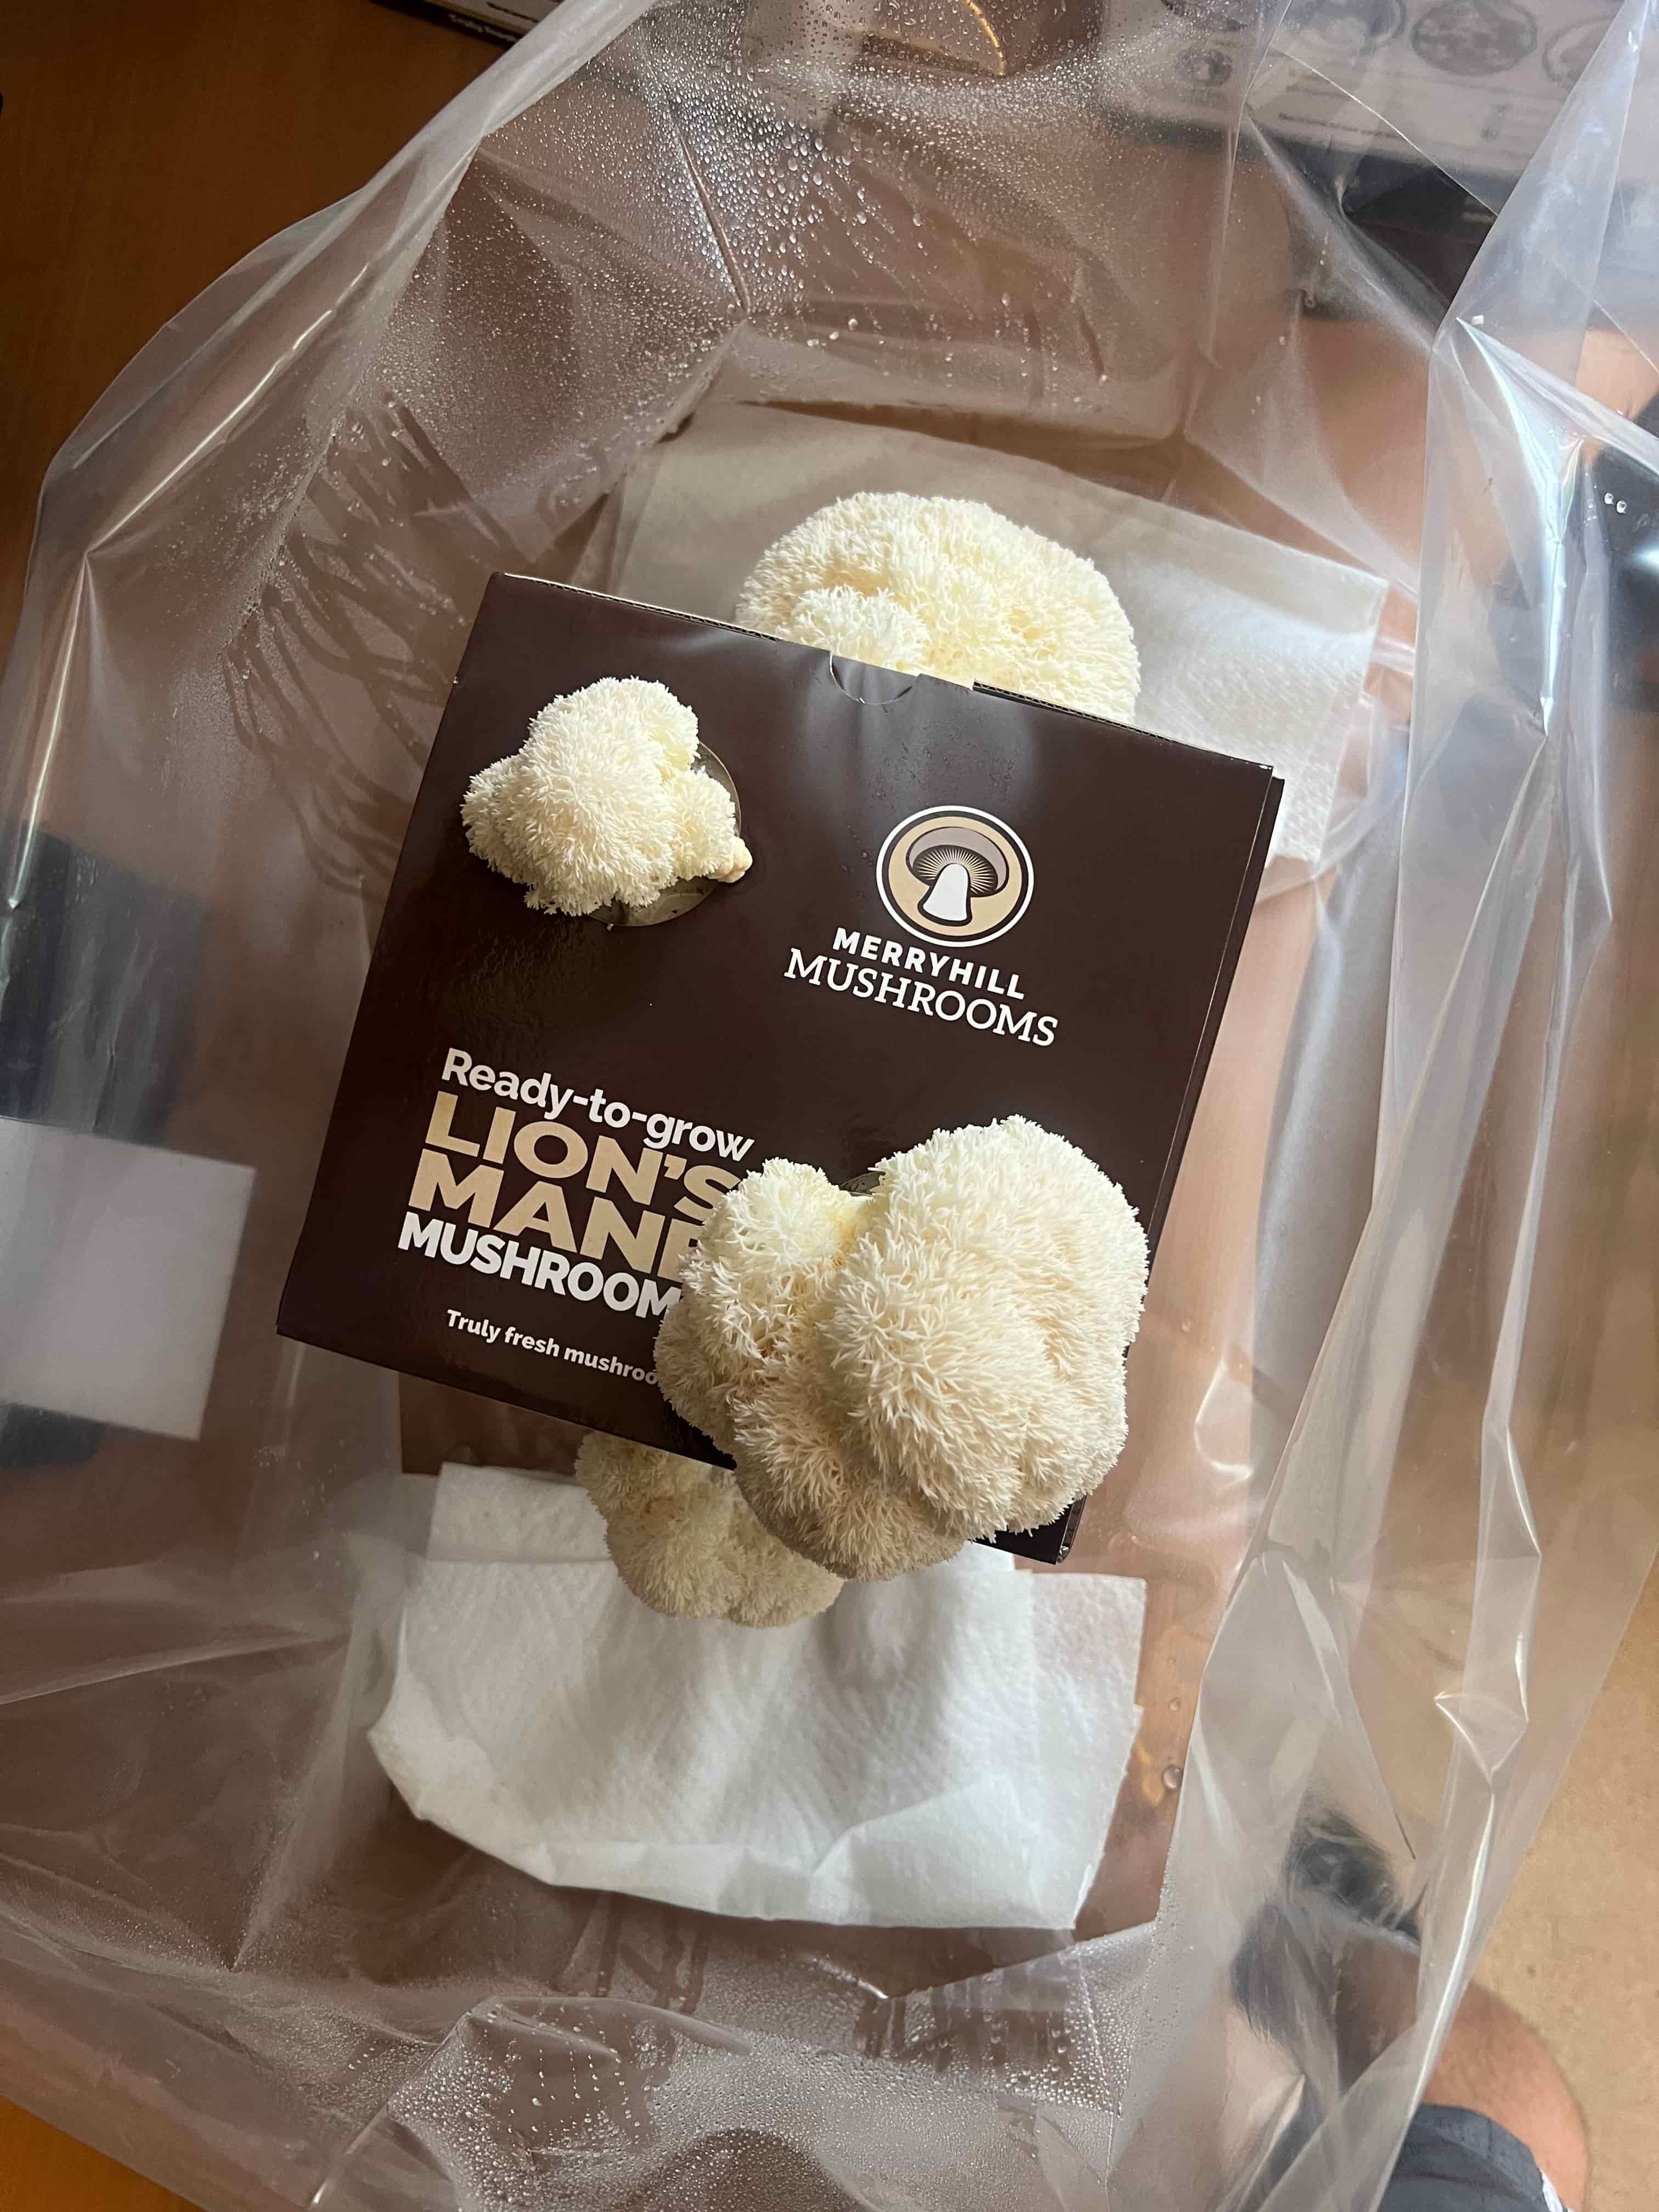
Lion's Mane kits use damp paper towels inside a humidity bag, never spray the kit, mushrooms or compost directly.
Chestnut and White mushroom kits: keep the topsoil deep black
Chestnut and White mushroom kits use a topsoil layer that sits on top of the colonised compost, and the colour of that topsoil is your best visual guide to hydration. When the topsoil is properly hydrated, it should be a consistent deep black colour. When it starts to dry out, it lightens, develops grey patches, or shows light speckles and if it pulls away from the edges of the container, it has become too dry.
Spray the topsoil directly with a fine mist, little and often throughout the day. Pay particular attention to the edges, which tend to dry out first and are easy to miss. The topsoil should feel damp to the touch but there should never be standing water on the surface. If the water is not absorbing, you are applying too much at once.
If the topsoil has already dried out significantly, with shrinkage from the edges, or a light grey colour throughout, it needs to be rehydrated gradually. Spray several times through the day in small amounts until the colour returns to deep black, then maintain that level going forward. The full Chestnut and White hydration guide covers this recovery process in detail with photos showing exactly what correct hydration looks like compared to under- and over-watered topsoil.
Chestnut and White misting summary: Spray the topsoil directly, little and often. The topsoil should stay deep black with no dry patches or standing water. Watch the edges, they dry out first. If in doubt, check the hydration guide for visual examples.
Shiitake kits: mist the block surface and maintain humidity
Shiitake kits grow from a dense hardwood-based block, and the misting approach is closer to Oyster mushrooms than Lion's Mane. Spray the surface of the block directly, two to three times a day, to keep it visibly damp. The block should look moist across its surface without any water running off or pooling at the base of the kit within the humidity bag.
Shiitake blocks are dense and do not absorb water as quickly as loose compost, so each misting session should be lighter than what you might use on an Oyster kit. A few passes with a fine spray is better than a heavy soak. Between harvests, then you look to soak the entire block in cold water for a few hours to rehydrate it before the next flush, this helps the block recover the moisture it lost during fruiting.
Quick reference: misting by variety
Every variety in the Merryhill Mushrooms range has slightly different moisture preferences. The table below gives you a quick reference for each kit type, covering where to spray, how often, and what to watch for.
Pink Oyster and White / Grey Oyster
Where: Spray the compost directly around the growing holes. How often: Twice daily, morning and evening. Watch for: Compost drying out between sprays in warm rooms. Add a midday mist if needed.
Yellow Oyster
Where: Spray the compost directly, but use lighter mists. How often: Twice daily. Watch for: Pooling water on the surface caused by thick mycelium blocking absorption. Blot any standing water with paper towel and reduce spray volume.
Lion's Mane
Where: Never spray the kit. Spray the paper towels inside the humidity bag. How often: Check at least twice daily, keep paper towels damp at all times. Watch for: Paper towels drying out, which drops humidity below 80 percent. See the Lion's Mane growing guide for full setup.
Chestnut and White and King Oyster
Where: Spray the topsoil directly, including the edges. How often: Little and often throughout the day. Watch for: Topsoil lightening in colour or pulling away from the edges are both signs of dehydration. See the hydration guide for visual examples.
Shiitake
Where: Spray the block surface directly. How often: Two to three times daily with a light mist. Watch for: Water running off the dense block rather than absorbing. Use lighter, more frequent sprays. Consider a cold-water soak between flushes to rehydrate the block.
Signs you are underwatering
Underwatering is the most common mistake with mushroom growing kits, and it is also the easiest to fix once you know what to look for. The symptoms vary slightly between varieties, but the underlying cause is always the same, the kit is losing moisture faster than it is being replaced, very important to adress this early on before the mycelium wilts back from the inhospitable conditions, it is always best to get on contact with us if ever there is a deviation from the predicted growth pattern.
Topsoil lightening or turning grey
On Chestnut and White kits, this is the earliest warning. Healthy topsoil is deep black. Any lightening, grey patches, or visible speckles mean the surface is drying out and needs more frequent spraying.
Shrinkage around the edges
When the compost or topsoil starts pulling away from the sides of the container, it has lost too much moisture. This is especially common when kits are placed near radiators or in rooms with draughts.
Pins forming but not developing
Small bumps (primordia) that appear but then stop growing or dry out before reaching harvestable size are a sign that humidity is too low. The mushrooms started but could not draw enough moisture from the environment to continue developing.
Cracking or yellowing / browning on developing mushrooms
Mushrooms that develop cracks on their caps or turn yellow prematurely have been exposed to air that is too dry or evaporation from excessive watering to the mushroom caps themselves. Increasing misting frequency to the compost and improving humidity around the kit with a bag, tent.
Signs you are overwatering
Overwatering is less common than underwatering, but it can be harder to recover from. Excess water suffocates the mycelium, creates conditions for bacterial growth, and prevents the mushrooms from forming properly. The symptoms to watch for differ depending on the kit type.
Standing water on the surface
If water is pooling on the topsoil or around the growing holes rather than absorbing, you are applying too much at once. This is particularly common on Yellow Oyster kits where thick mycelium blocks absorption. Blot any standing water with a paper towel immediately and reduce the volume of each spray.
Compost not absorbing water
When the compost stops absorbing your spray, it is already at capacity. Continuing to spray at this point does more harm than good. Skip the next misting session and allow the surface to use up some of its existing moisture before resuming.
Soft, soggy, or discoloured mushrooms
Mushrooms that feel waterlogged, develop dark soft patches, or begin to smell sour have been overwatered or are sitting in too much moisture. Reduce misting, improve airflow around the kit, and remove any damaged mushrooms to prevent them affecting healthy growth.
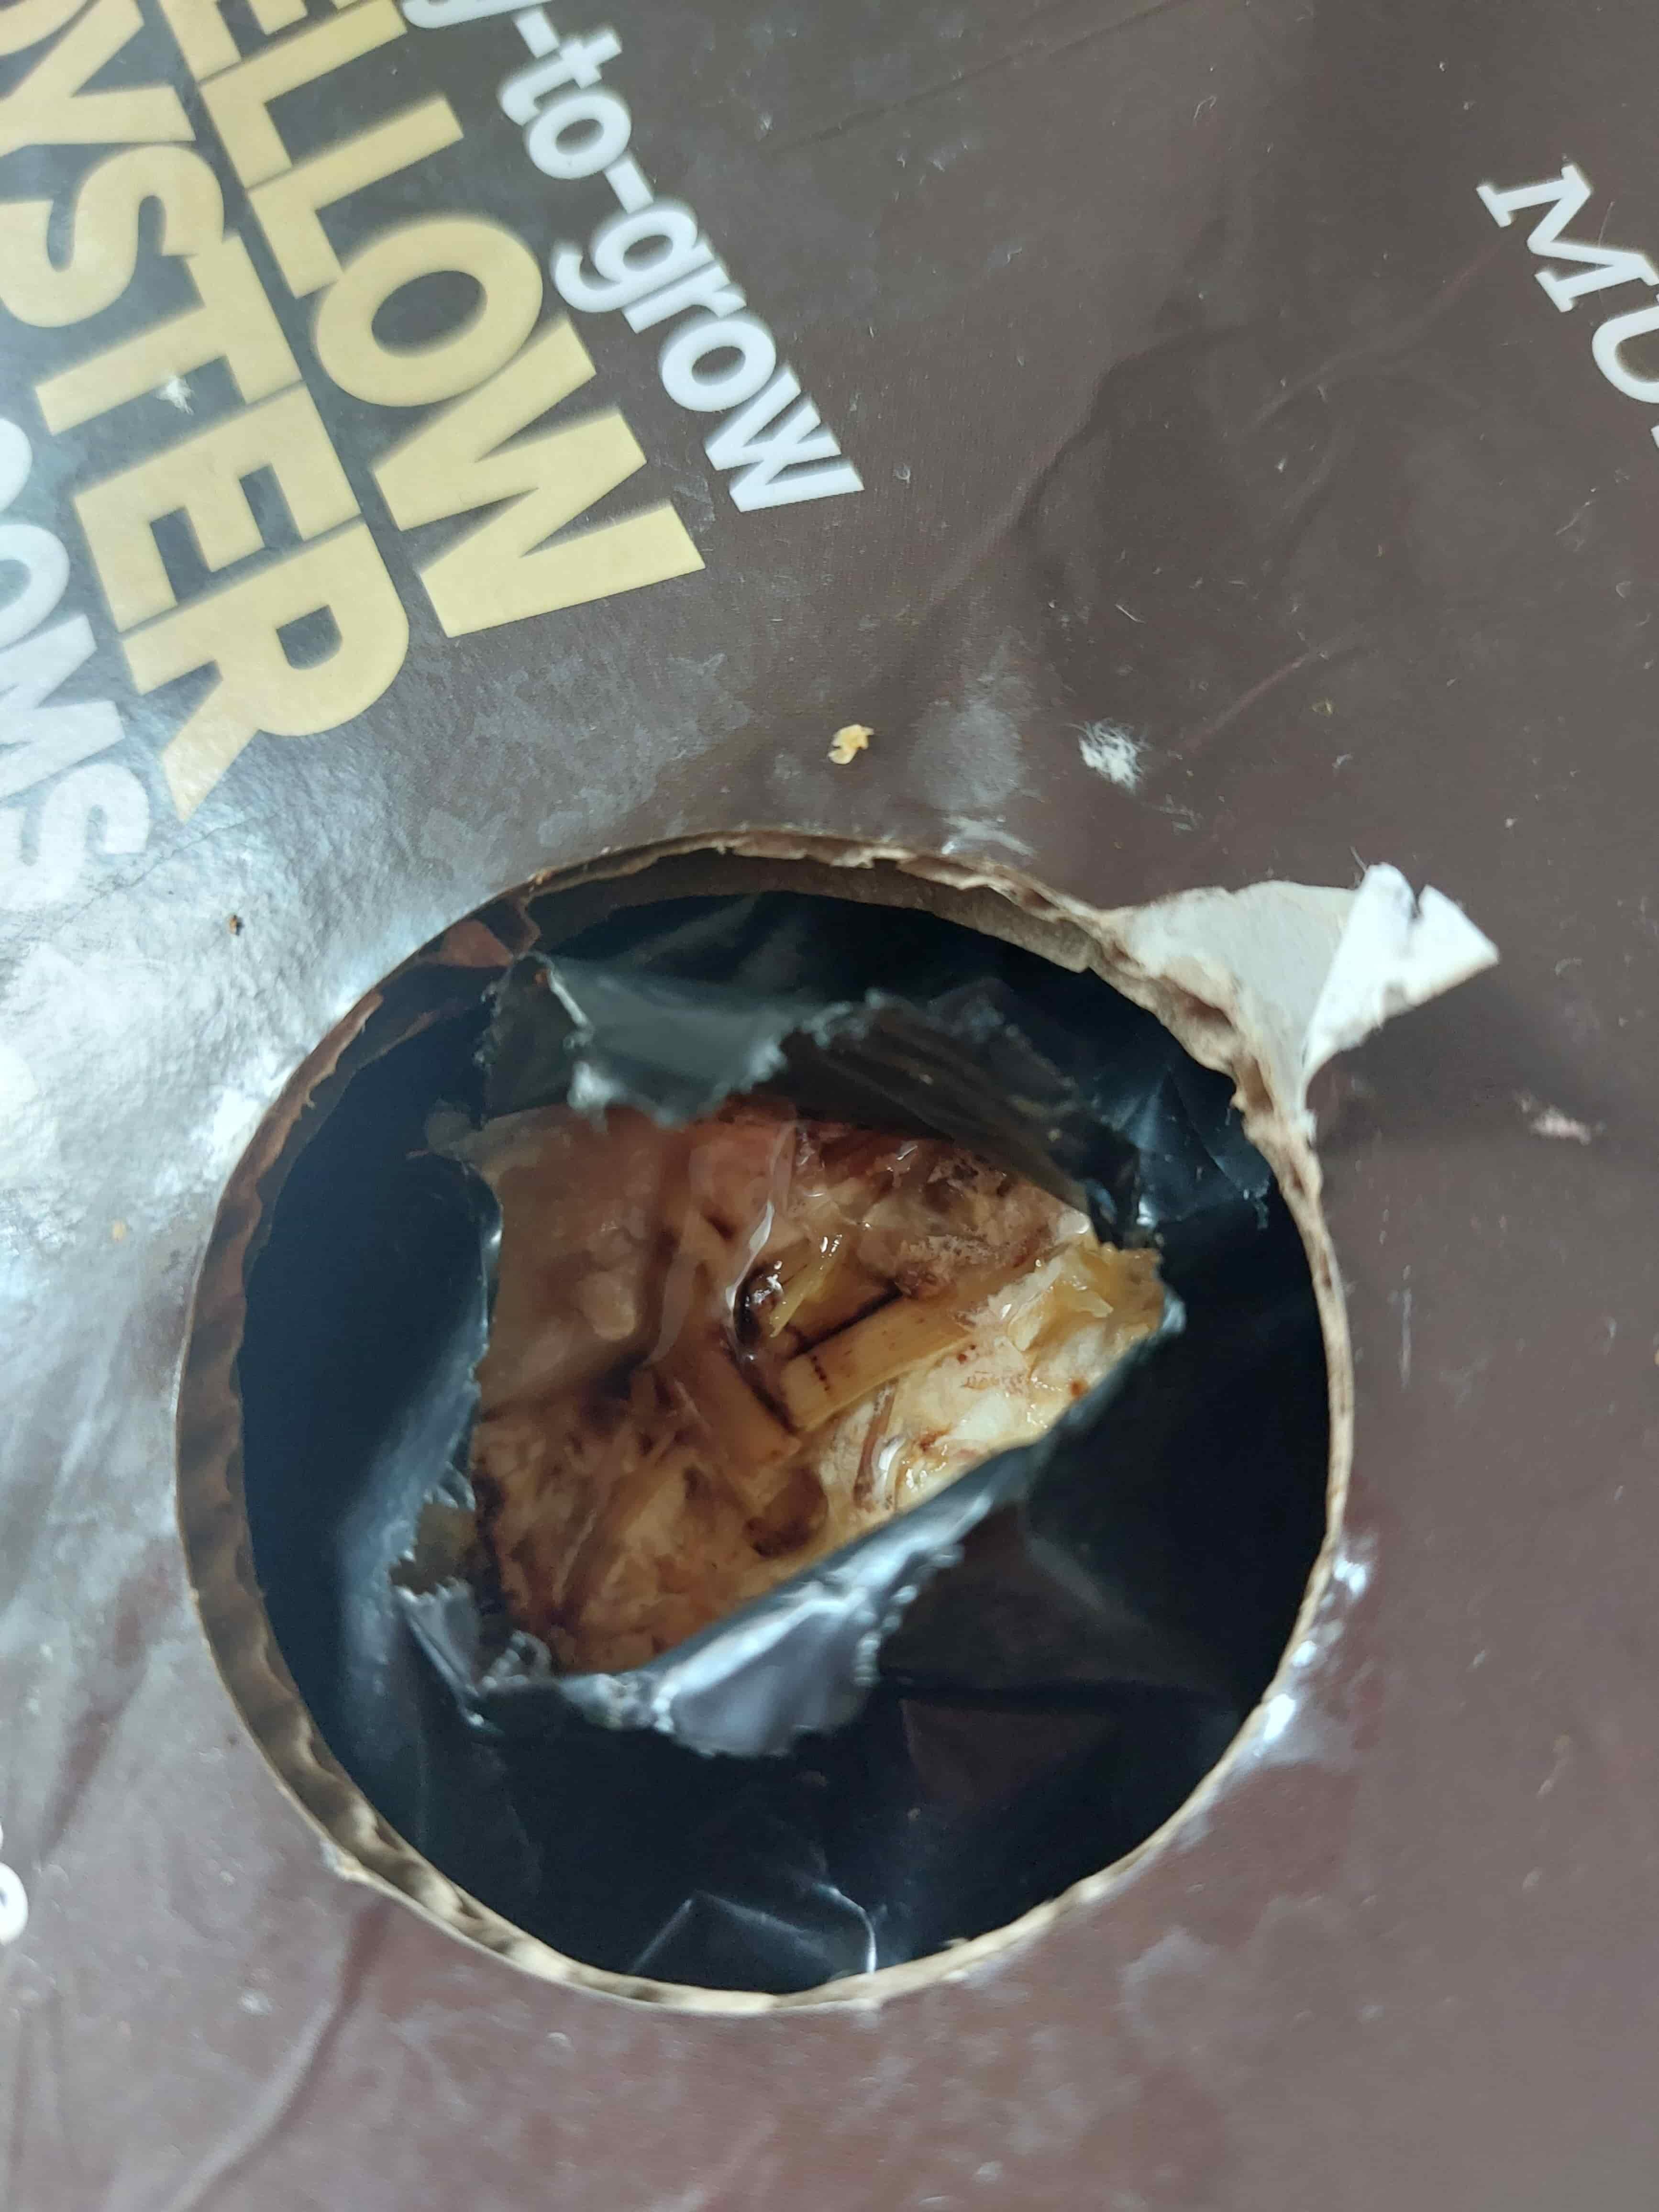
The surface should look damp and even — never shiny with standing water
Practical tips that make misting easier
Getting misting right is not complicated once you settle into a routine. A few practical adjustments can make a noticeable difference to how well your kit performs, especially during the first flush when getting the moisture balance right matters most.
Use a fine mist spray bottle
A spray bottle with a fine mist setting distributes water evenly across the surface without creating heavy droplets that pool. The trigger sprayers used for houseplants work well. Avoid bottles that produce a jet or a coarse spray, these deliver too much water to a small area and cause localised pooling.
Set a reminder until it becomes habit
Consistency matters more than precision. A phone alarm for morning and evening misting helps build the routine. After a week or so it becomes second nature, but the first few days are when kits are most likely to dry out because the habit is not yet established.
Keep the kit away from heat sources and draughts
Radiators, direct sunlight, and draughty corridors all accelerate drying. A kit placed on a worktop two feet from a radiator will dry out twice as fast as one across the room. Location is half the battle, the right spot means less misting effort and more consistent results.
Adjust for the season
Central heating in winter dries the air significantly. Kits that needed two sprays a day in October may need three or four by December. In summer, open windows can create draughts that have a similar drying effect. Check the kit visually each time you mist and adjust frequency based on what you see, not just the clock.
Water quality rarely matters for mushroom growing kits. Standard tap water is fine for all varieties. There is no need to use filtered, distilled, or rainwater, just make sure the spray bottle is clean and free from residue from any cleaning products.
The most common misting mistakes and how to avoid them
Most misting problems come from the same few habits. Knowing what they are makes them easy to avoid from the start.
Treating all varieties the same
The single biggest mistake. Spraying a Lion's Mane kit the way you would spray an Oyster kit introduces direct water where it should not be. Always check the variety-specific instructions before starting.
Spraying heavily once a day instead of lightly twice
One big spray creates a wet surface that dries out unevenly. Two lighter sprays maintain a steadier moisture level throughout the day, which is what the mycelium and developing mushrooms prefer.
Forgetting the edges
On Chestnut and White kits especially, the edges of the topsoil dry out before the centre. Spraying only the middle leaves the outer ring dehydrated, which can cause the entire topsoil layer to shrink and pull away from the sides of the container.
Ignoring seasonal changes
A misting routine that worked in spring may not be enough in winter when central heating is running. Check the kit before each spray — look at the colour and feel of the surface rather than just following the same schedule regardless of conditions.
Start Growing With Confidence
Every Merryhill Mushrooms kit arrives ready growing with variety-specific instructions. Choose from Lion's Mane, Oyster, Chestnut, White, and Shiitake, each with clear guidance on exactly how to water it.
Shop Mushroom Growing KitsFrequently asked questions
How often should I mist my mushroom growing kit?
It depends on the variety. Oyster and Shiitake kits need direct misting two to three times a day. Chestnut and White kits need little-and-often spraying to keep the topsoil deep black. Lion's Mane kits should not be sprayed directly, instead, keep the paper towels inside the humidity bag damp. Adjust frequency based on room temperature and how quickly the surface dries.
Can I overwater a mushroom growing kit?
Yes. Overwatering causes pooling, which suffocates the mycelium and can lead to bacterial contamination and or rotting of young mushrooms. This is a common risk of Yellow Oyster kits where the thick mycelium prevents water from absorbing into the compost. The surface should look damp and even, never shiny with standing water. If you see pooling, blot it with paper towel and reduce the amount you spray.
Why does Lion's Mane need a different watering method?
Lion's Mane does not respond well to direct water on the compost or the developing mushrooms. It needs high ambient humidity around 80 to 90 percent, rather than a wet growing surface. The humidity bag and damp paper towel method creates this environment without direct water contact, allowing the mushrooms to develop their characteristic long, cascading spines.
What kind of water should I use?
Standard tap water is fine for all mushroom growing kits. There is no need to use filtered, distilled, or bottled water. The only thing to avoid is water from a spray bottle that previously contained cleaning products, residue from household chemicals can harm the mycelium.
My kit has dried out, can I save it?
Usually, yes, but it very much depends on how long it has been too dry for. Rehydrate gradually by spraying little and often throughout the day rather than soaking it all at once. For Chestnut and White kits, follow the topsoil hydration guide for a step-by-step recovery process. in any case you should, contact the Merryhill Mushrooms support team with a photo and description of your setup for assistance.
Related reading