
Mushroom Growing Kit Timeline: What You Should See From Day 1 to First Harvest
Mushroom growing kit timelines are easier to follow when you know what normal progress looks like for each variety. Growth speed changes from one kit to another, but most Merryhill Mushrooms ready growing kits show clear signs of activity within the first few days and reach a first harvest within one to three weeks. Temperature, humidity, airflow, and variety all shape the pace, so this guide shows what you should expect from the day you open the box to the day you pick your first mushrooms.
Key takeaways
- Mushroom kit progress starts from the day you open the box because the mycelium is already colonised.
- Pink Oyster, Summer Oyster, White Oyster, Lion's Mane, Shiitake, and King Oyster usually move faster than Chestnut, White, Black Pearl, and Enoki.
- Room conditions between 14 and 21 degrees Celsius suit most kits, with Summer Oyster tolerating up to 22 degrees and Lion's Mane often liking the cooler end.
- Pins are the first clear sign of fruiting and usually appear before rapid growth begins.
- Dry surfaces, poor airflow, and unstable temperatures are the most common causes of delays.
- A delay of one or two days is usually normal, especially in cooler or drier homes.
Why does this timeline matter when choosing a Merryhill Mushrooms kit?
All Merryhill Mushrooms ready growing kits arrive with the mycelium already colonised, so the timeline starts from the moment you open the box. Variety-specific instructions, simple setup, and practical support help first-time growers avoid guesswork and help repeat growers judge progress with more confidence. Each variety comes with a growth method that suits its natural fruiting habit, whether that means open-air misting, a humidity bag, or a cased topsoil layer.
What should you expect after opening a mushroom growing kit?
Mushroom kit growth usually begins quietly and then speeds up fast once pins appear. Mycelium activity is often visible from the start, but fruiting bodies do not always show on day 1. Early stages can look slow, especially in cooler rooms, yet a healthy kit often changes quickly once the first pinheads break through the surface.
Temperature plays a major part in the timeline. Humidity matters just as much because dry air can slow fruiting, harden the surface, or stop young mushrooms from forming properly. The best results usually come from a bright room with indirect light, steady moisture, and fresh air rather than from a sealed cupboard, a sunny windowsill, or a room next to a radiator.
How to use this guide
Find your kit variety below and compare what you see on your kit to the milestone images at each stage. Timeline checks work best when you compare your kit with the right variety rather than with another mushroom type. Pink Oyster can race ahead in a week, while Chestnut and White need more time because the topsoil layer must colonise before pins form. A slower kit is not always a faulty kit.
Visual checks help most at each stage. Surface moisture, pin formation, stem shape, cap shape, colour, and cluster size all tell you whether the kit is on track. A difference of a day or two is usually fine, but a long stall with no visible change often points to dry air, poor airflow, or the wrong temperature.
What does a Pink Oyster mushroom kit look like from day 1 to harvest?
Pink Oyster is one of the quickest kits in the range. Fast pinning, fast cluster growth, and a quick first flush make this variety a strong choice for beginners who want visible progress within days. Growth can be dramatic once pins appear, with clusters doubling in size overnight.
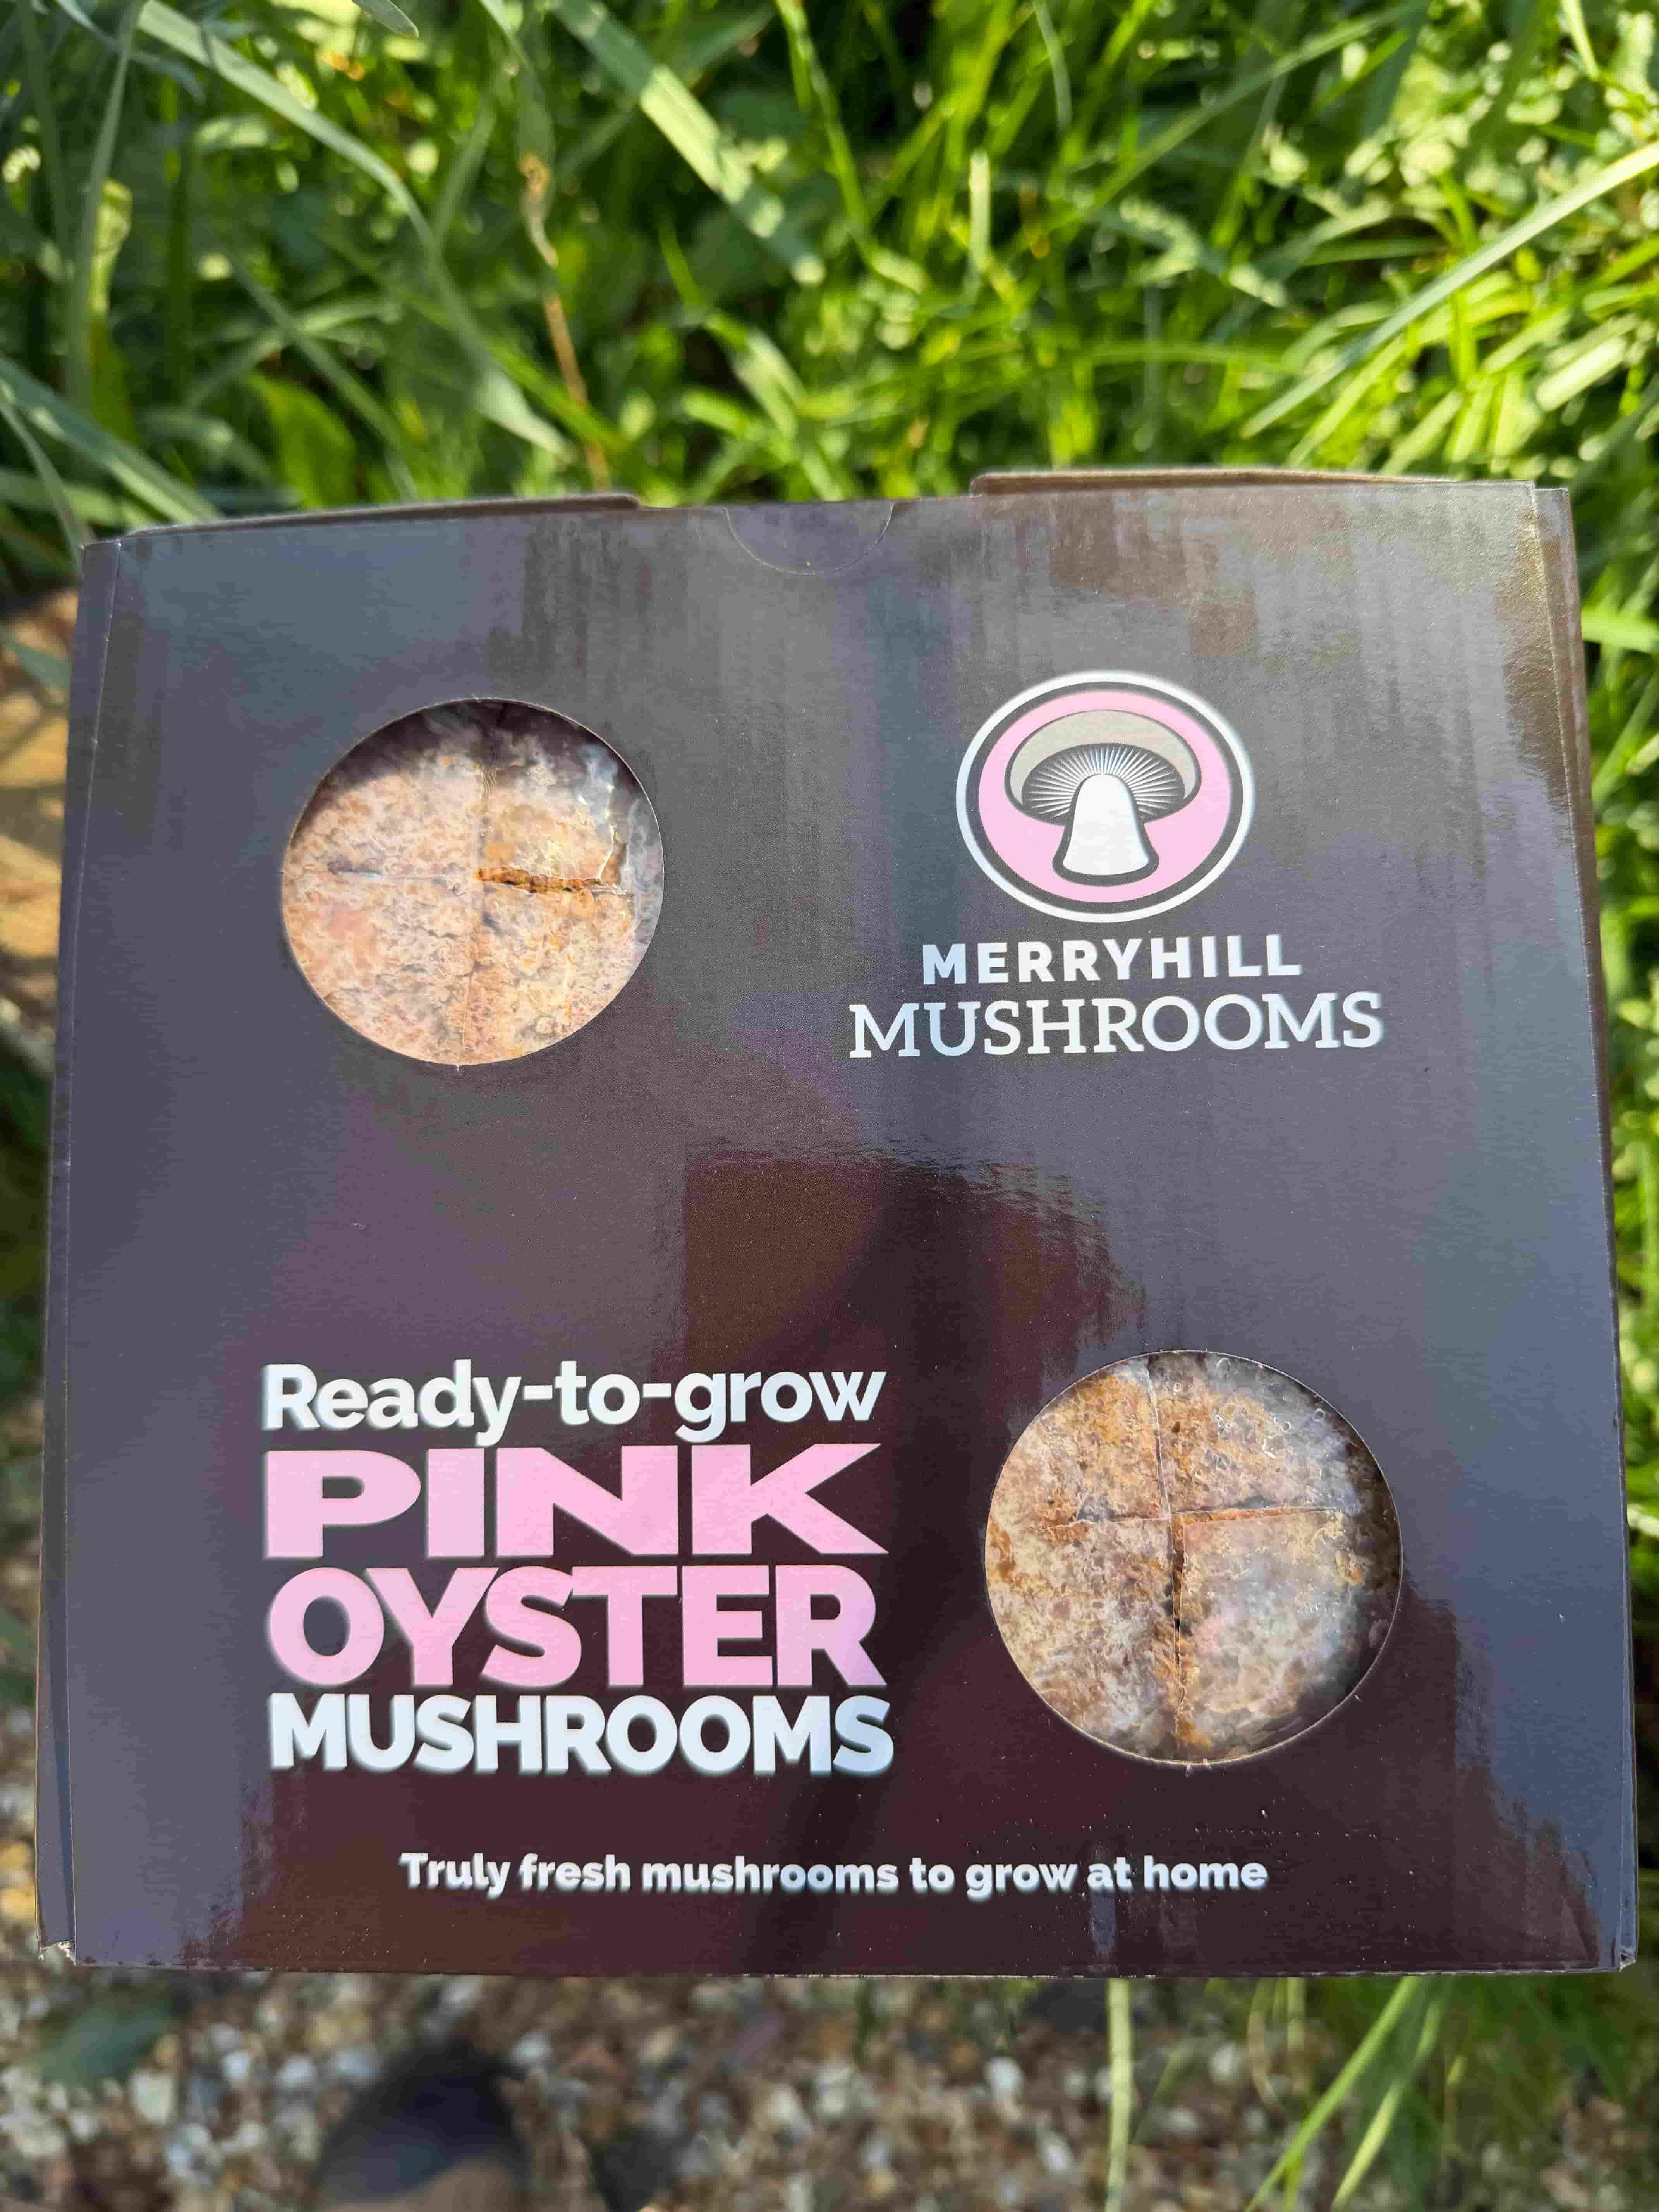
Day 1 - Setup
Fine white / pink mycelium is visible through the growing holes, which is a good sign that the block is healthy and active. Position the kit in a room with indirect daylight and good airflow, then begin misting twice a day.
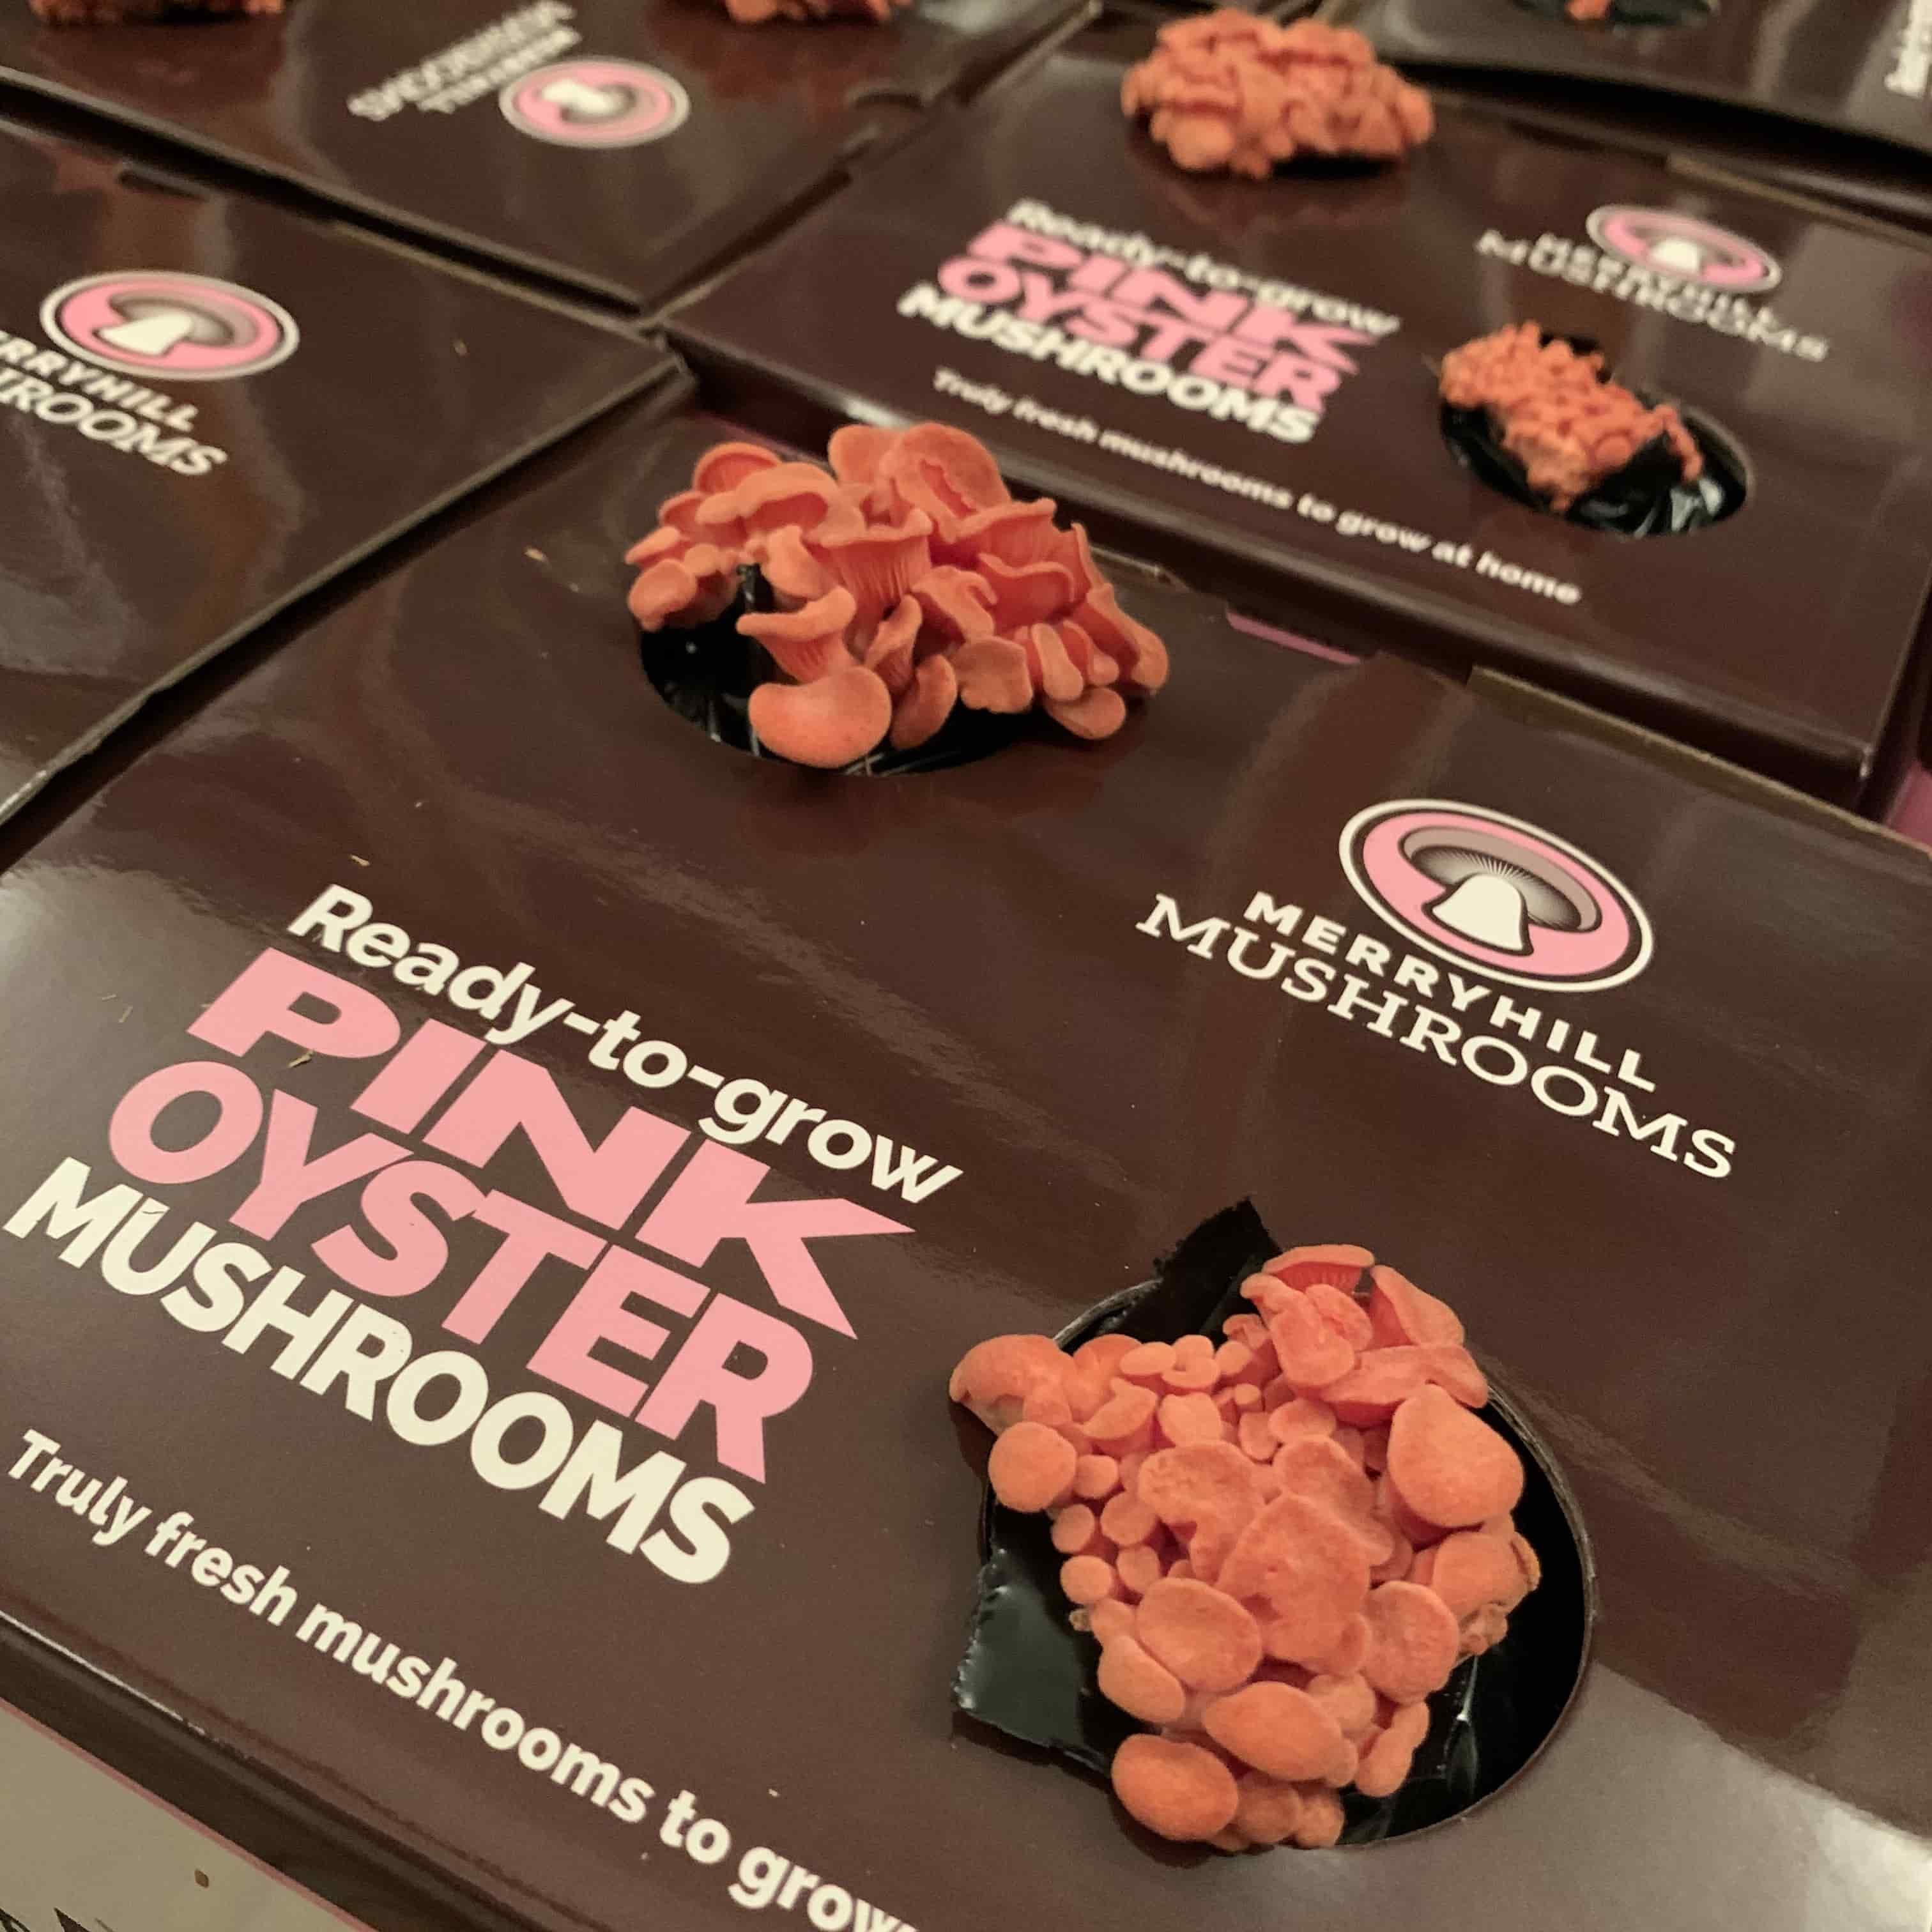
Day 4-5 - Pins appear
Pinning usually starts with small pink bumps near the openings. Early fruit bodies can look tiny at first, but the shape changes quickly once moisture and airflow are steady. Growth often accelerates overnight at this point.
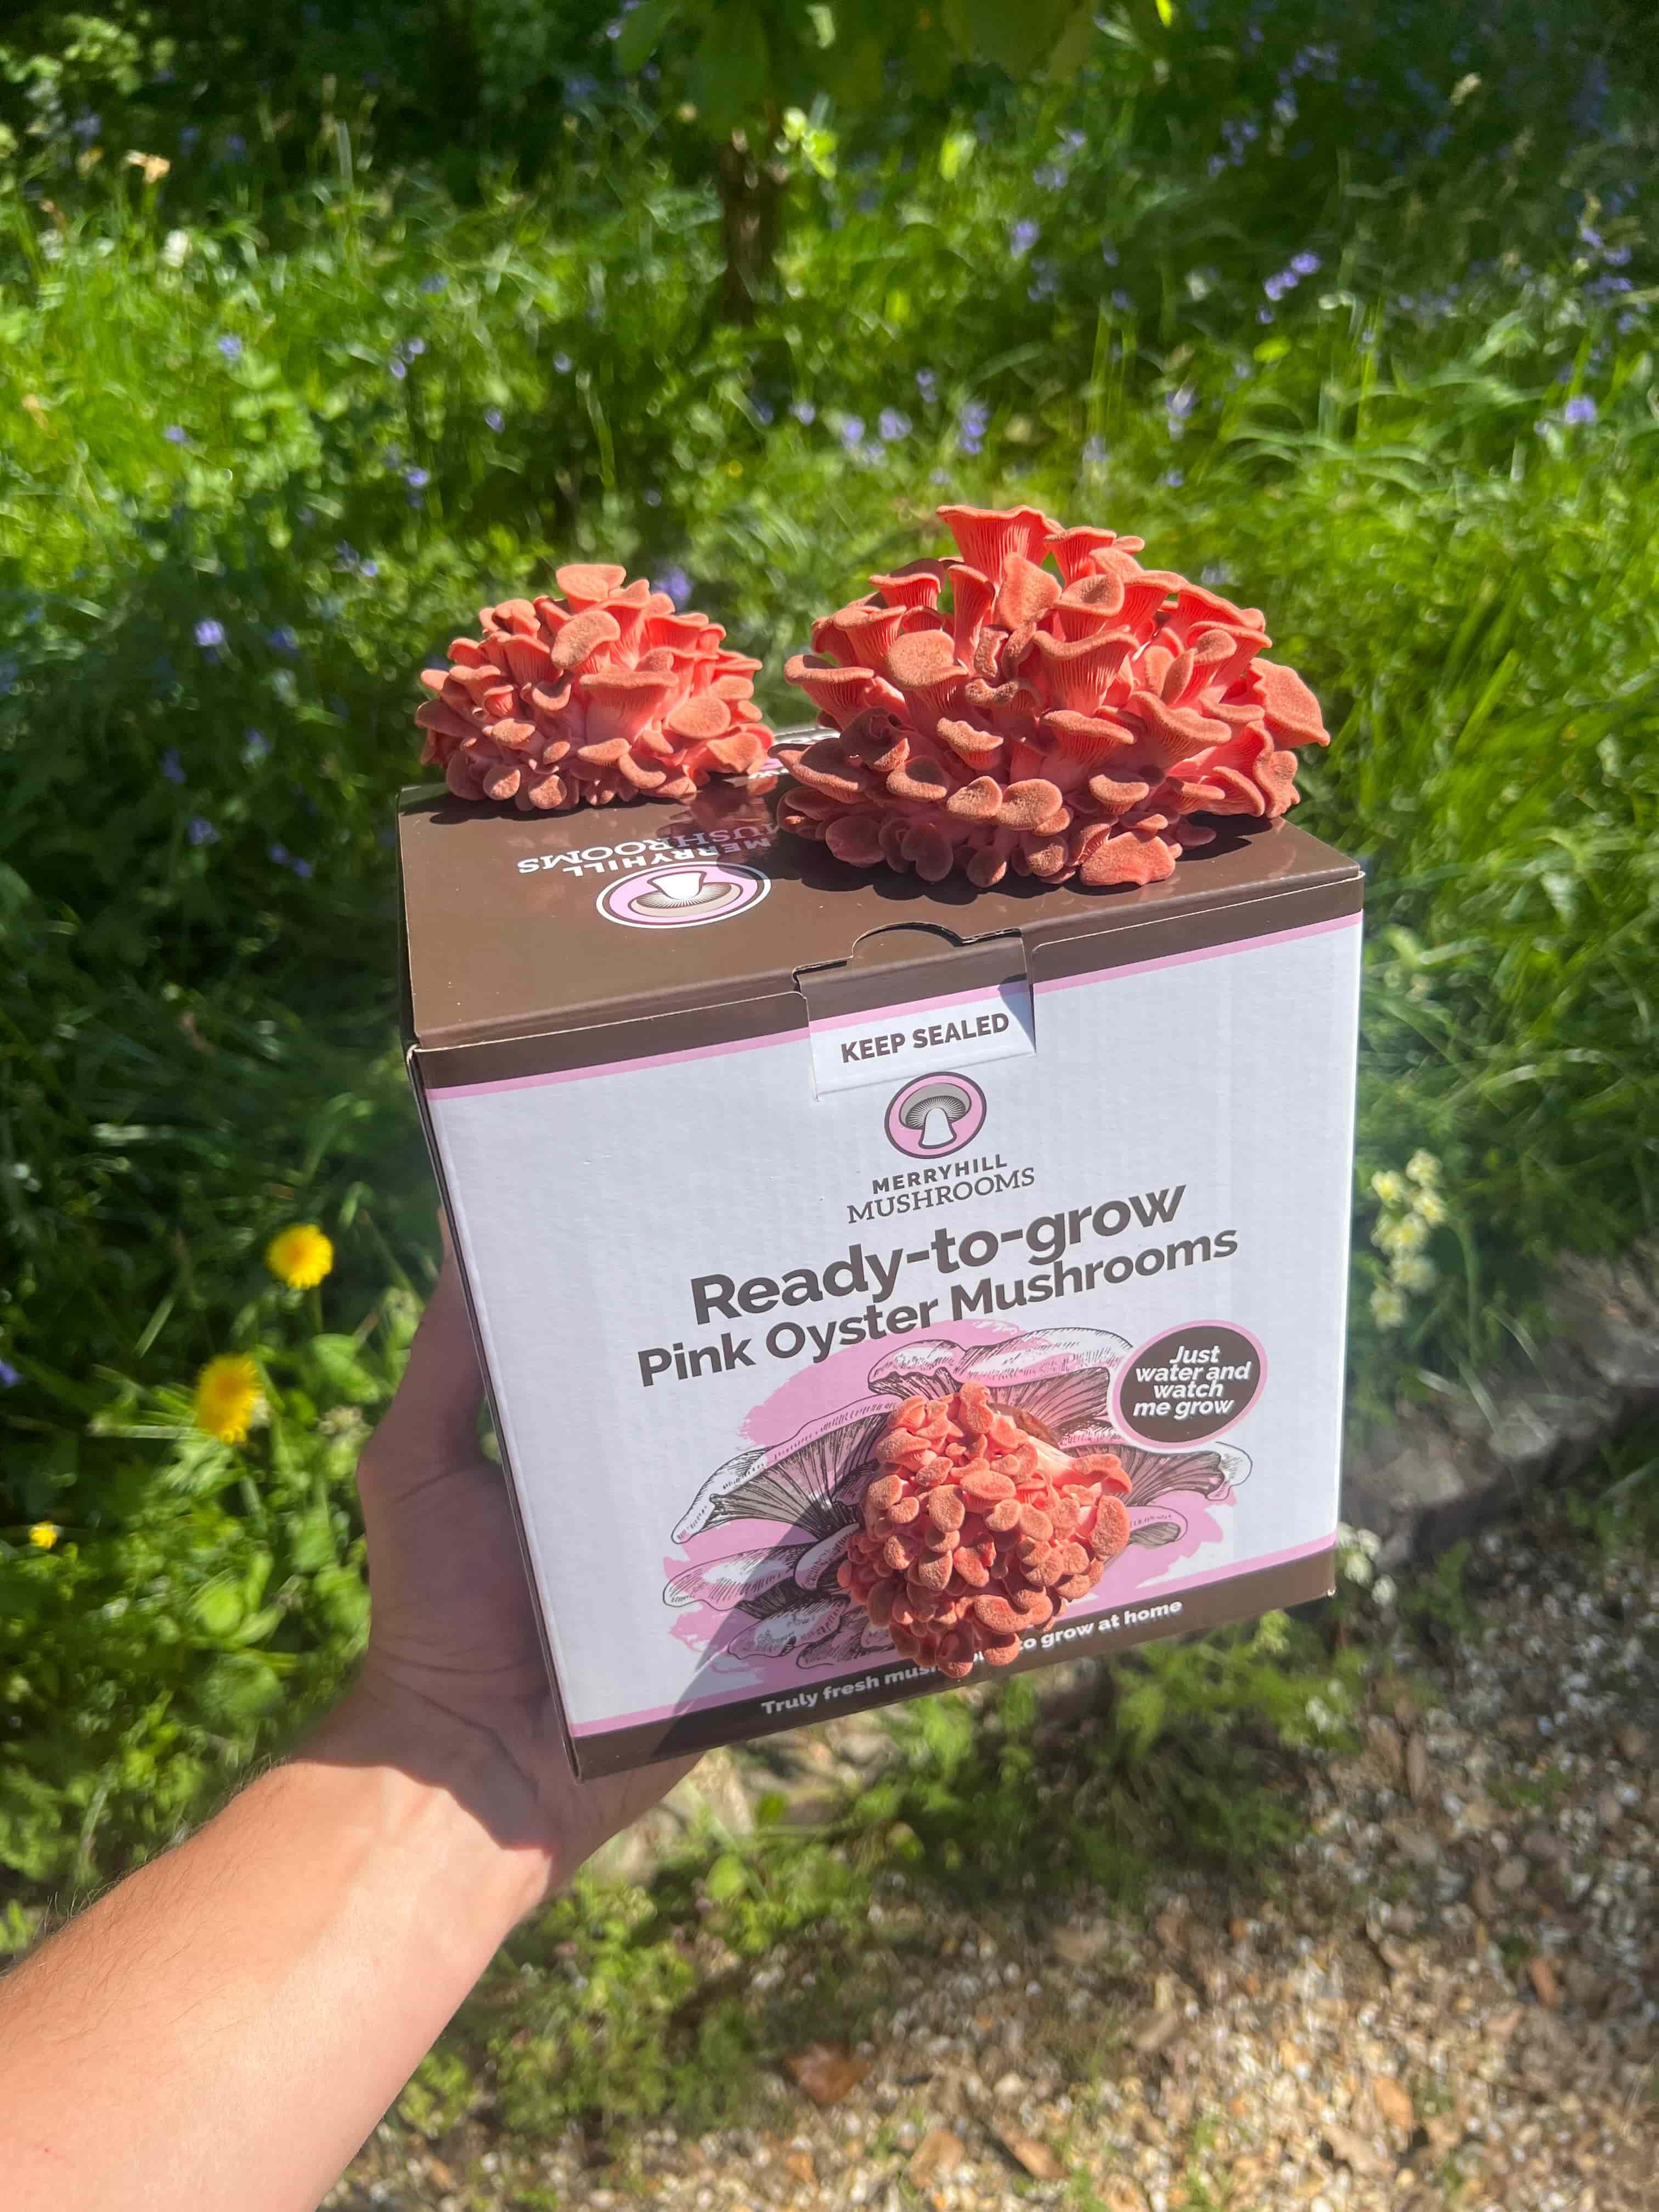
Day 6-7 - Clusters expand
Typical cluster shaped growth becomes obvious during this stage. Clusters push outward fast and start showing the familiar oyster shape. Continue misting and allow time for the mushrooms to develop further.
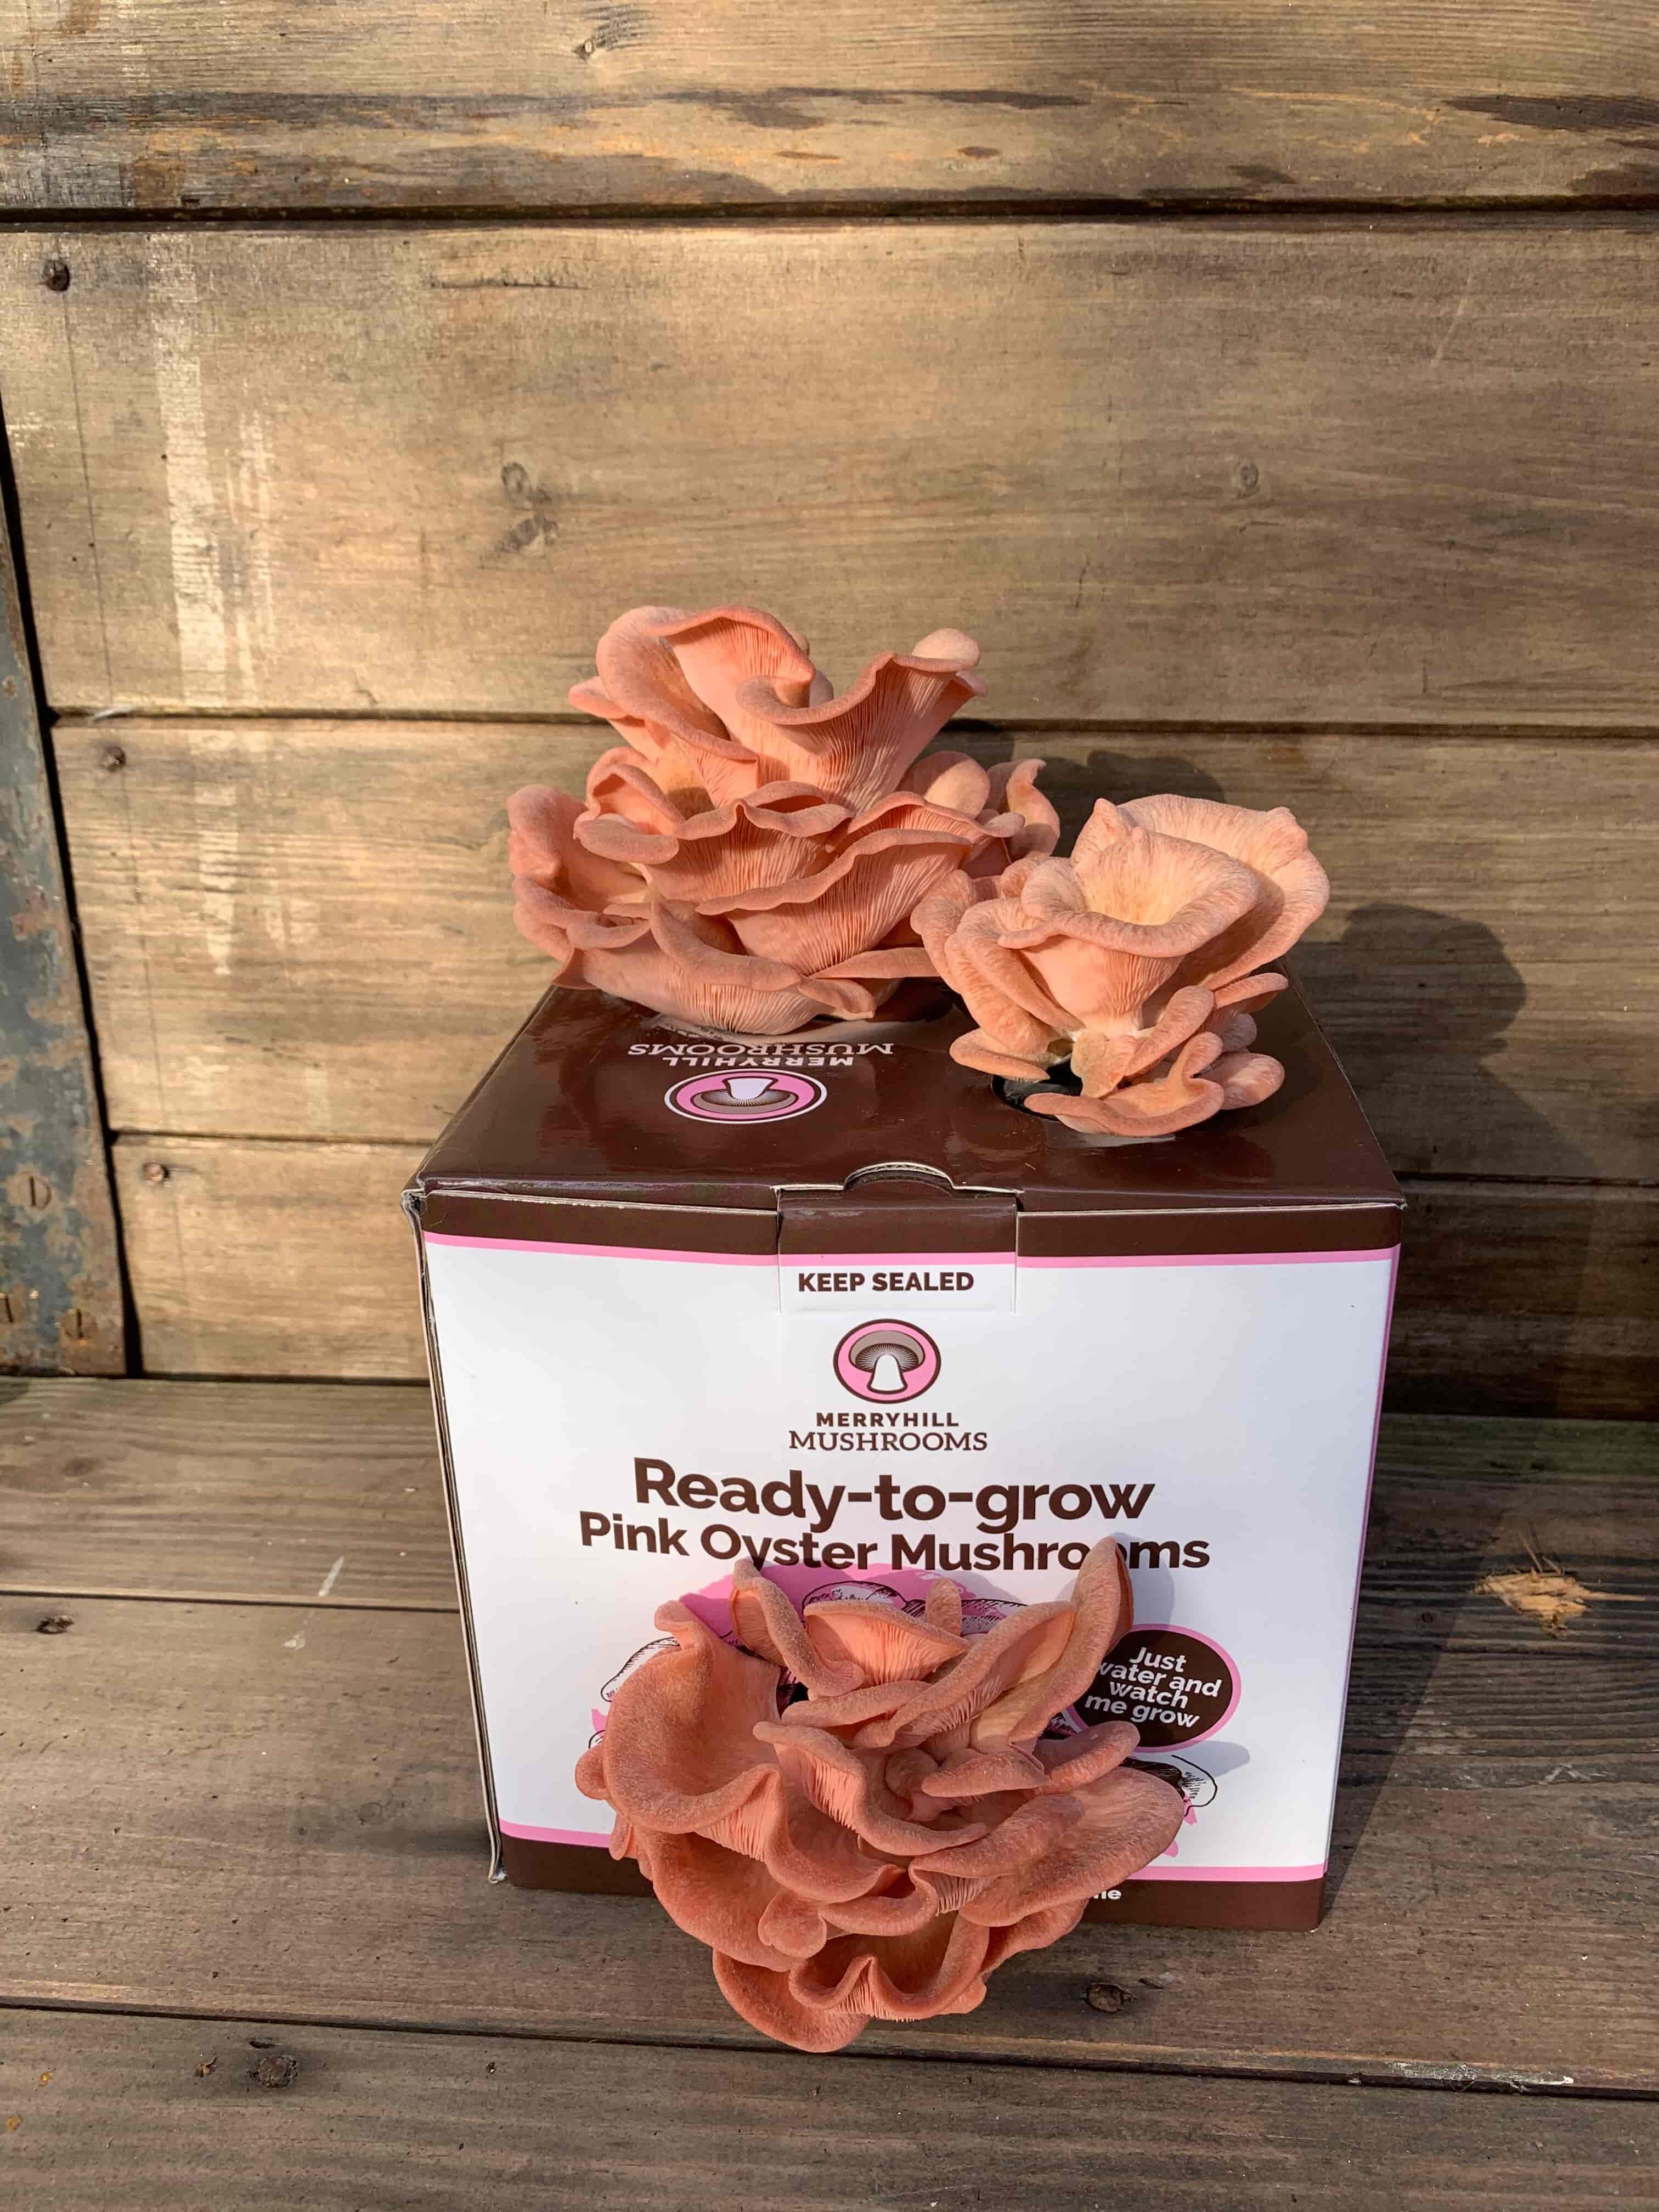
Day 7-8 - Harvest size gets close
Size increase becomes very noticeable here. Caps begin to form more clearly and the cluster starts to fill out. Good humidity helps the edges stay healthy while the mushrooms put on size.
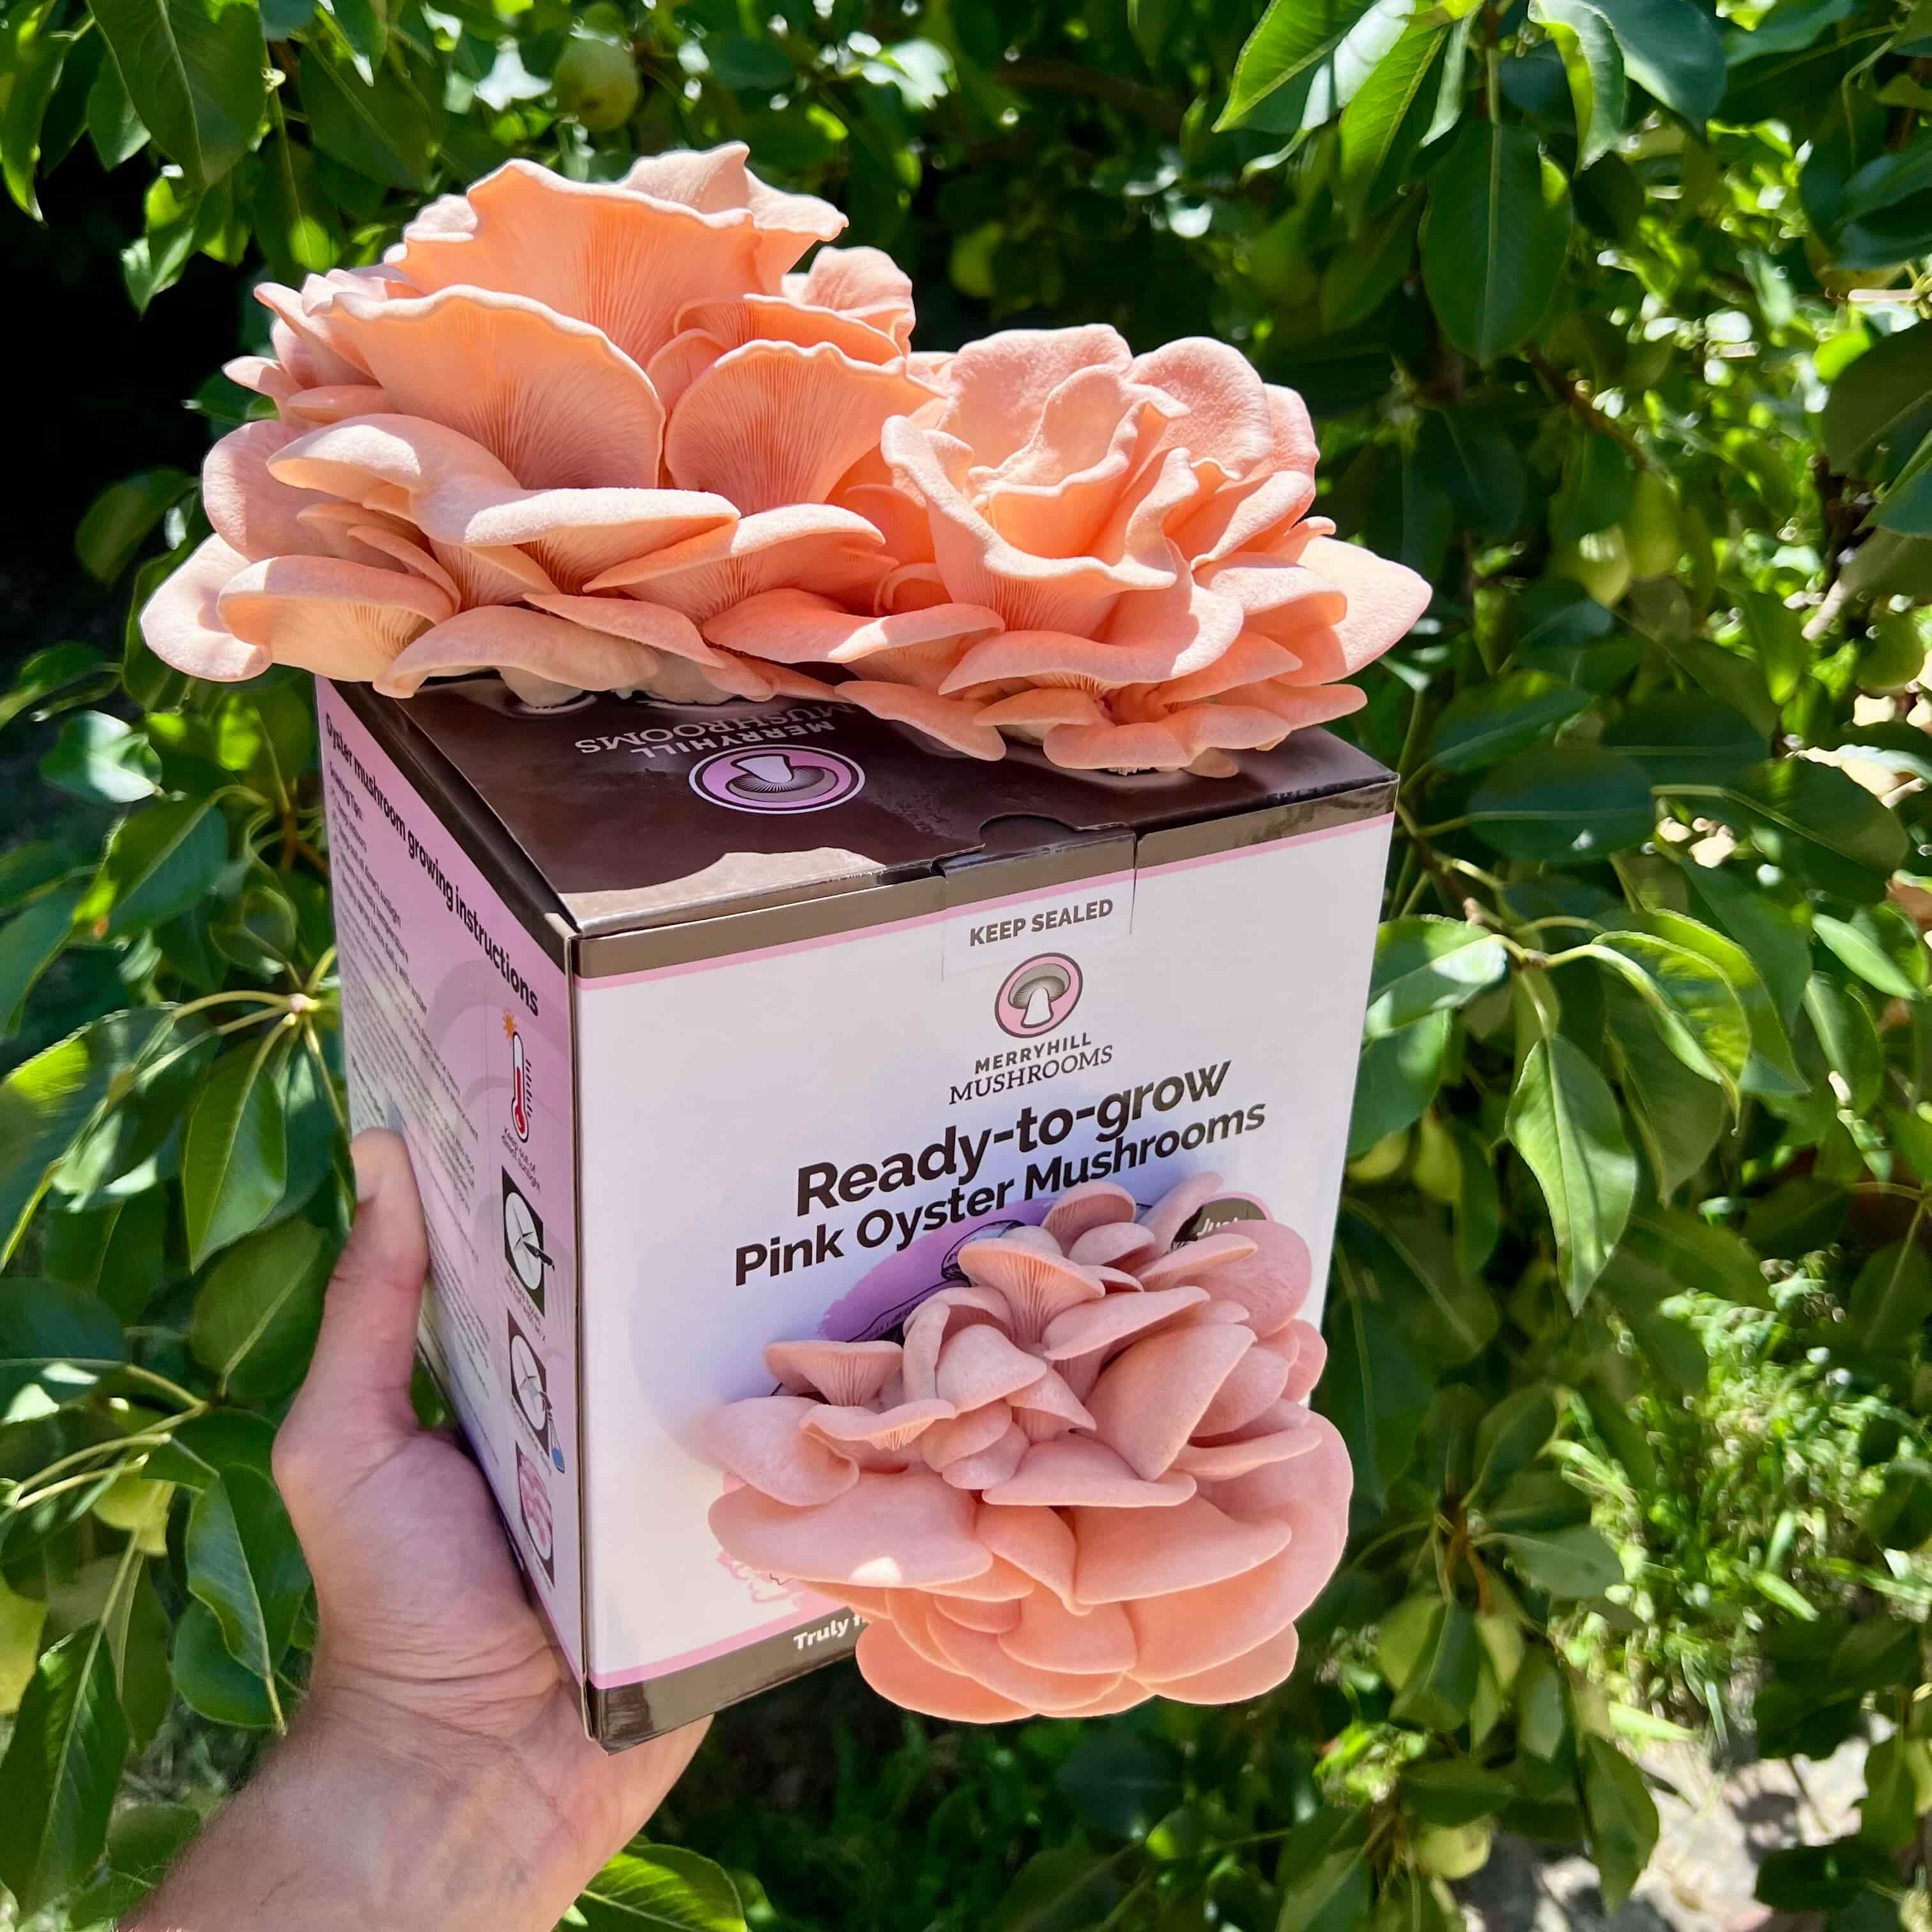
Day 8-10 - Harvest time
Harvest when the caps are formed but the edges have not flattened. Twist and pull at the base to remove the whole cluster. Pink Oyster is best picked before the caps spread too wide because texture and shelf life are better at that stage.
What does a Summer Oyster mushroom kit look like from day 1 to harvest?
Summer Oyster (Pleurotus pulmonarius) is a British native oyster mushroom that thrives in warmer conditions, making it an excellent choice for centrally heated homes or growing through the summer months. It follows a similar pace to Pink Oyster, with most kits reaching a first harvest within 7 to 10 days. The caps are pale cream to soft beige with a mild, sweet, delicately savoury flavour that works well in pasta, stir-fries, risotto, and simple garlic butter dishes.
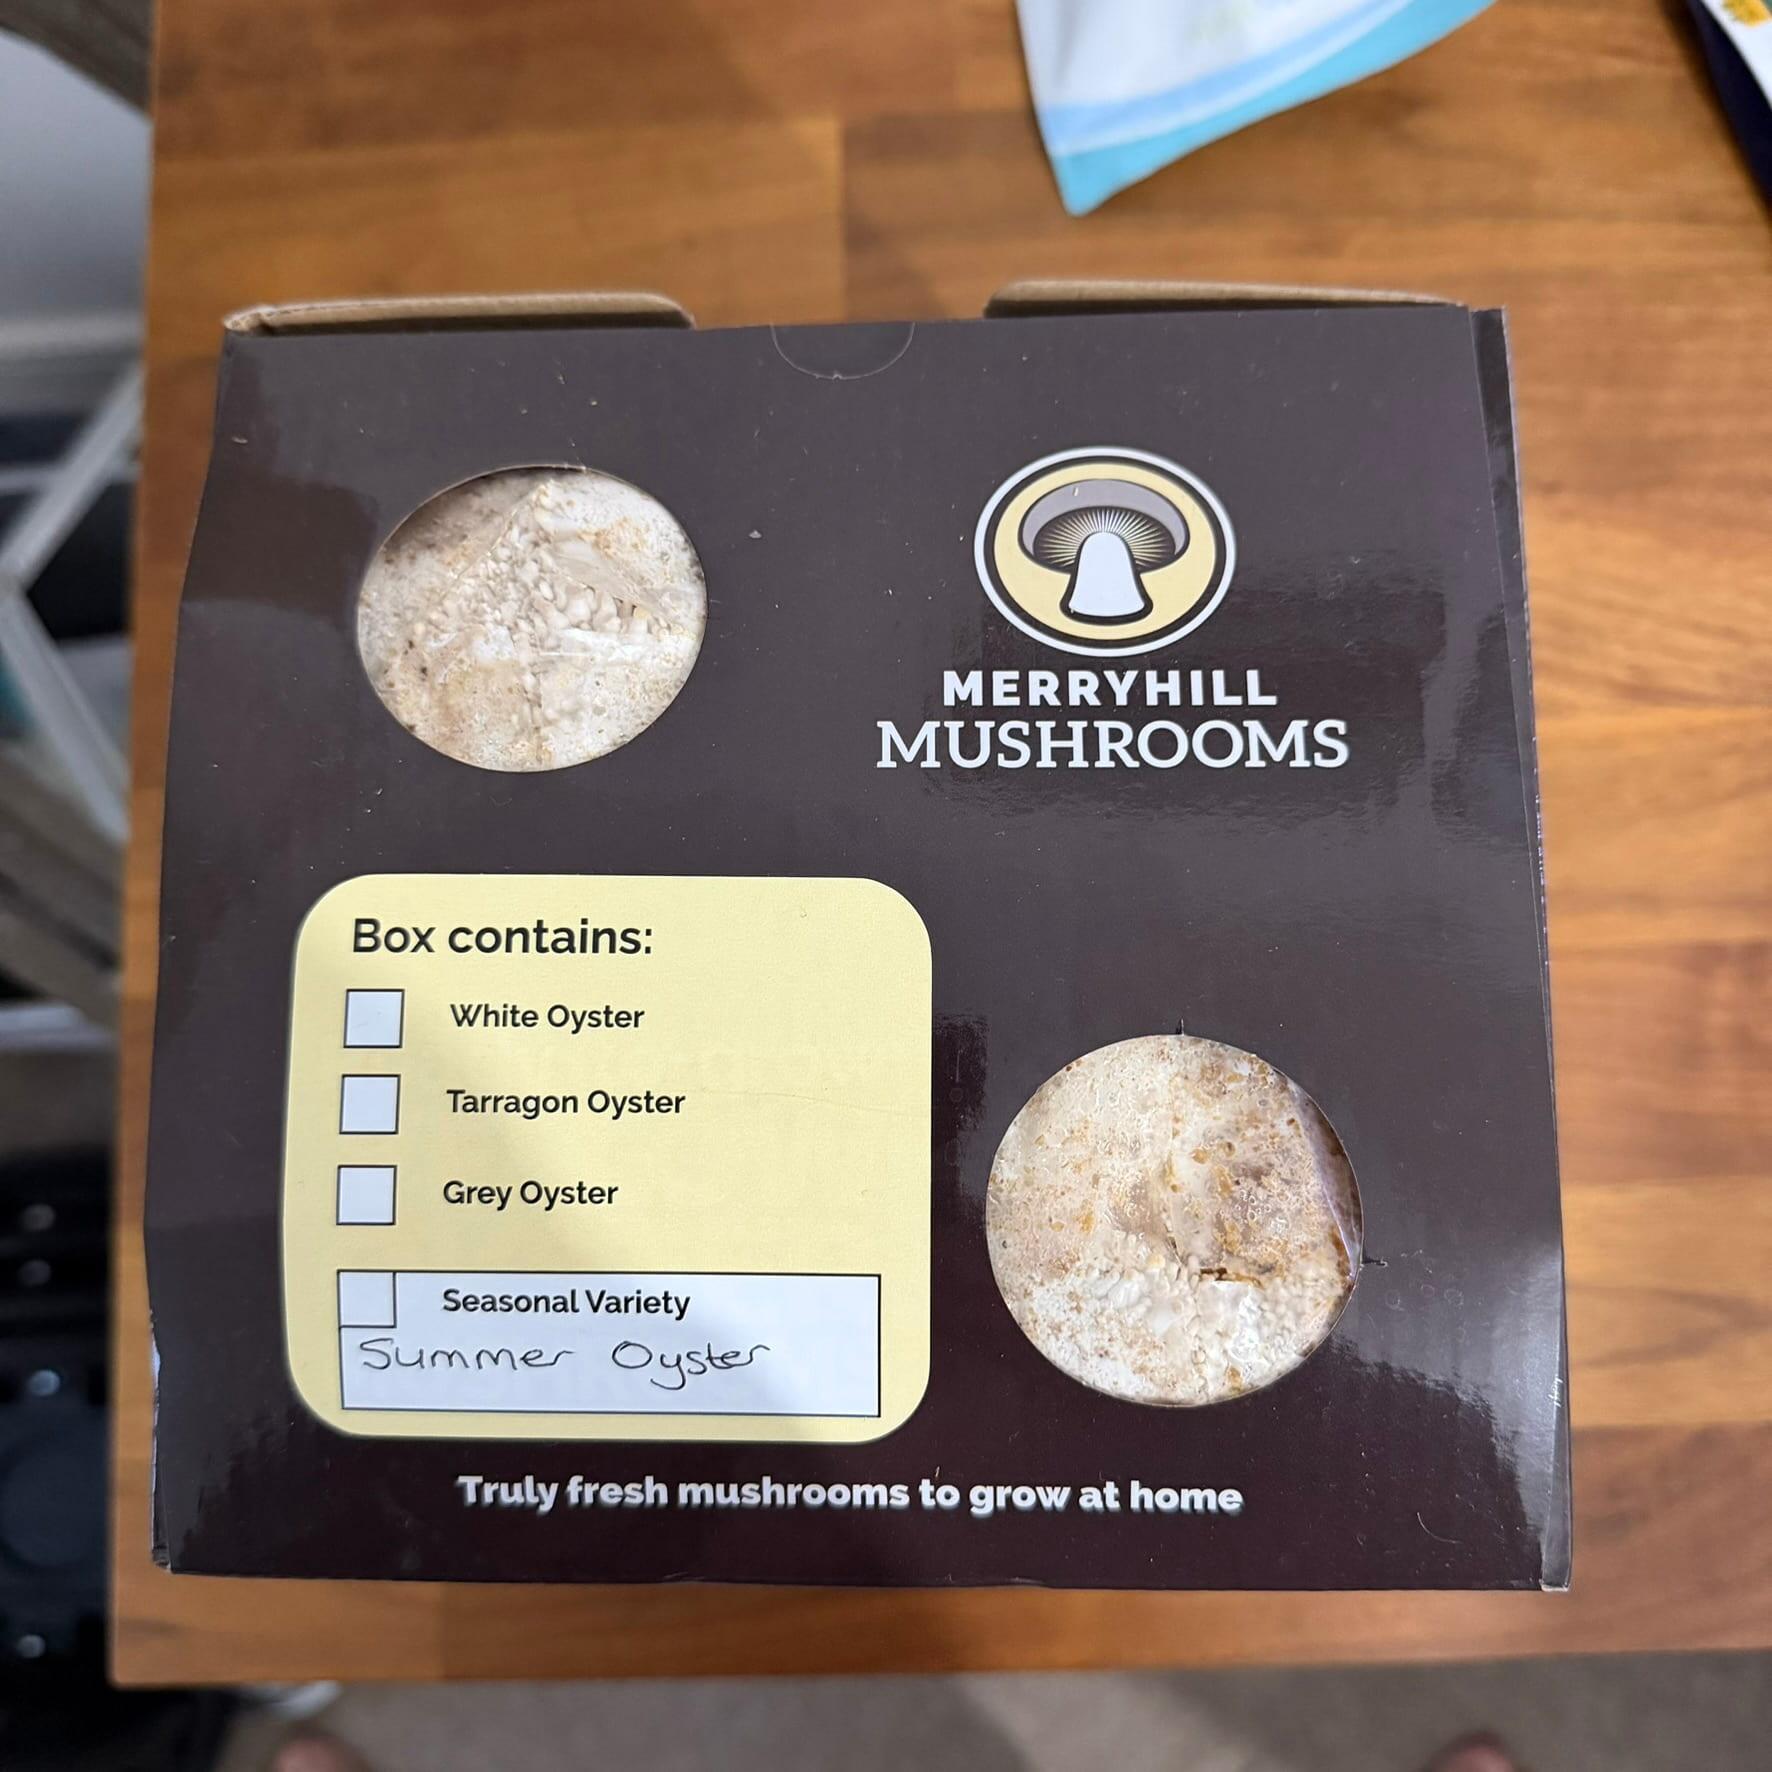
Day 1 - Setup
Setup starts as soon as the box is opened. Healthy white mycelium should be visible through the growing holes. Place the kit in a warm room with indirect daylight and good airflow, ideally between 14 and 22 degrees Celsius, and begin misting twice a day.
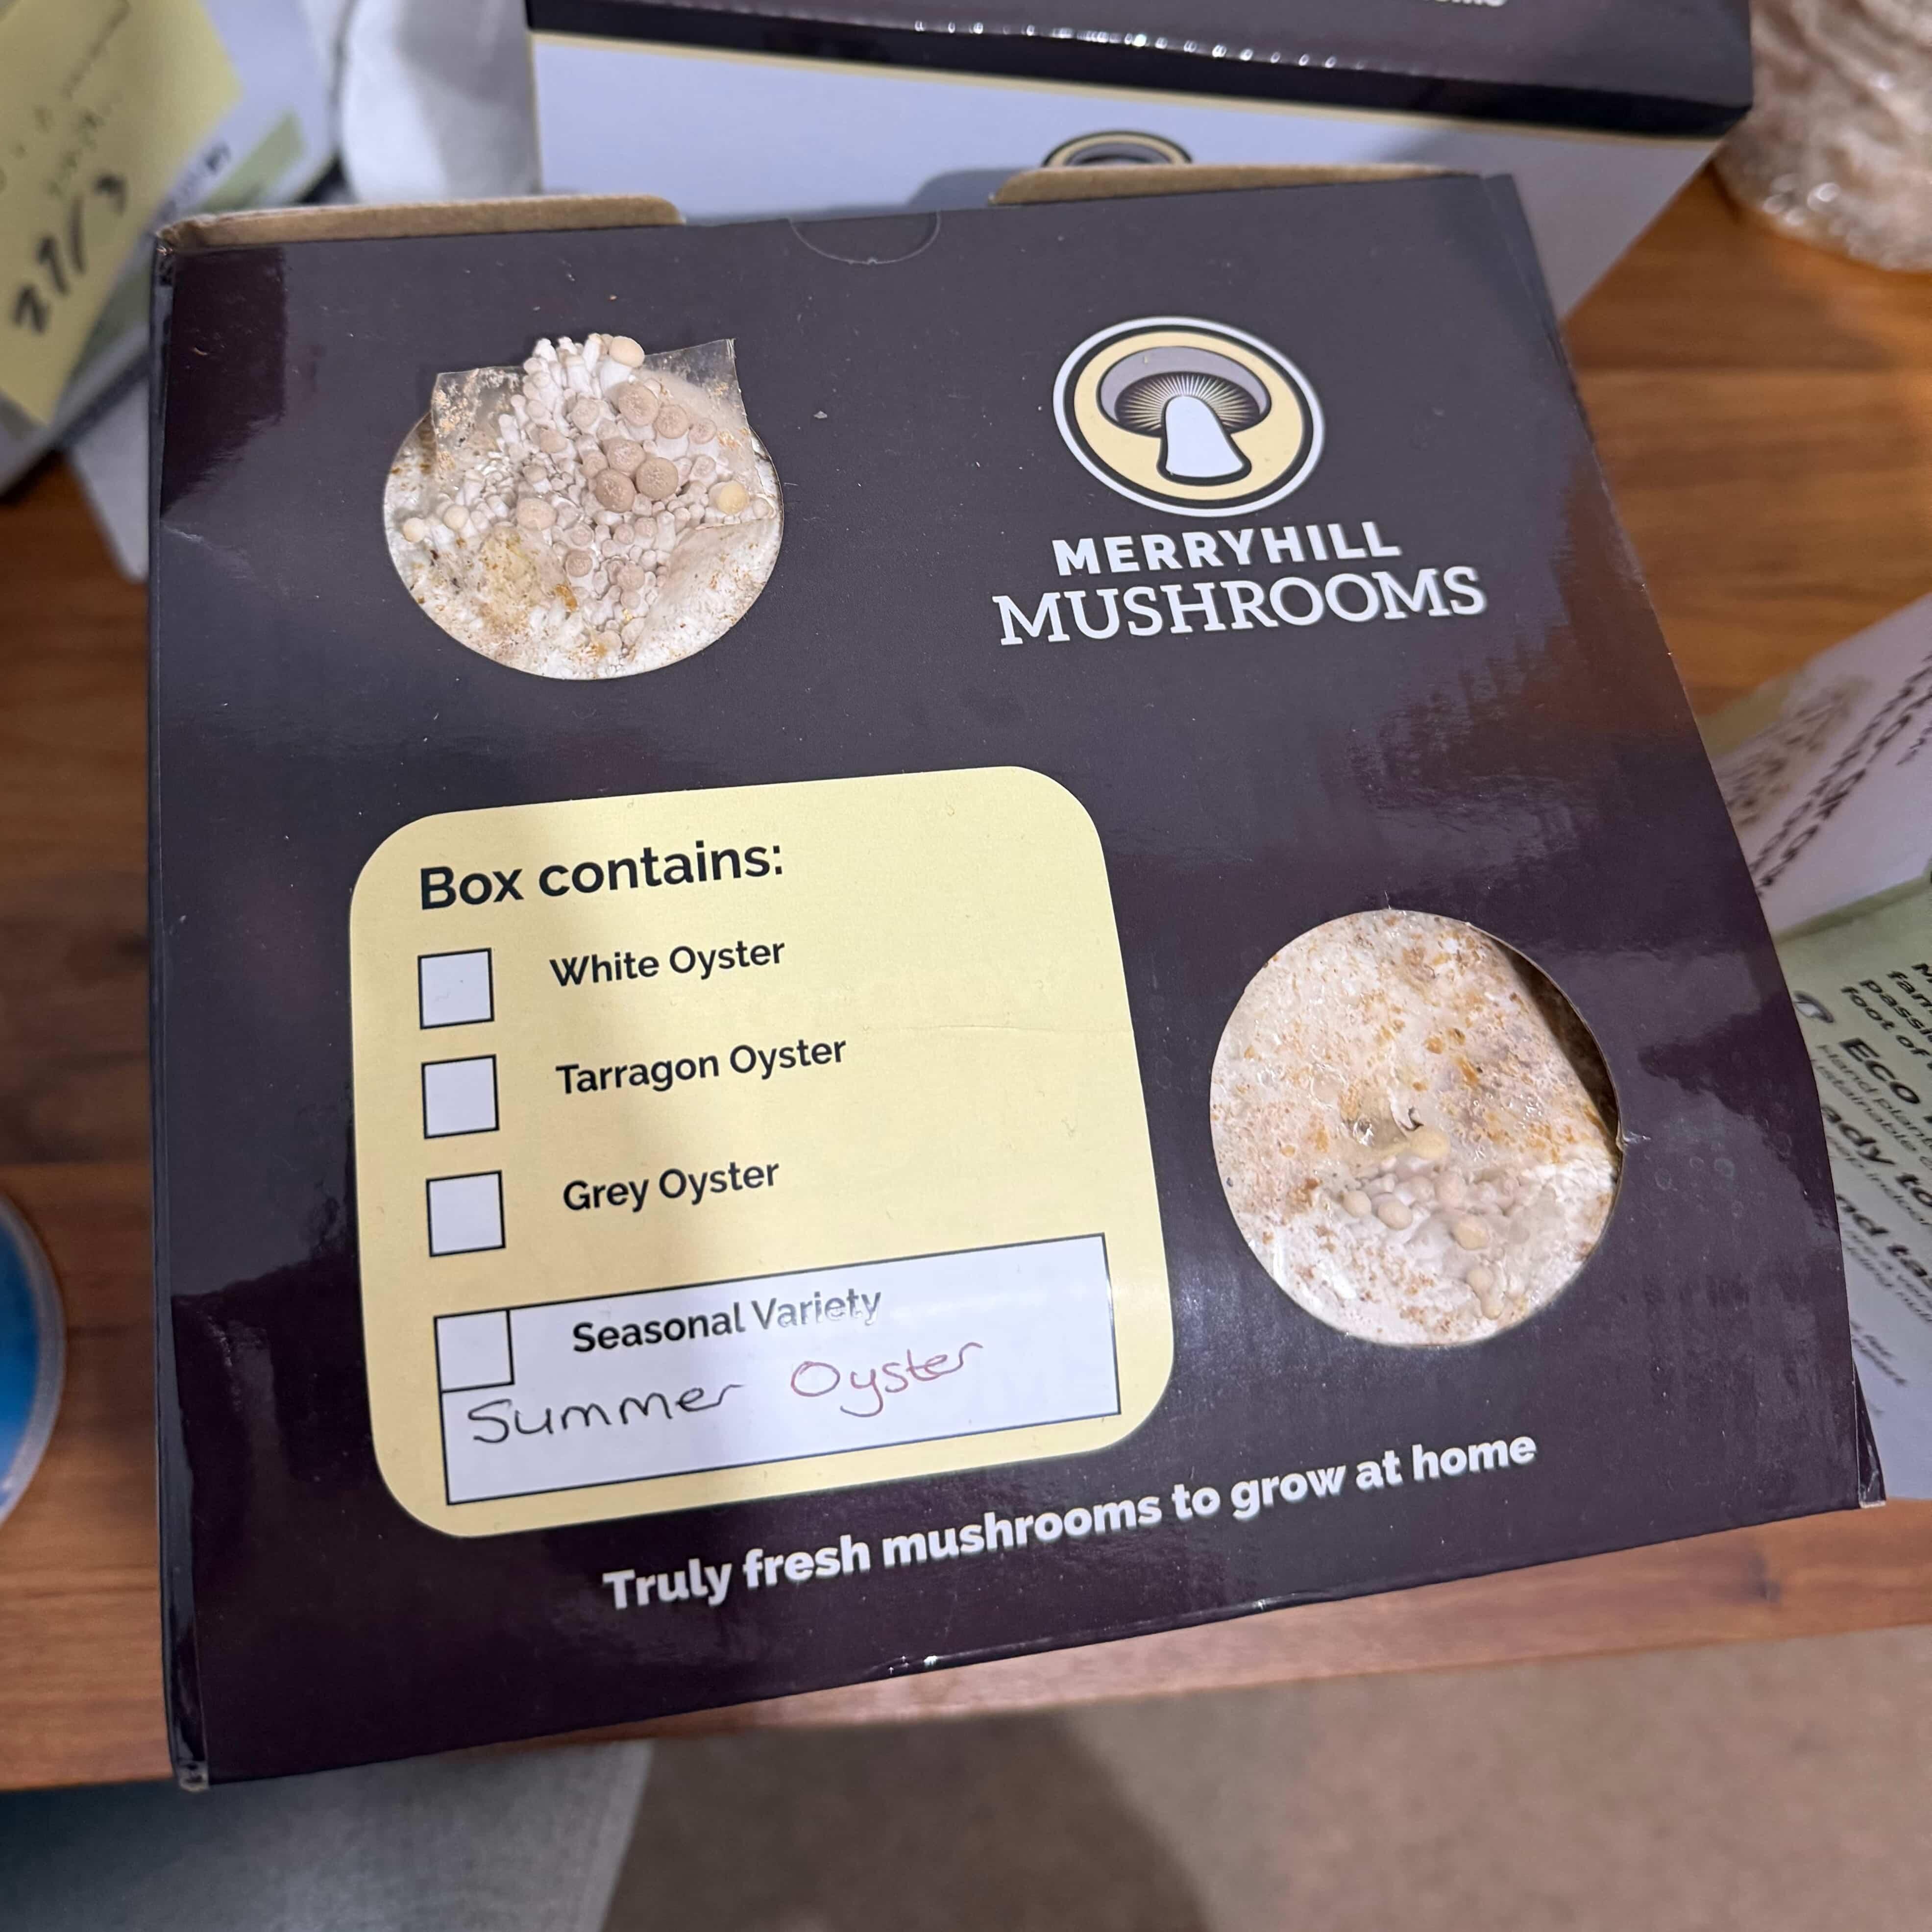
Day 3-5 - Pins appear
Pinning usually starts with small pale bumps near the openings. Summer Oyster pins can appear slightly faster than other oyster varieties in warmer rooms, especially between 19 and 21 degrees Celsius. Growth often picks up overnight once moisture and airflow are steady.
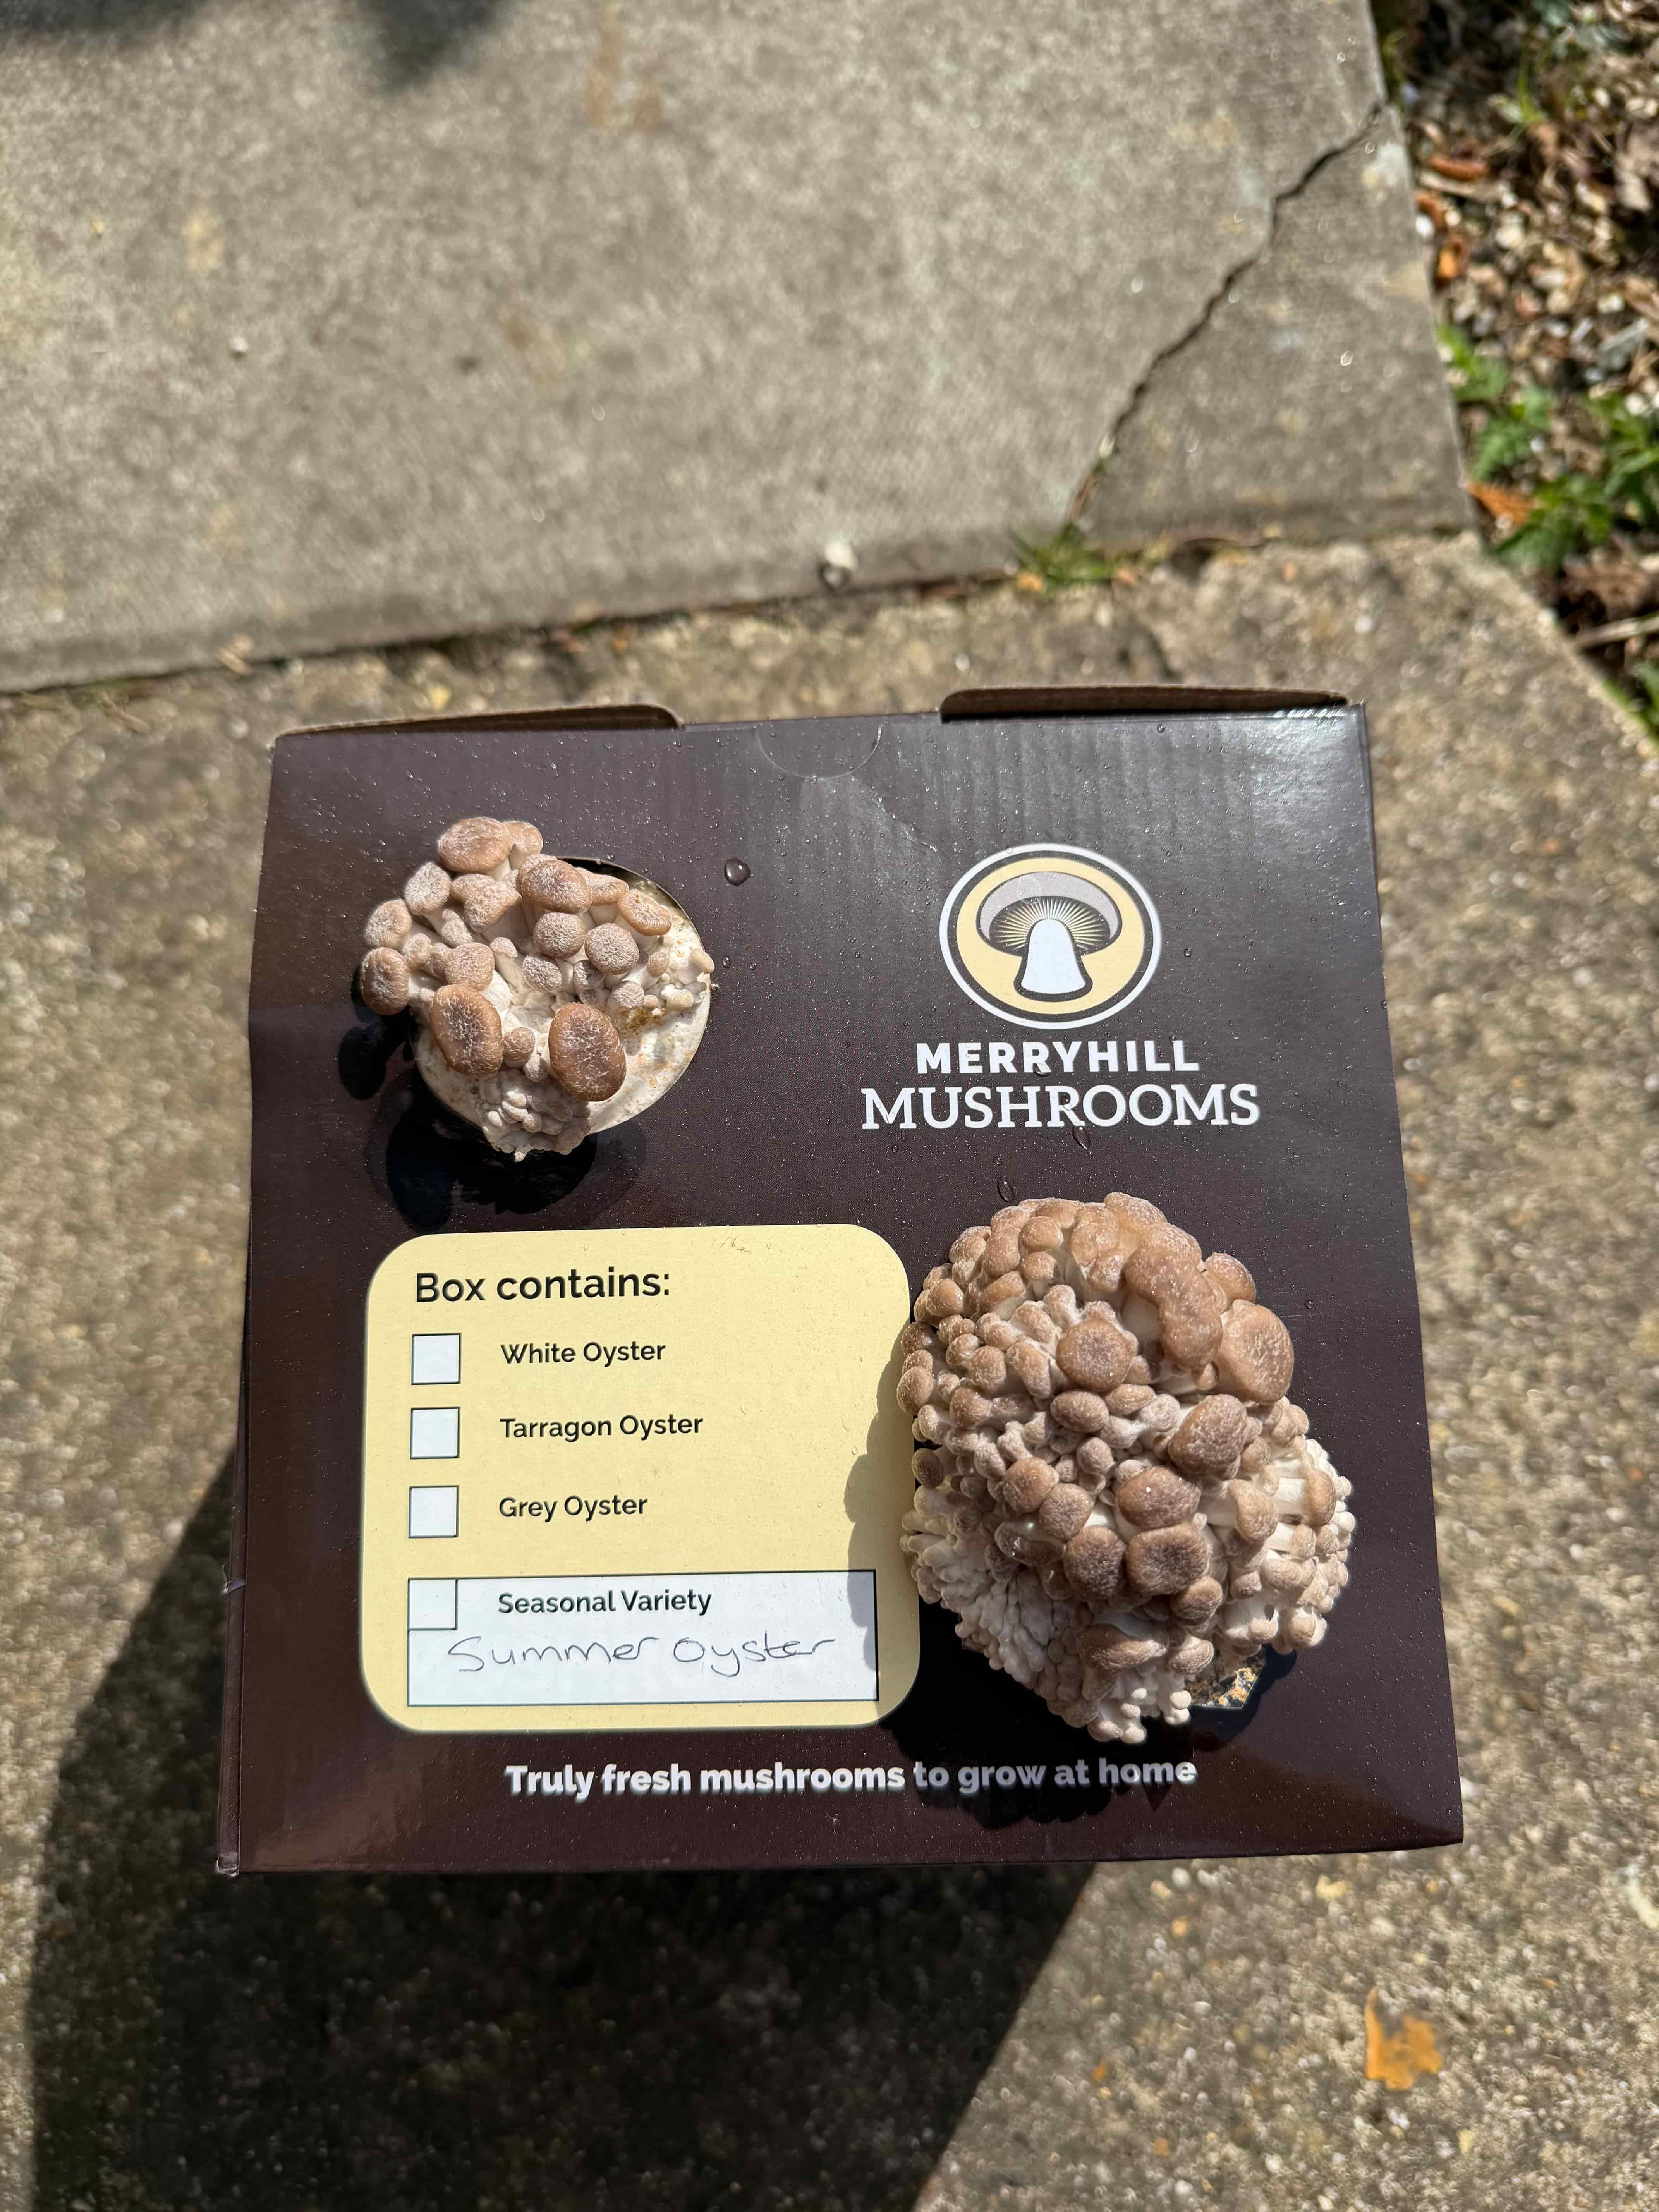
Day 5-6 - Clusters expand
Cluster growth becomes clear as mushroom groups push outward and start forming the familiar oyster shape. Caps tend to be more mottled and textured compared to White Oyster.
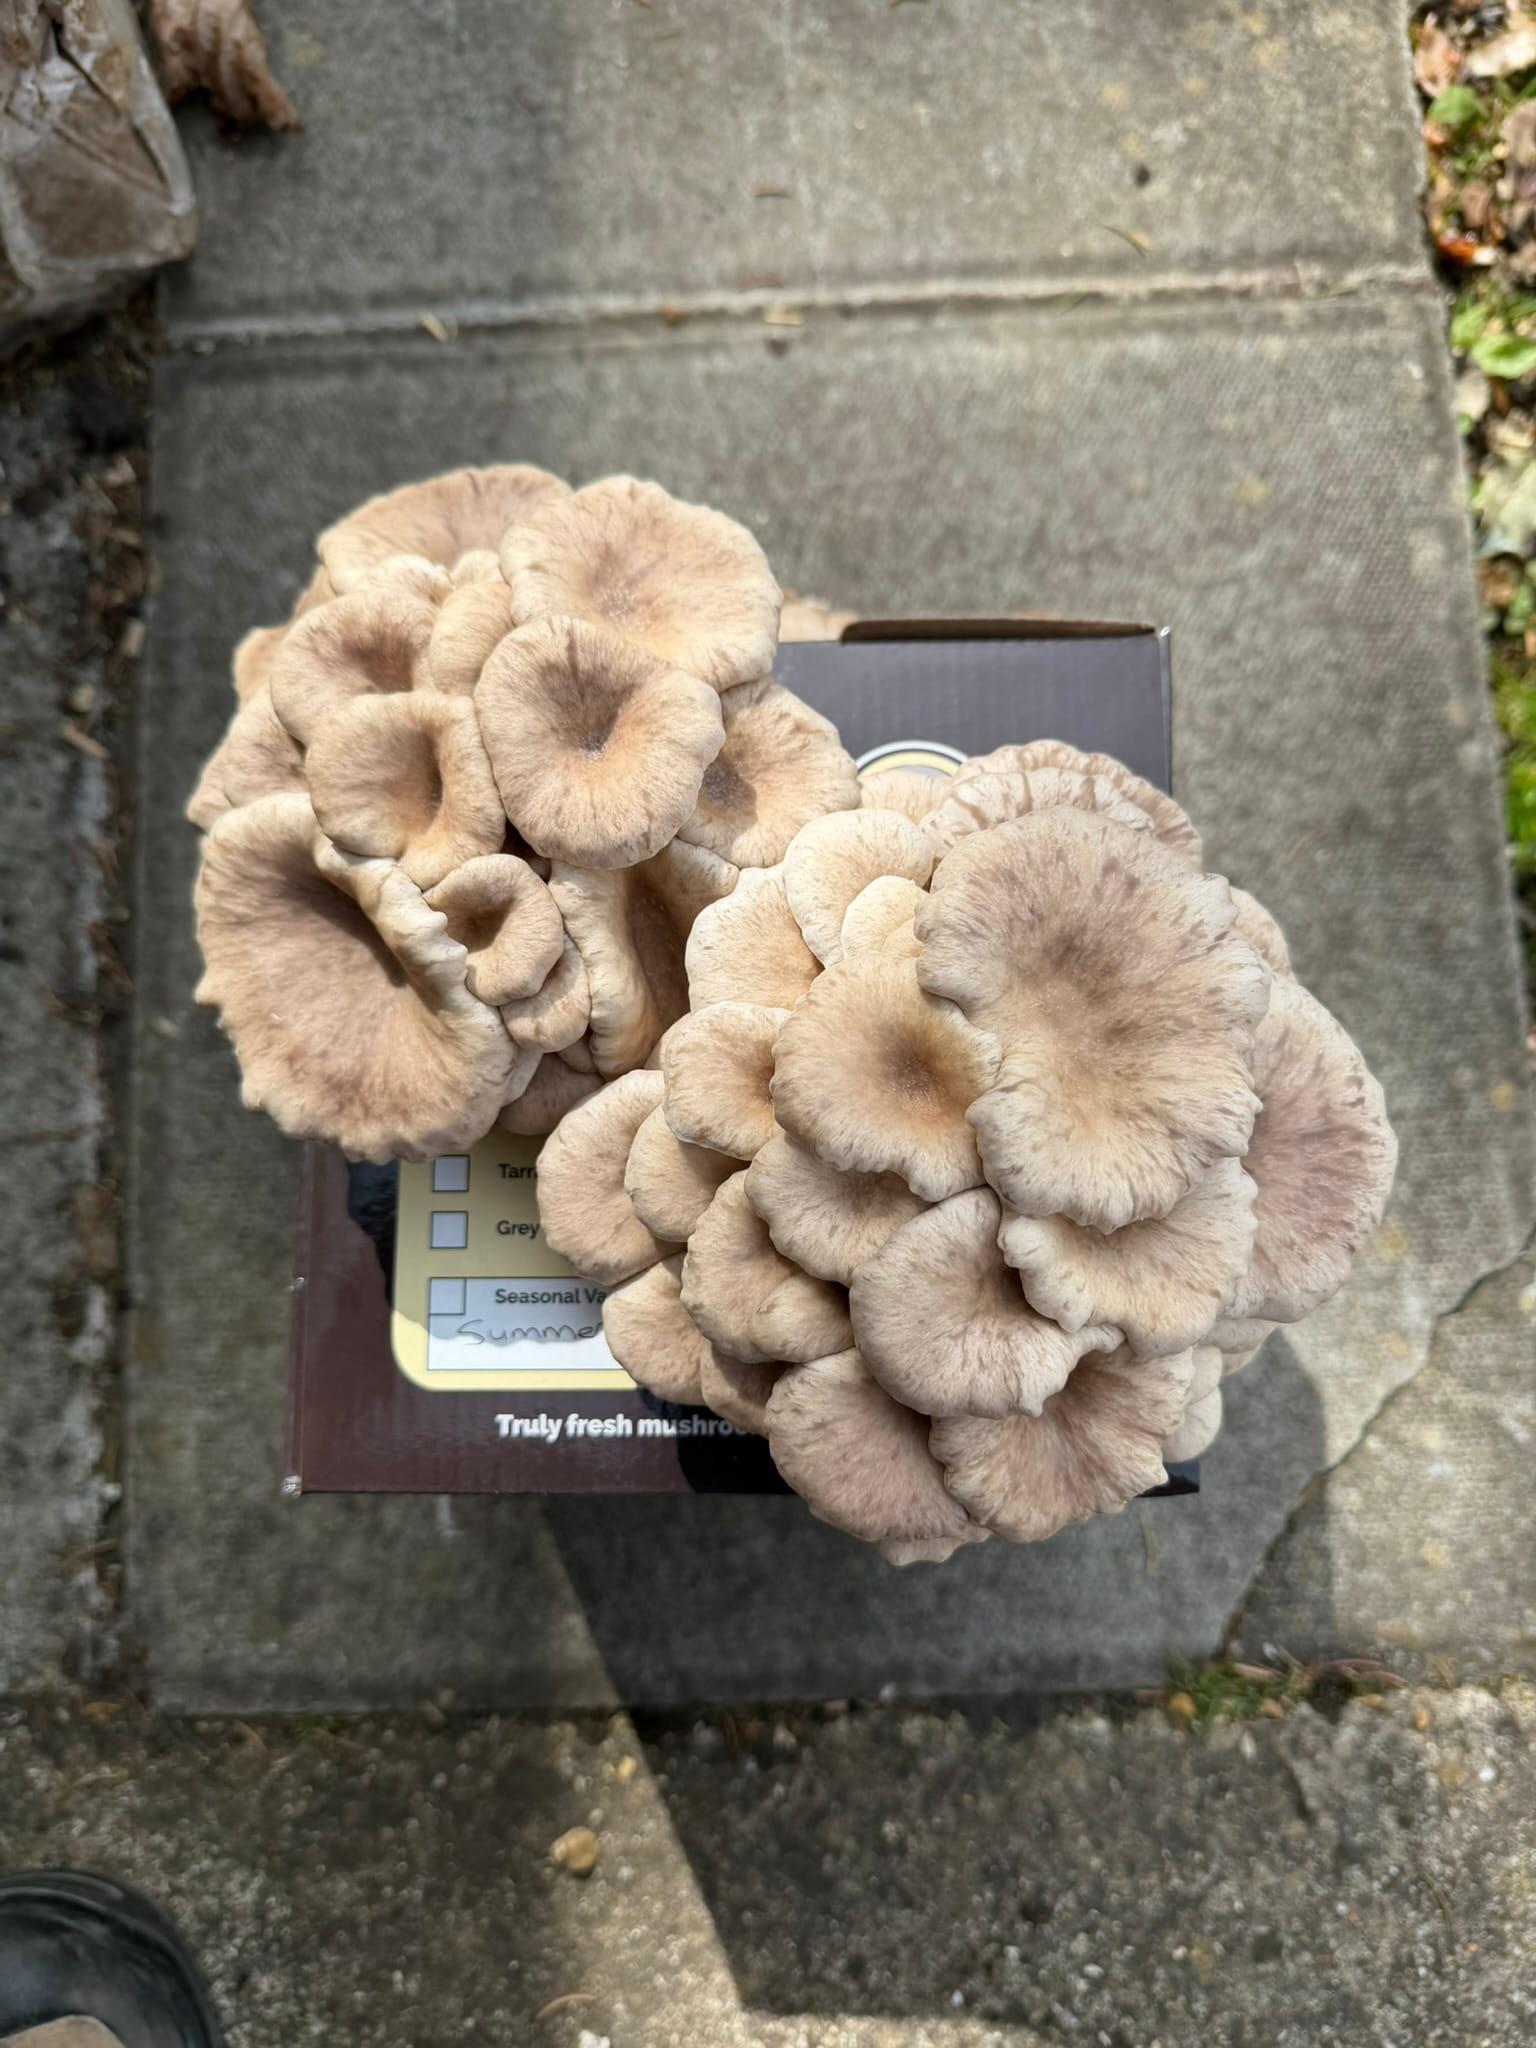
Day 6-7 - Harvest size gets close
Size increase becomes noticeable as the caps fill out and the cluster takes shape. Good humidity helps the edges stay healthy. Some crinkled texture begins to form, which is completely normal.
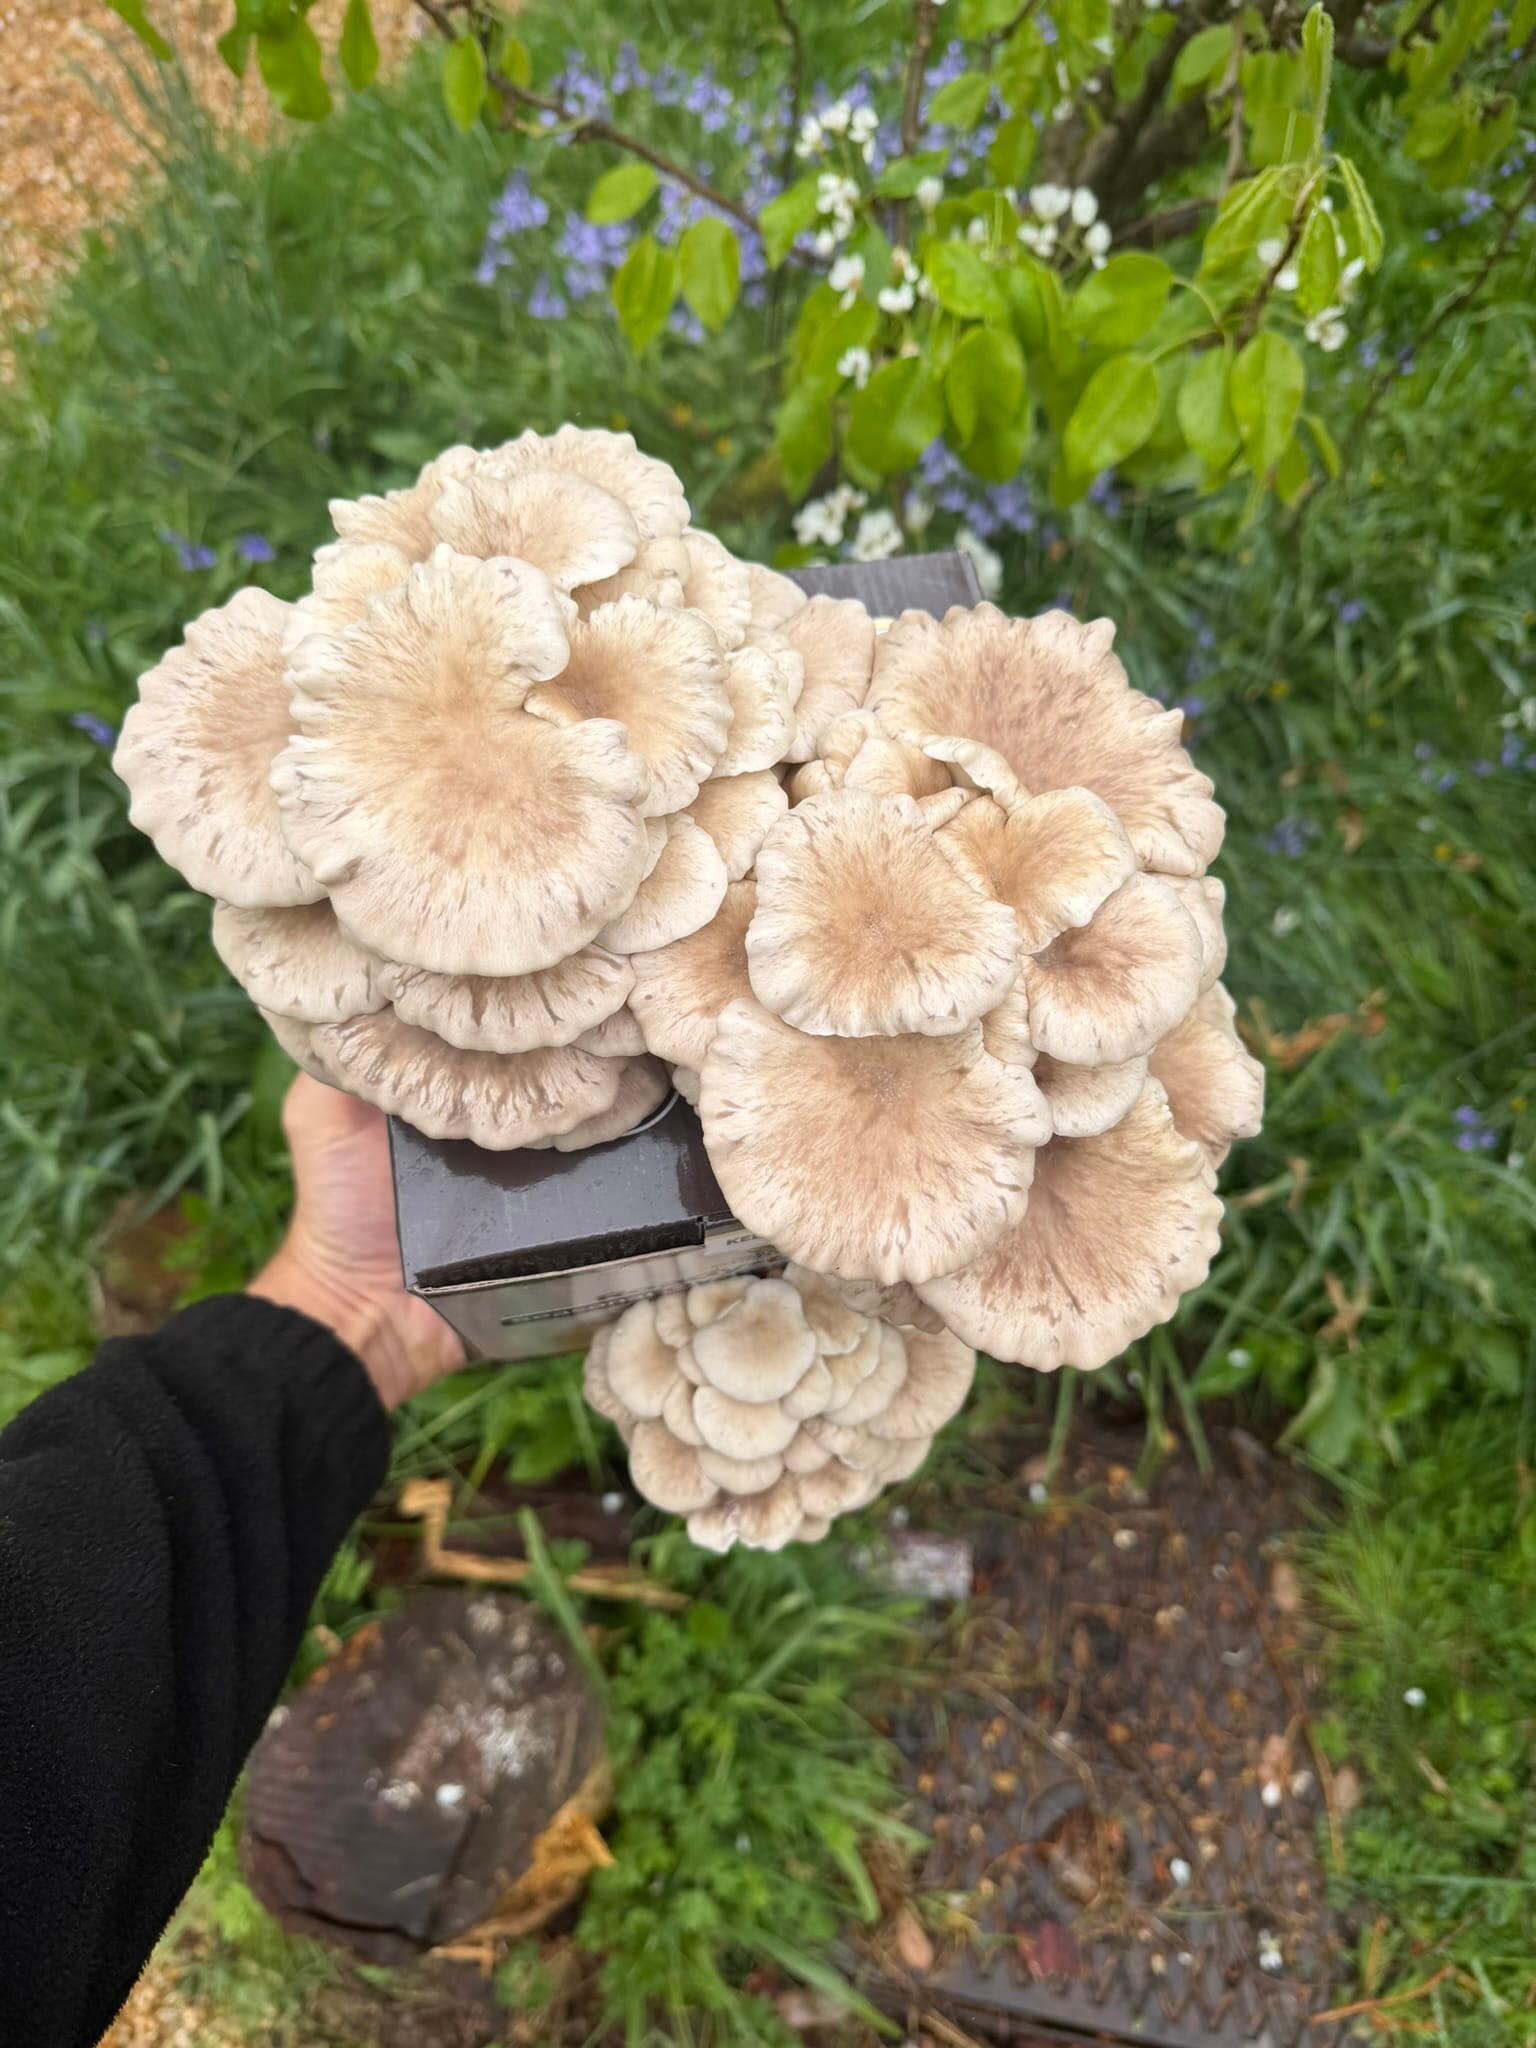
Day 7-10 - Harvest time
Harvest when the caps have fully opened and flattened but before the edges curl upward. A fine white dust on the surface means spores are dropping, so pick promptly at that point. A firm twist and pull at the base of the cluster removes it cleanly. Continue misting the holes after harvest and the next flush usually appears within one to two weeks.
Shop Summer Oyster Growing Kit
What does a White Oyster mushroom kit look like from day 1 to harvest?
White Oyster (Pleurotus ostreatus var. florida) is a forgiving, beginner-friendly variety with bright white caps and a clean savoury flavour. It follows a similar 7 to 10 day timeline to Pink Oyster and Summer Oyster, and produces reliable clusters across two to three flushes. White Oyster prefers slightly cooler conditions than Summer Oyster, so it suits rooms at the lower end of the 14 to 21 degree Celsius range well.
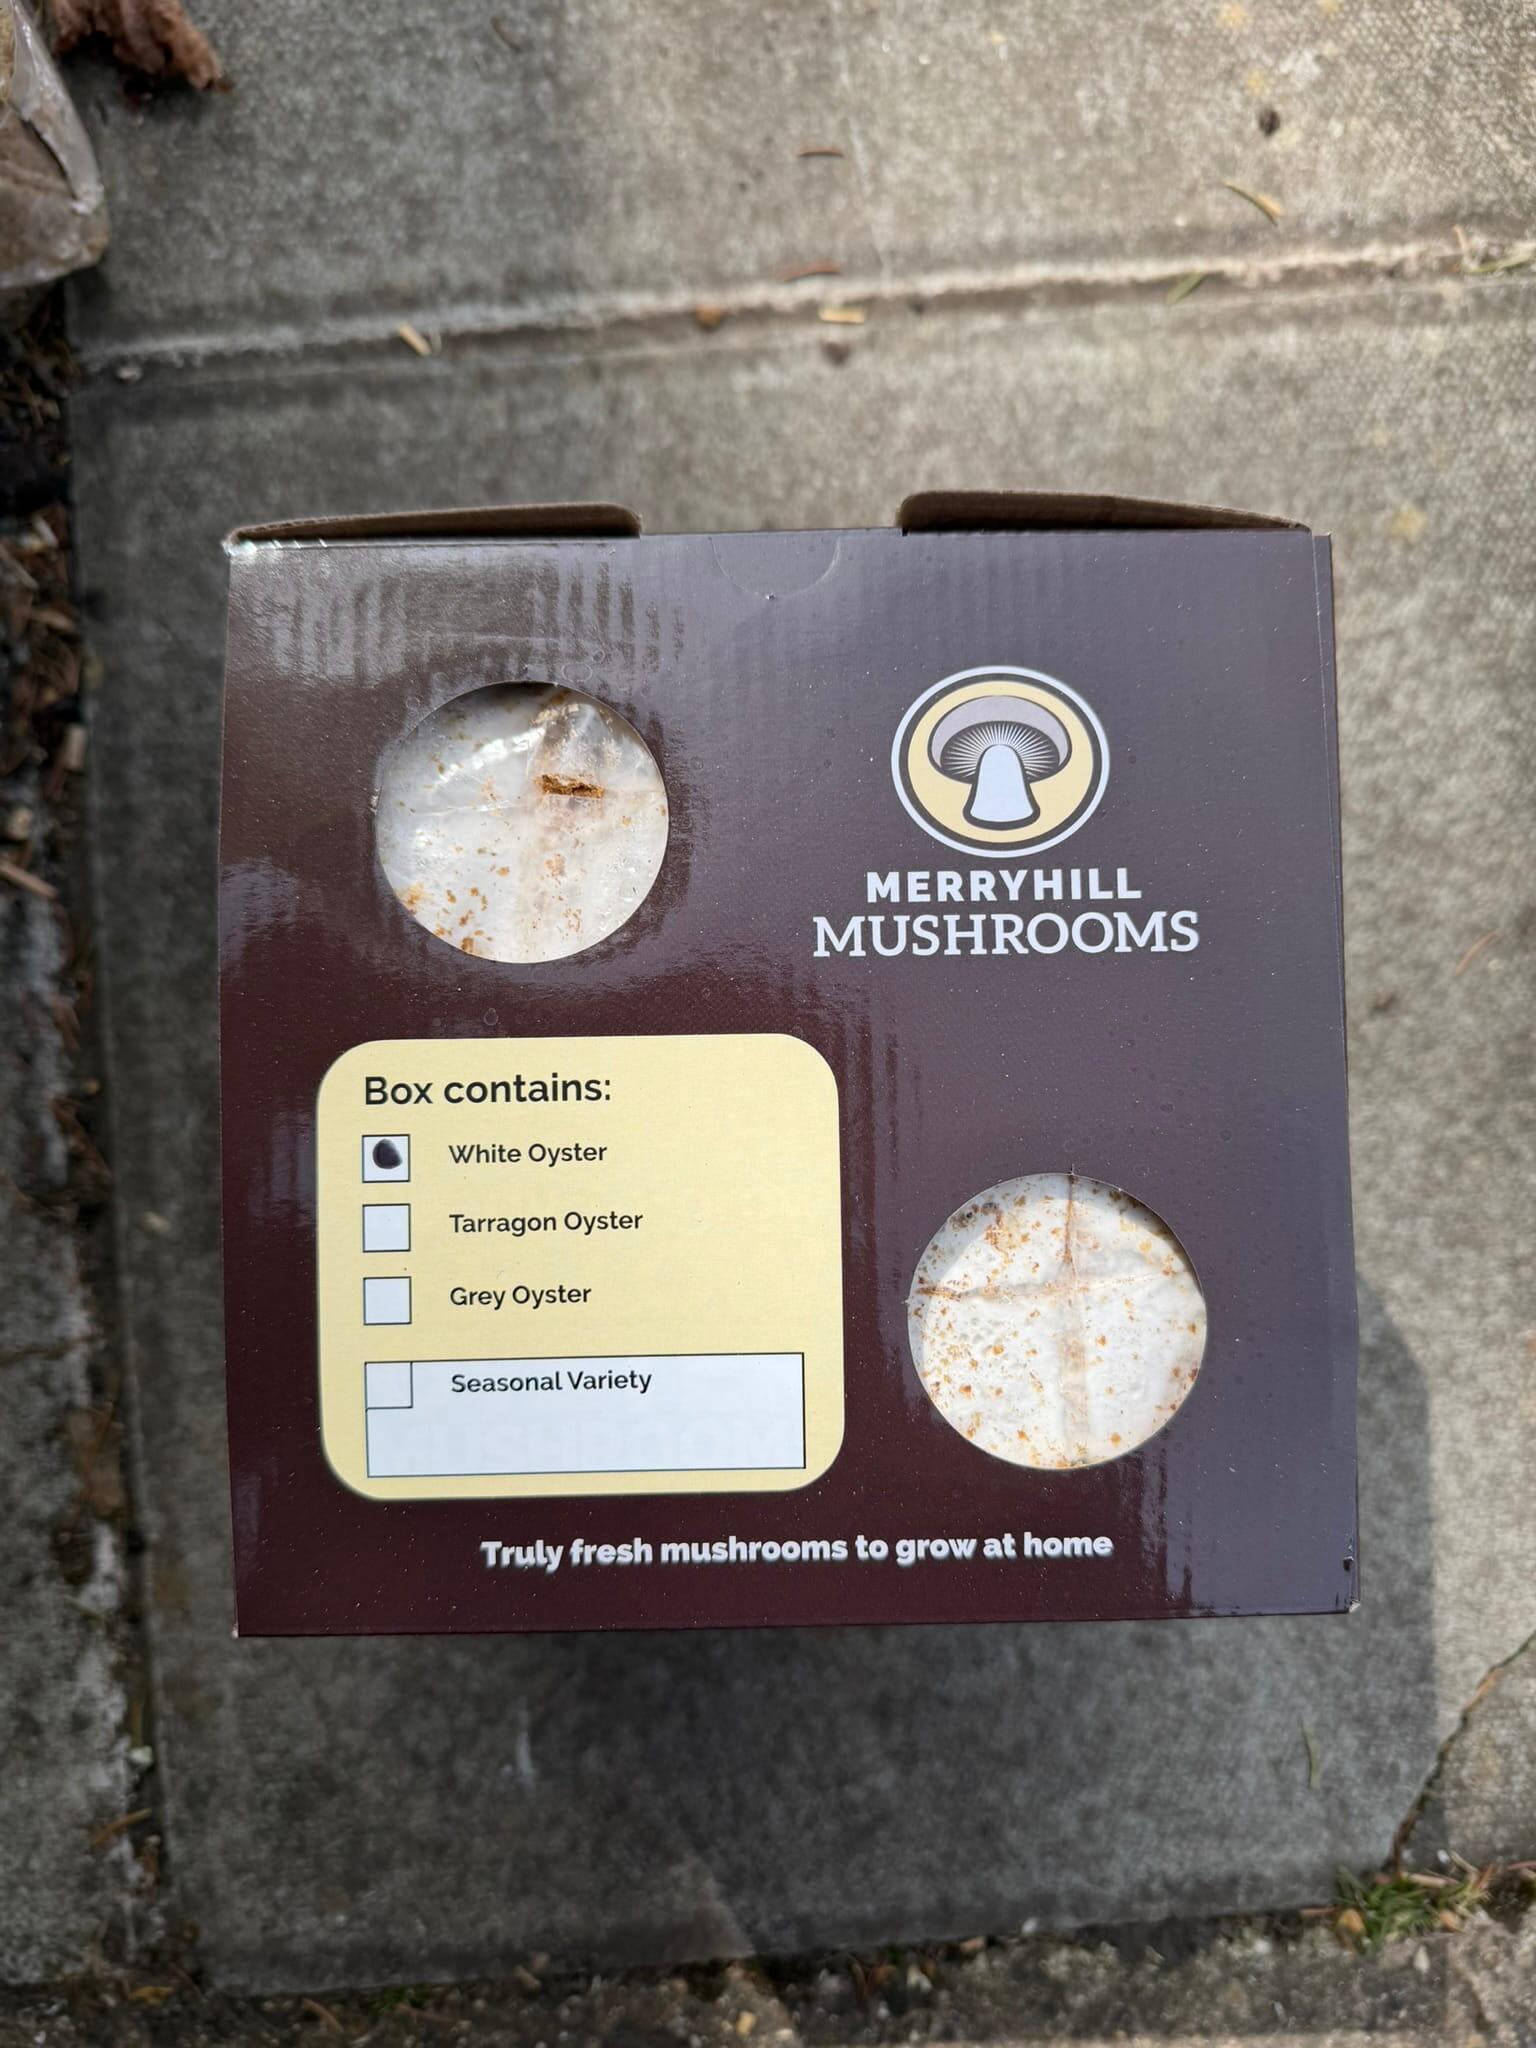
Day 1 - Setup
Setup starts as soon as the box is opened and the growing area is prepared. White mycelium should be visible through the growing holes. Position the kit in a room with indirect daylight and good airflow between 14 and 21 degrees Celsius, then begin misting twice a day.
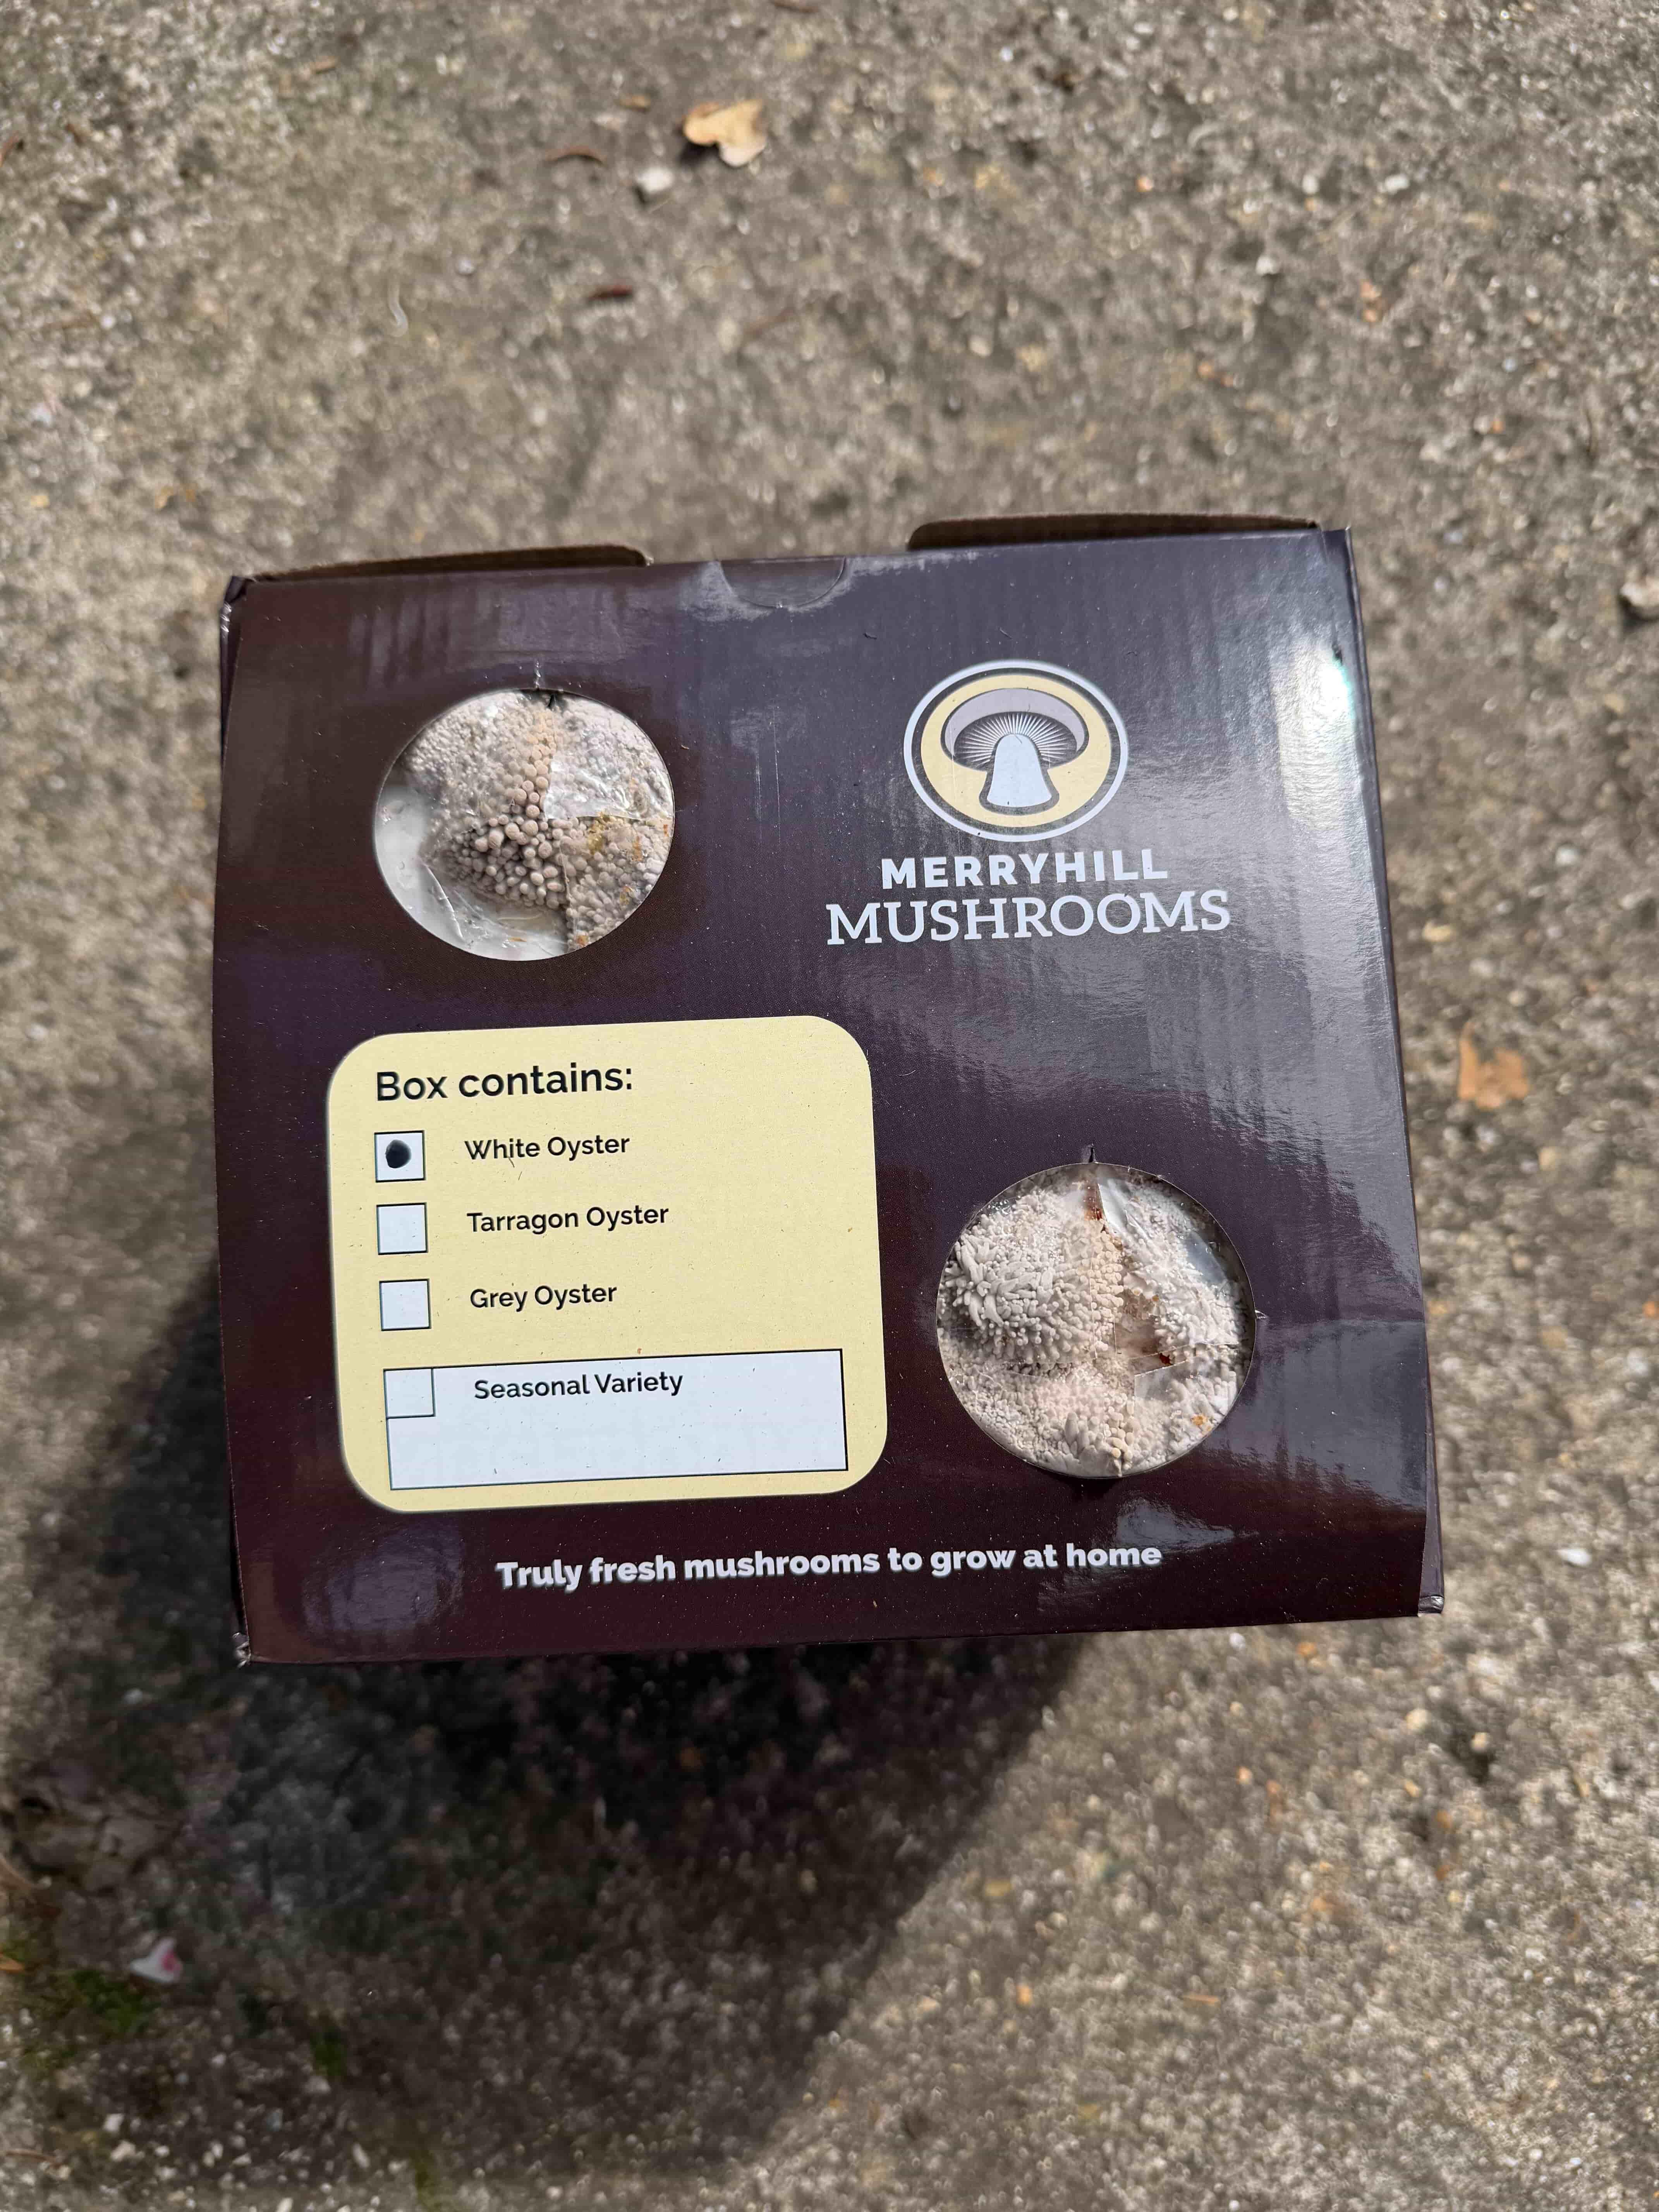
Day 3-5 - Pins appear
Pinning usually starts with small grey / beige bumps near the openings. Early fruit bodies can look tiny at first but change shape quickly once moisture and airflow hold steady. Growth will accelerates overnight at this point.
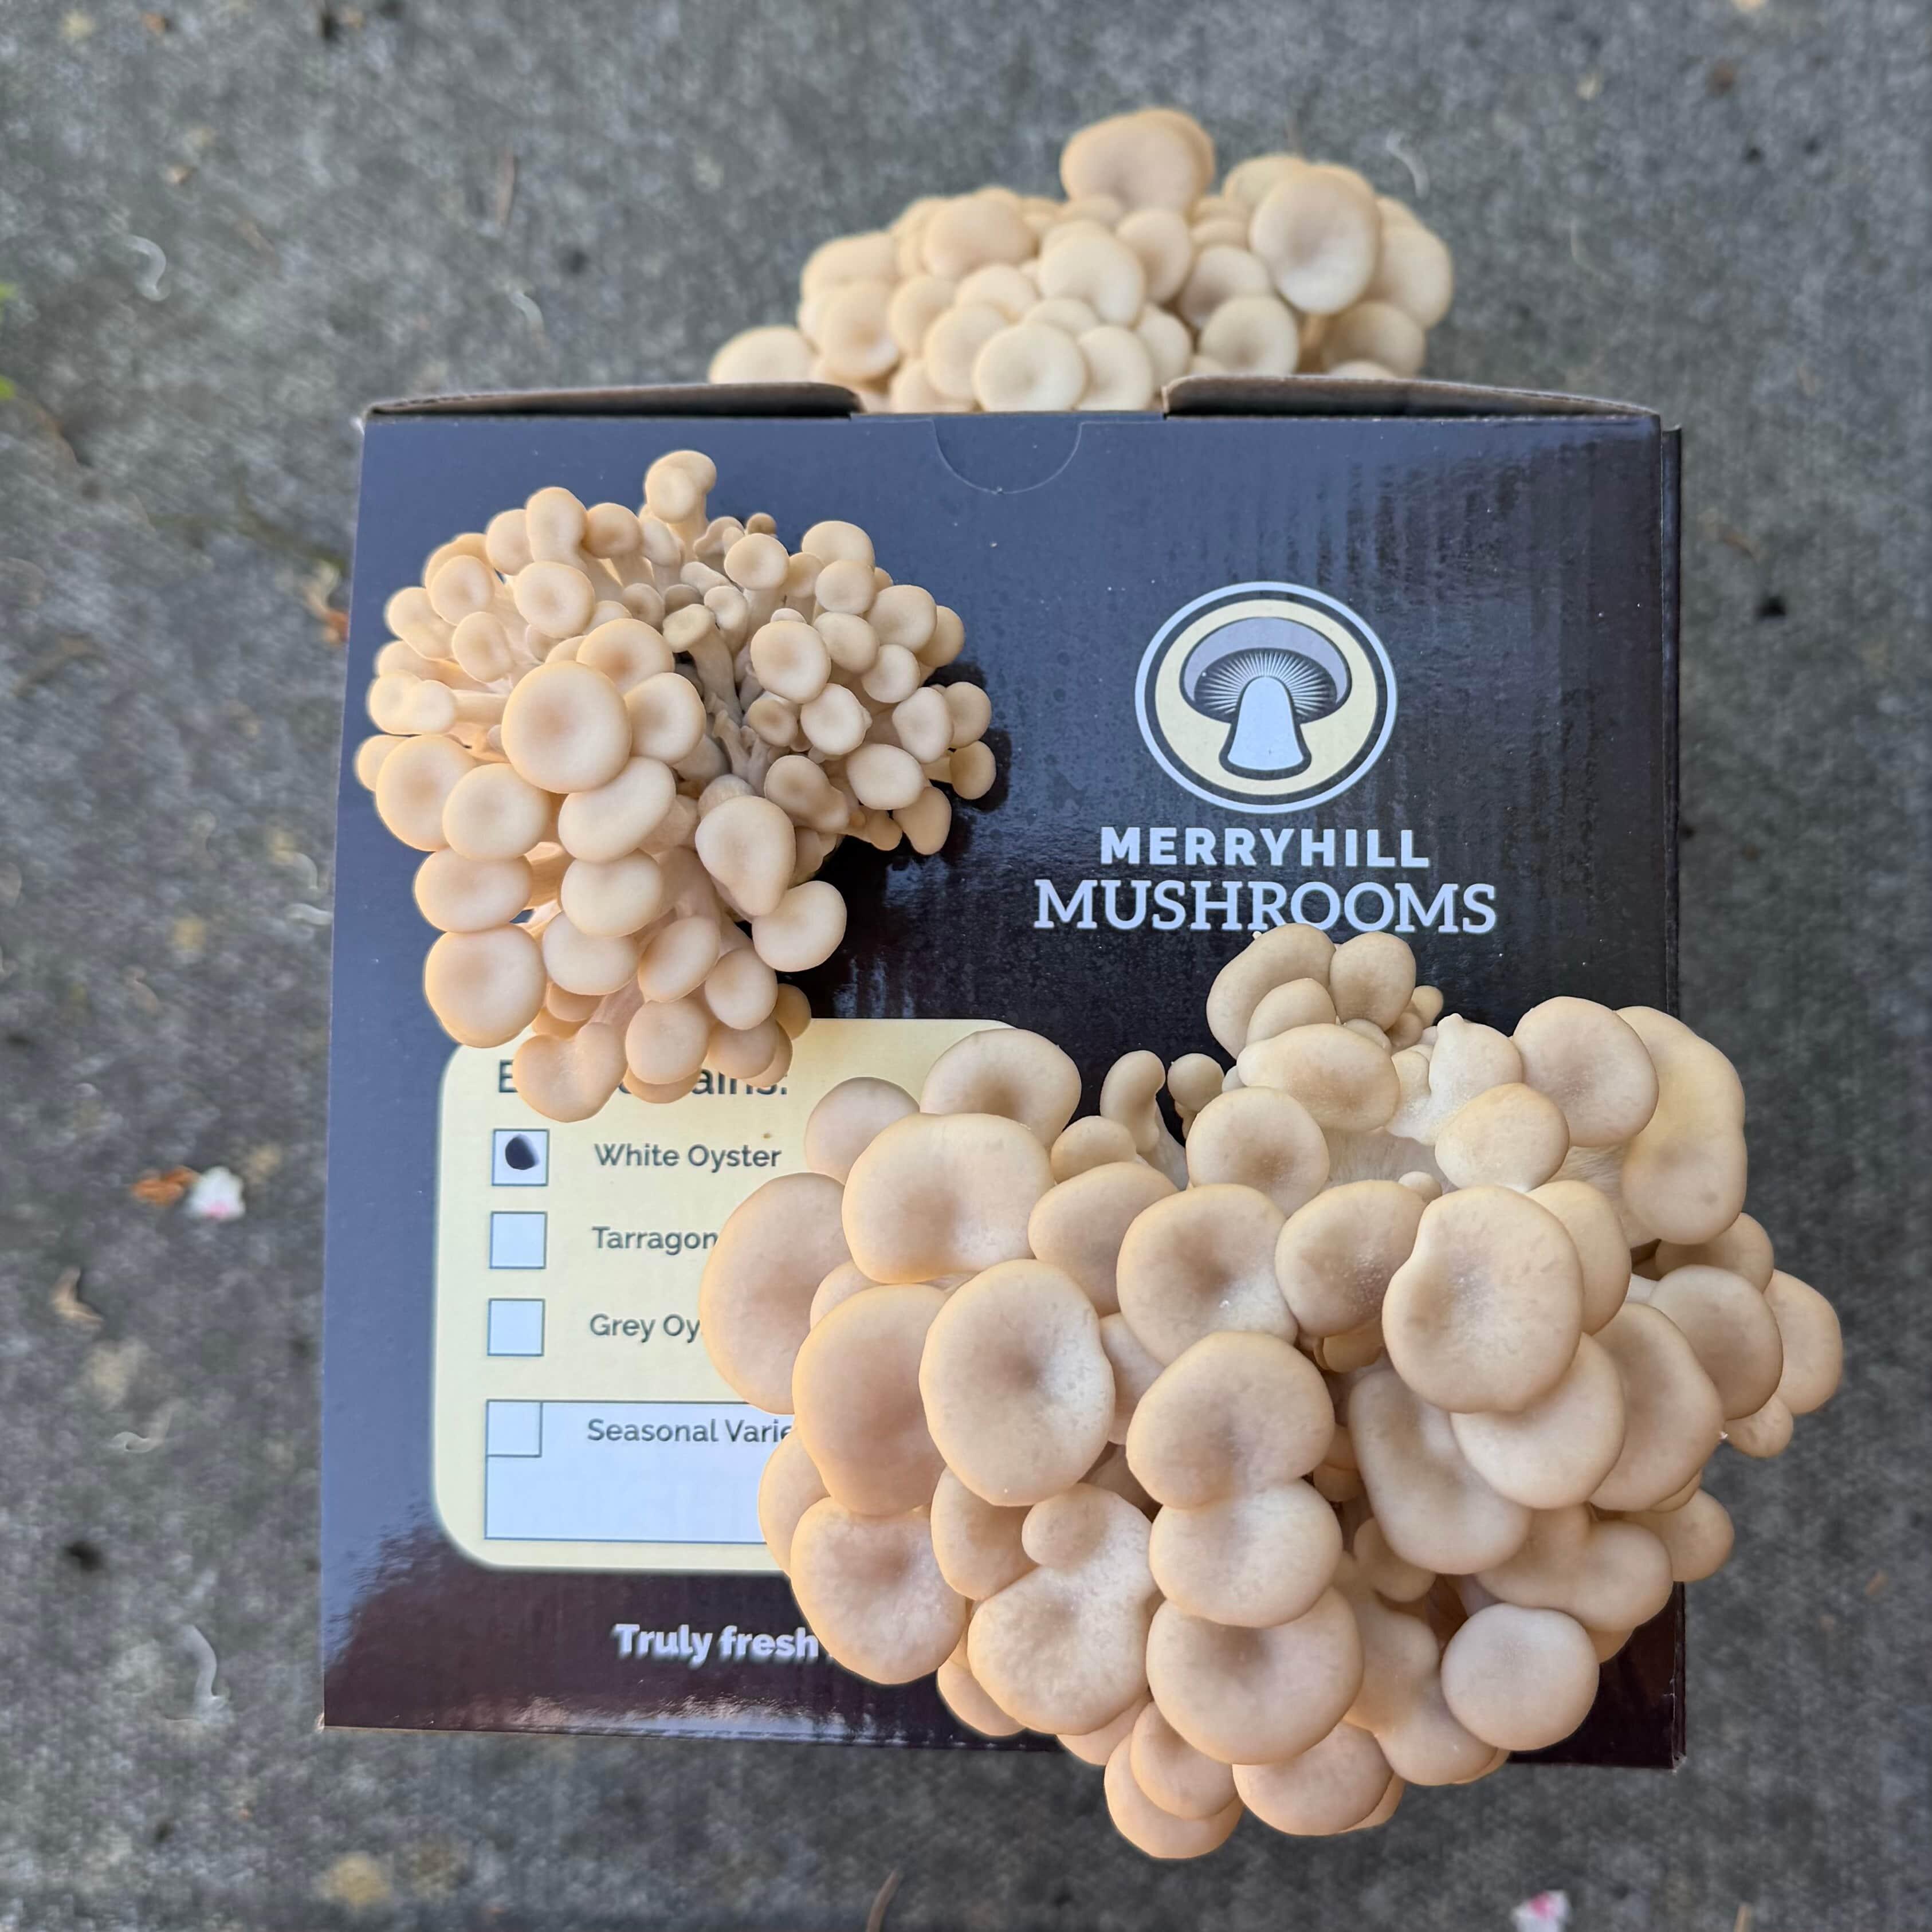
Day 5-7 - Clusters expand
Cluster growth becomes obvious as mushroom groups push outward and take on the familiar oyster shape. The bright white caps are distinctive at this stage. Continue misting around the kit rather than soaking the mushrooms directly.
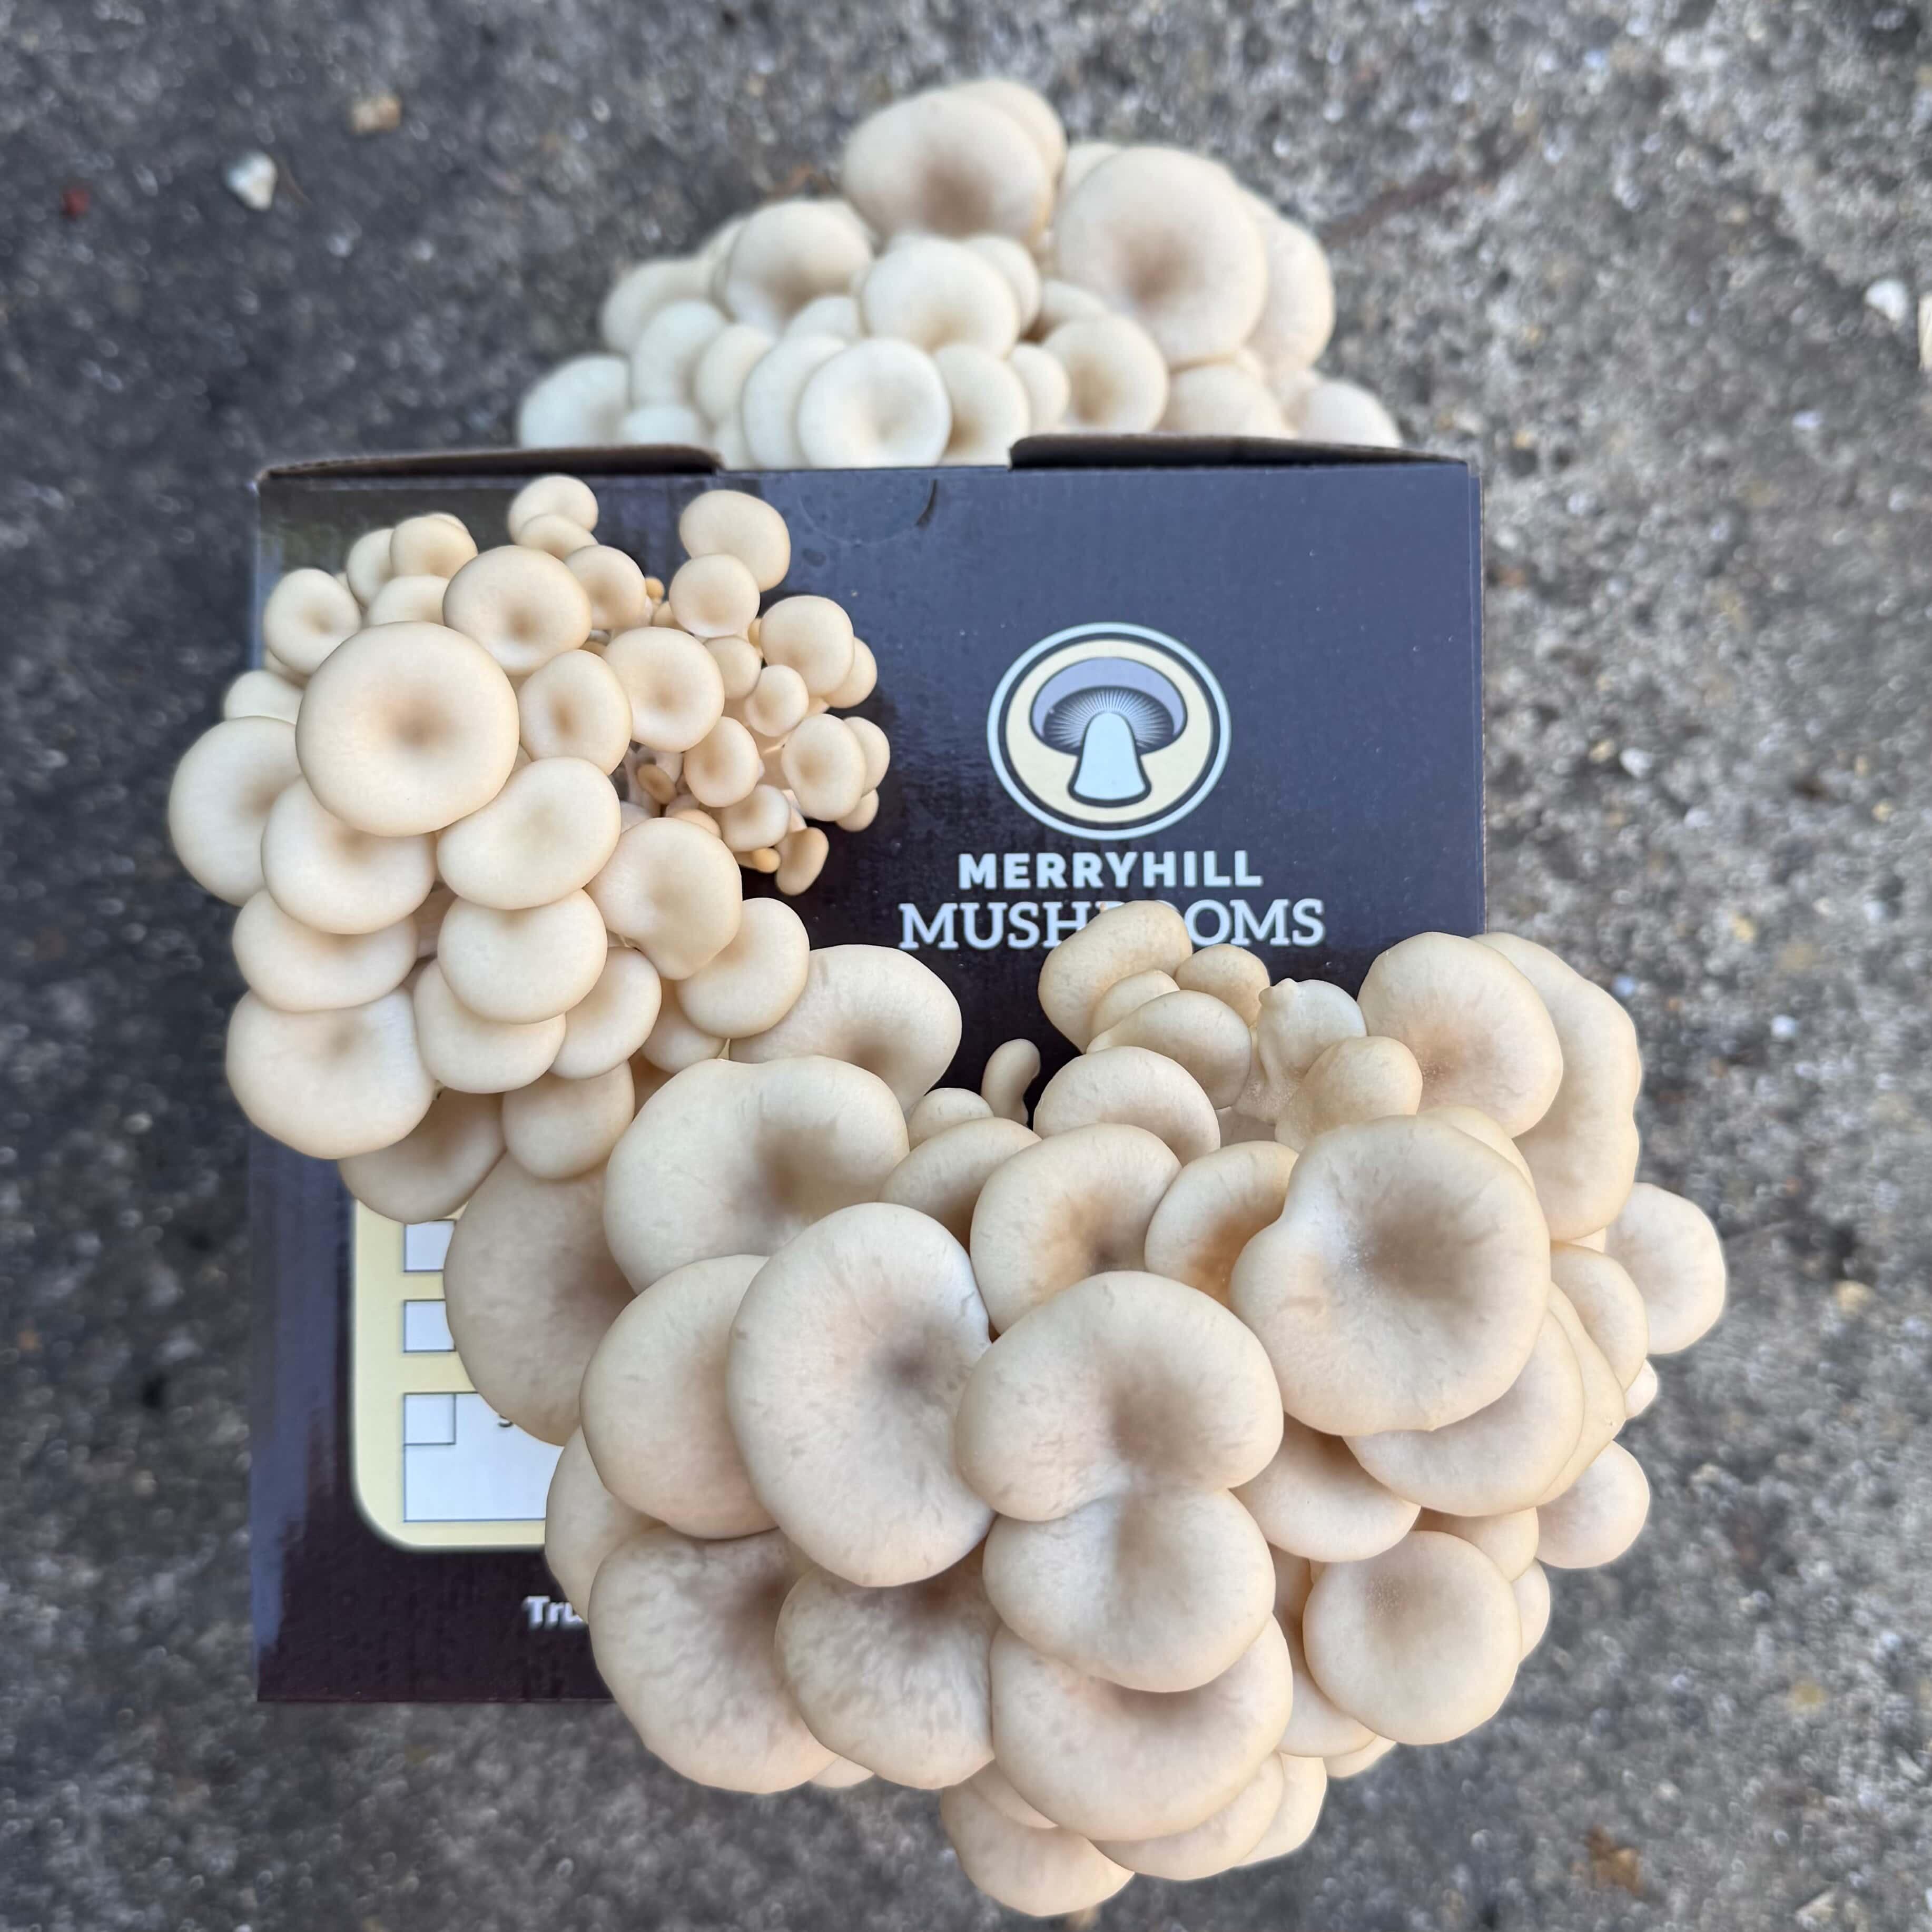
Day 6-7 - Caps fill out
Size builds noticeably as the cluster fills out. Good humidity keeps the cap edges healthy while the mushrooms put on size. Long stretched stems with small caps usually mean the kit needs more fresh air exchange.
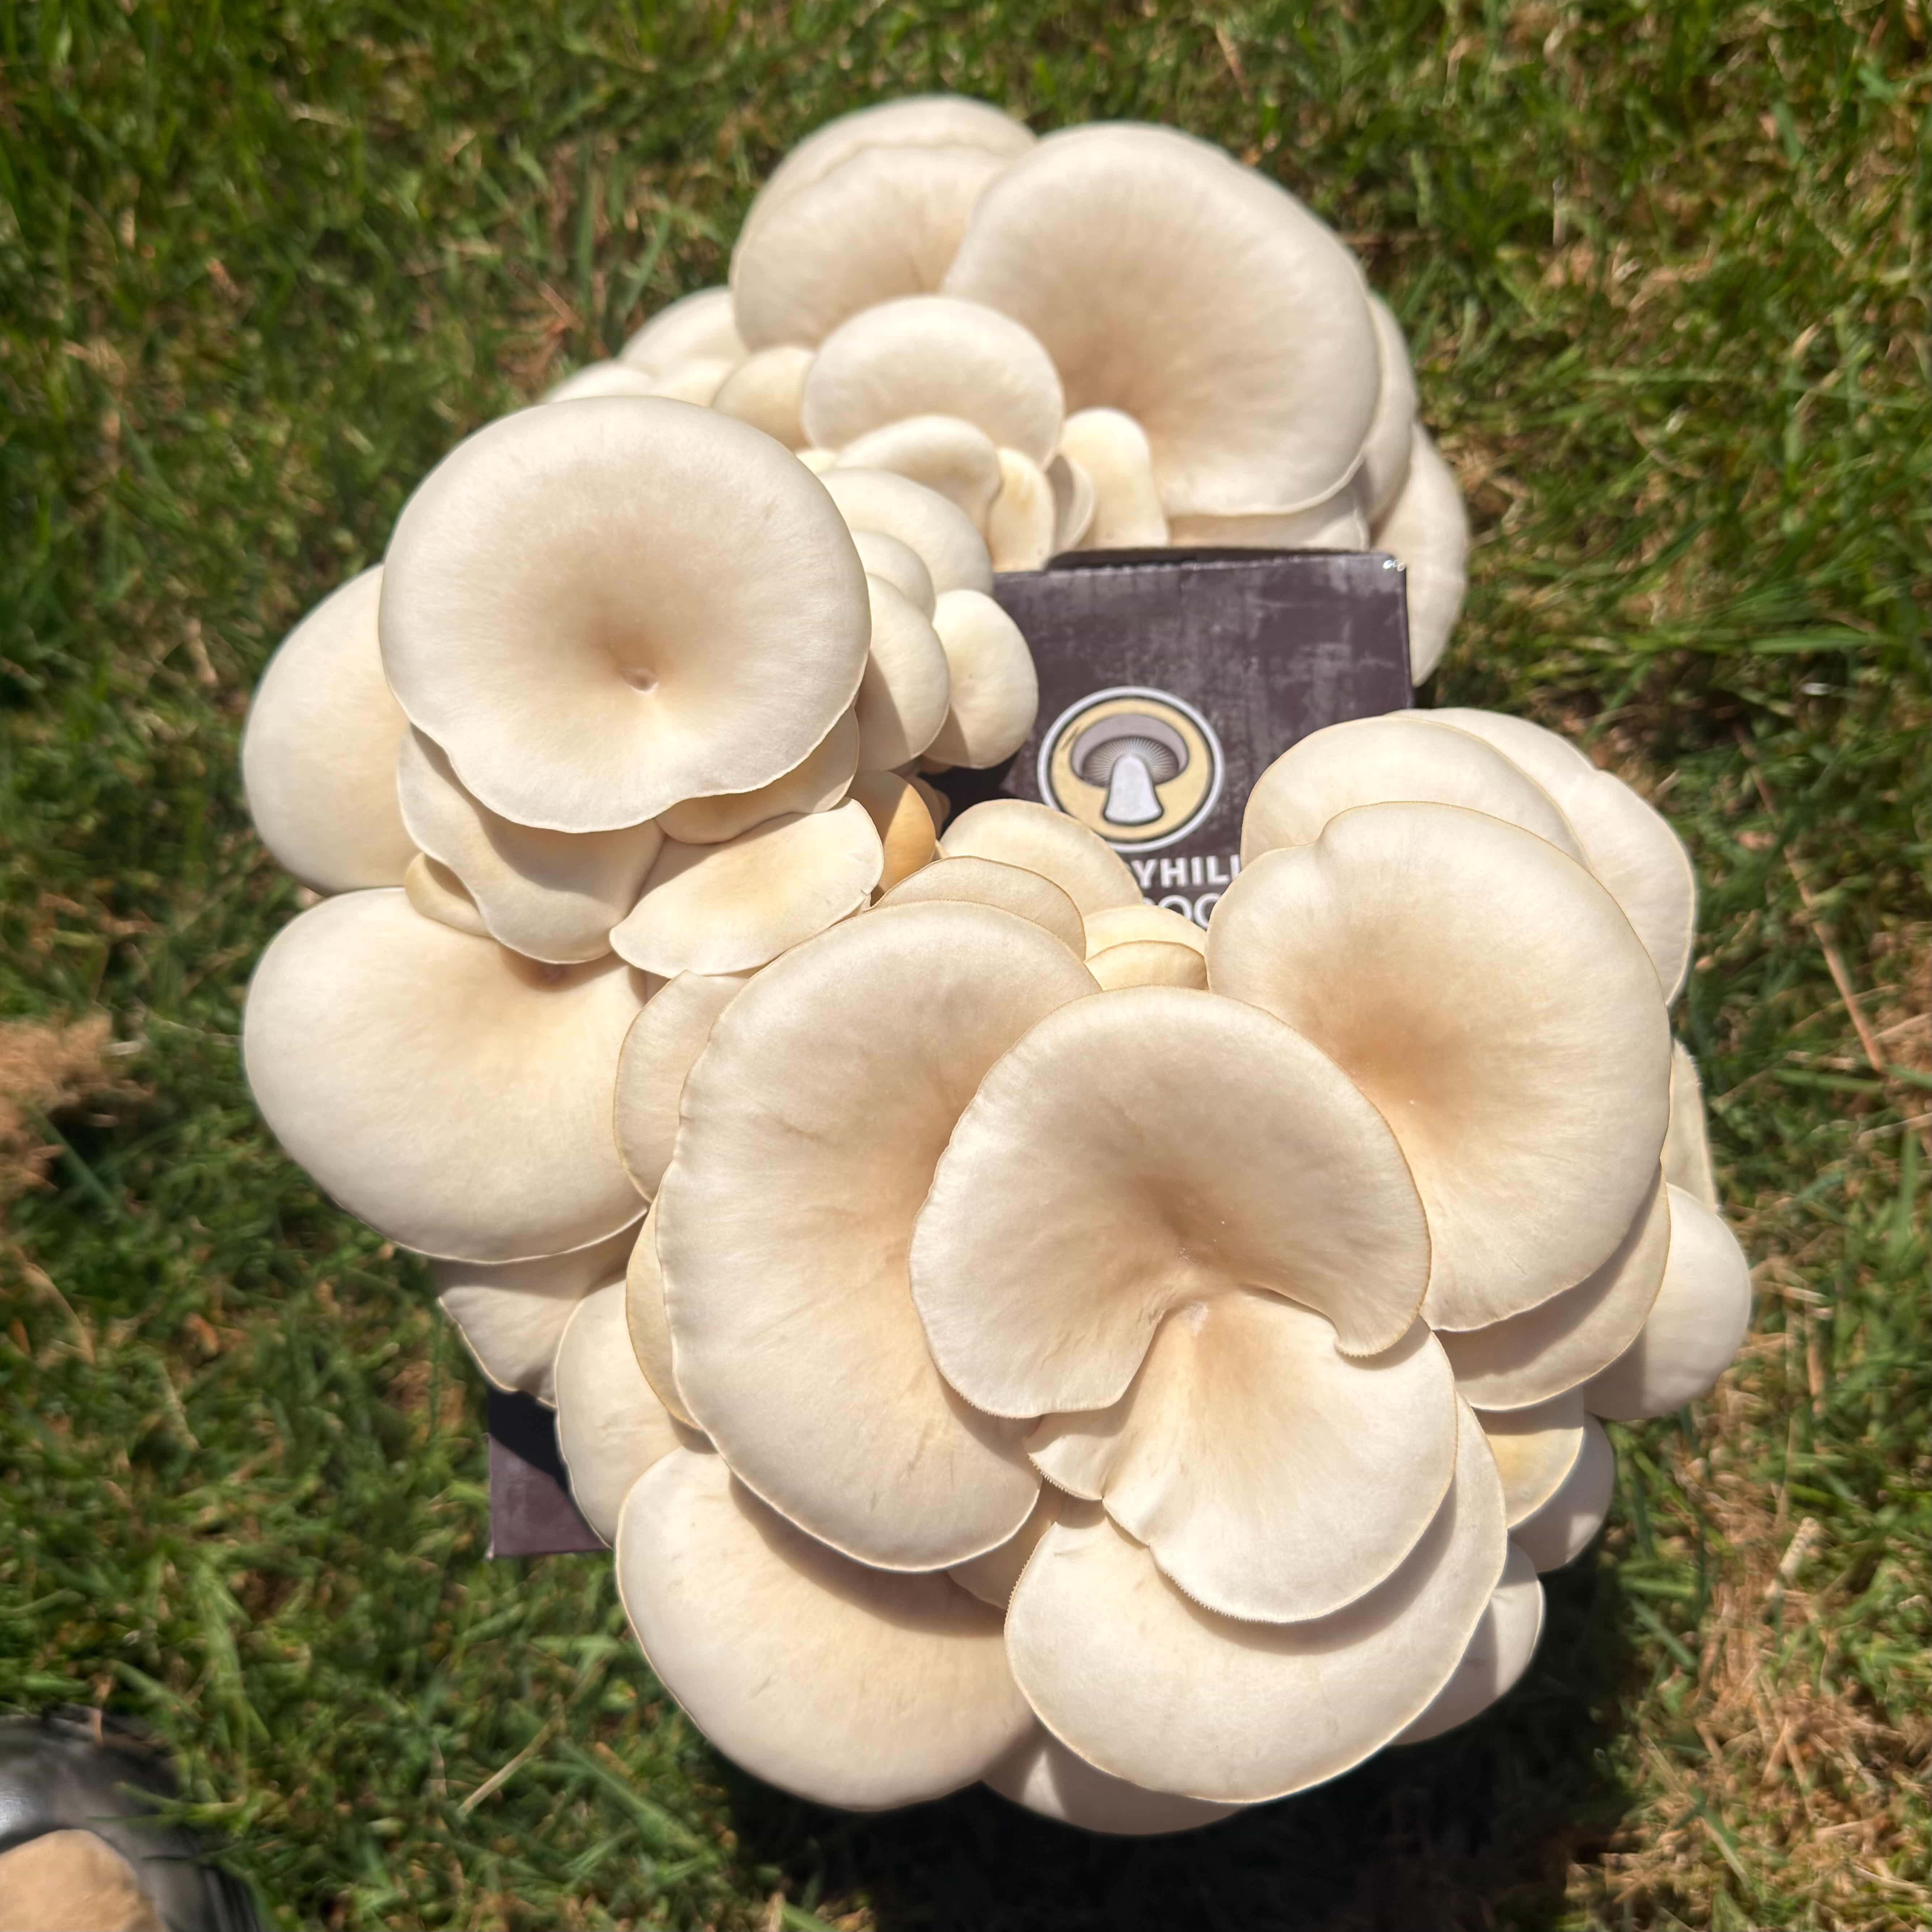
Day 7-10 - Harvest time
Harvest is usually ready once the caps have opened but the edges have not curled upward. A firm twist at the base of the cluster removes the whole group cleanly. White Oyster is best picked before the caps spread too wide because texture and shelf life are better at that stage. Store in the fridge using the damp paper towel method.
What happens with a Lion's Mane growing kit over the first 10 days?
Lion's Mane grows in a very different way from oyster mushrooms. Soft white mass formation comes first, and the long hanging spines develop later, so the shape can look unusual until the final stage. Do not spray water directly on the mushroom or the compost. Instead, spray the paper towels inside the humidity bag to maintain ambient moisture. The full Lion's Mane growing instructions cover the setup in detail.
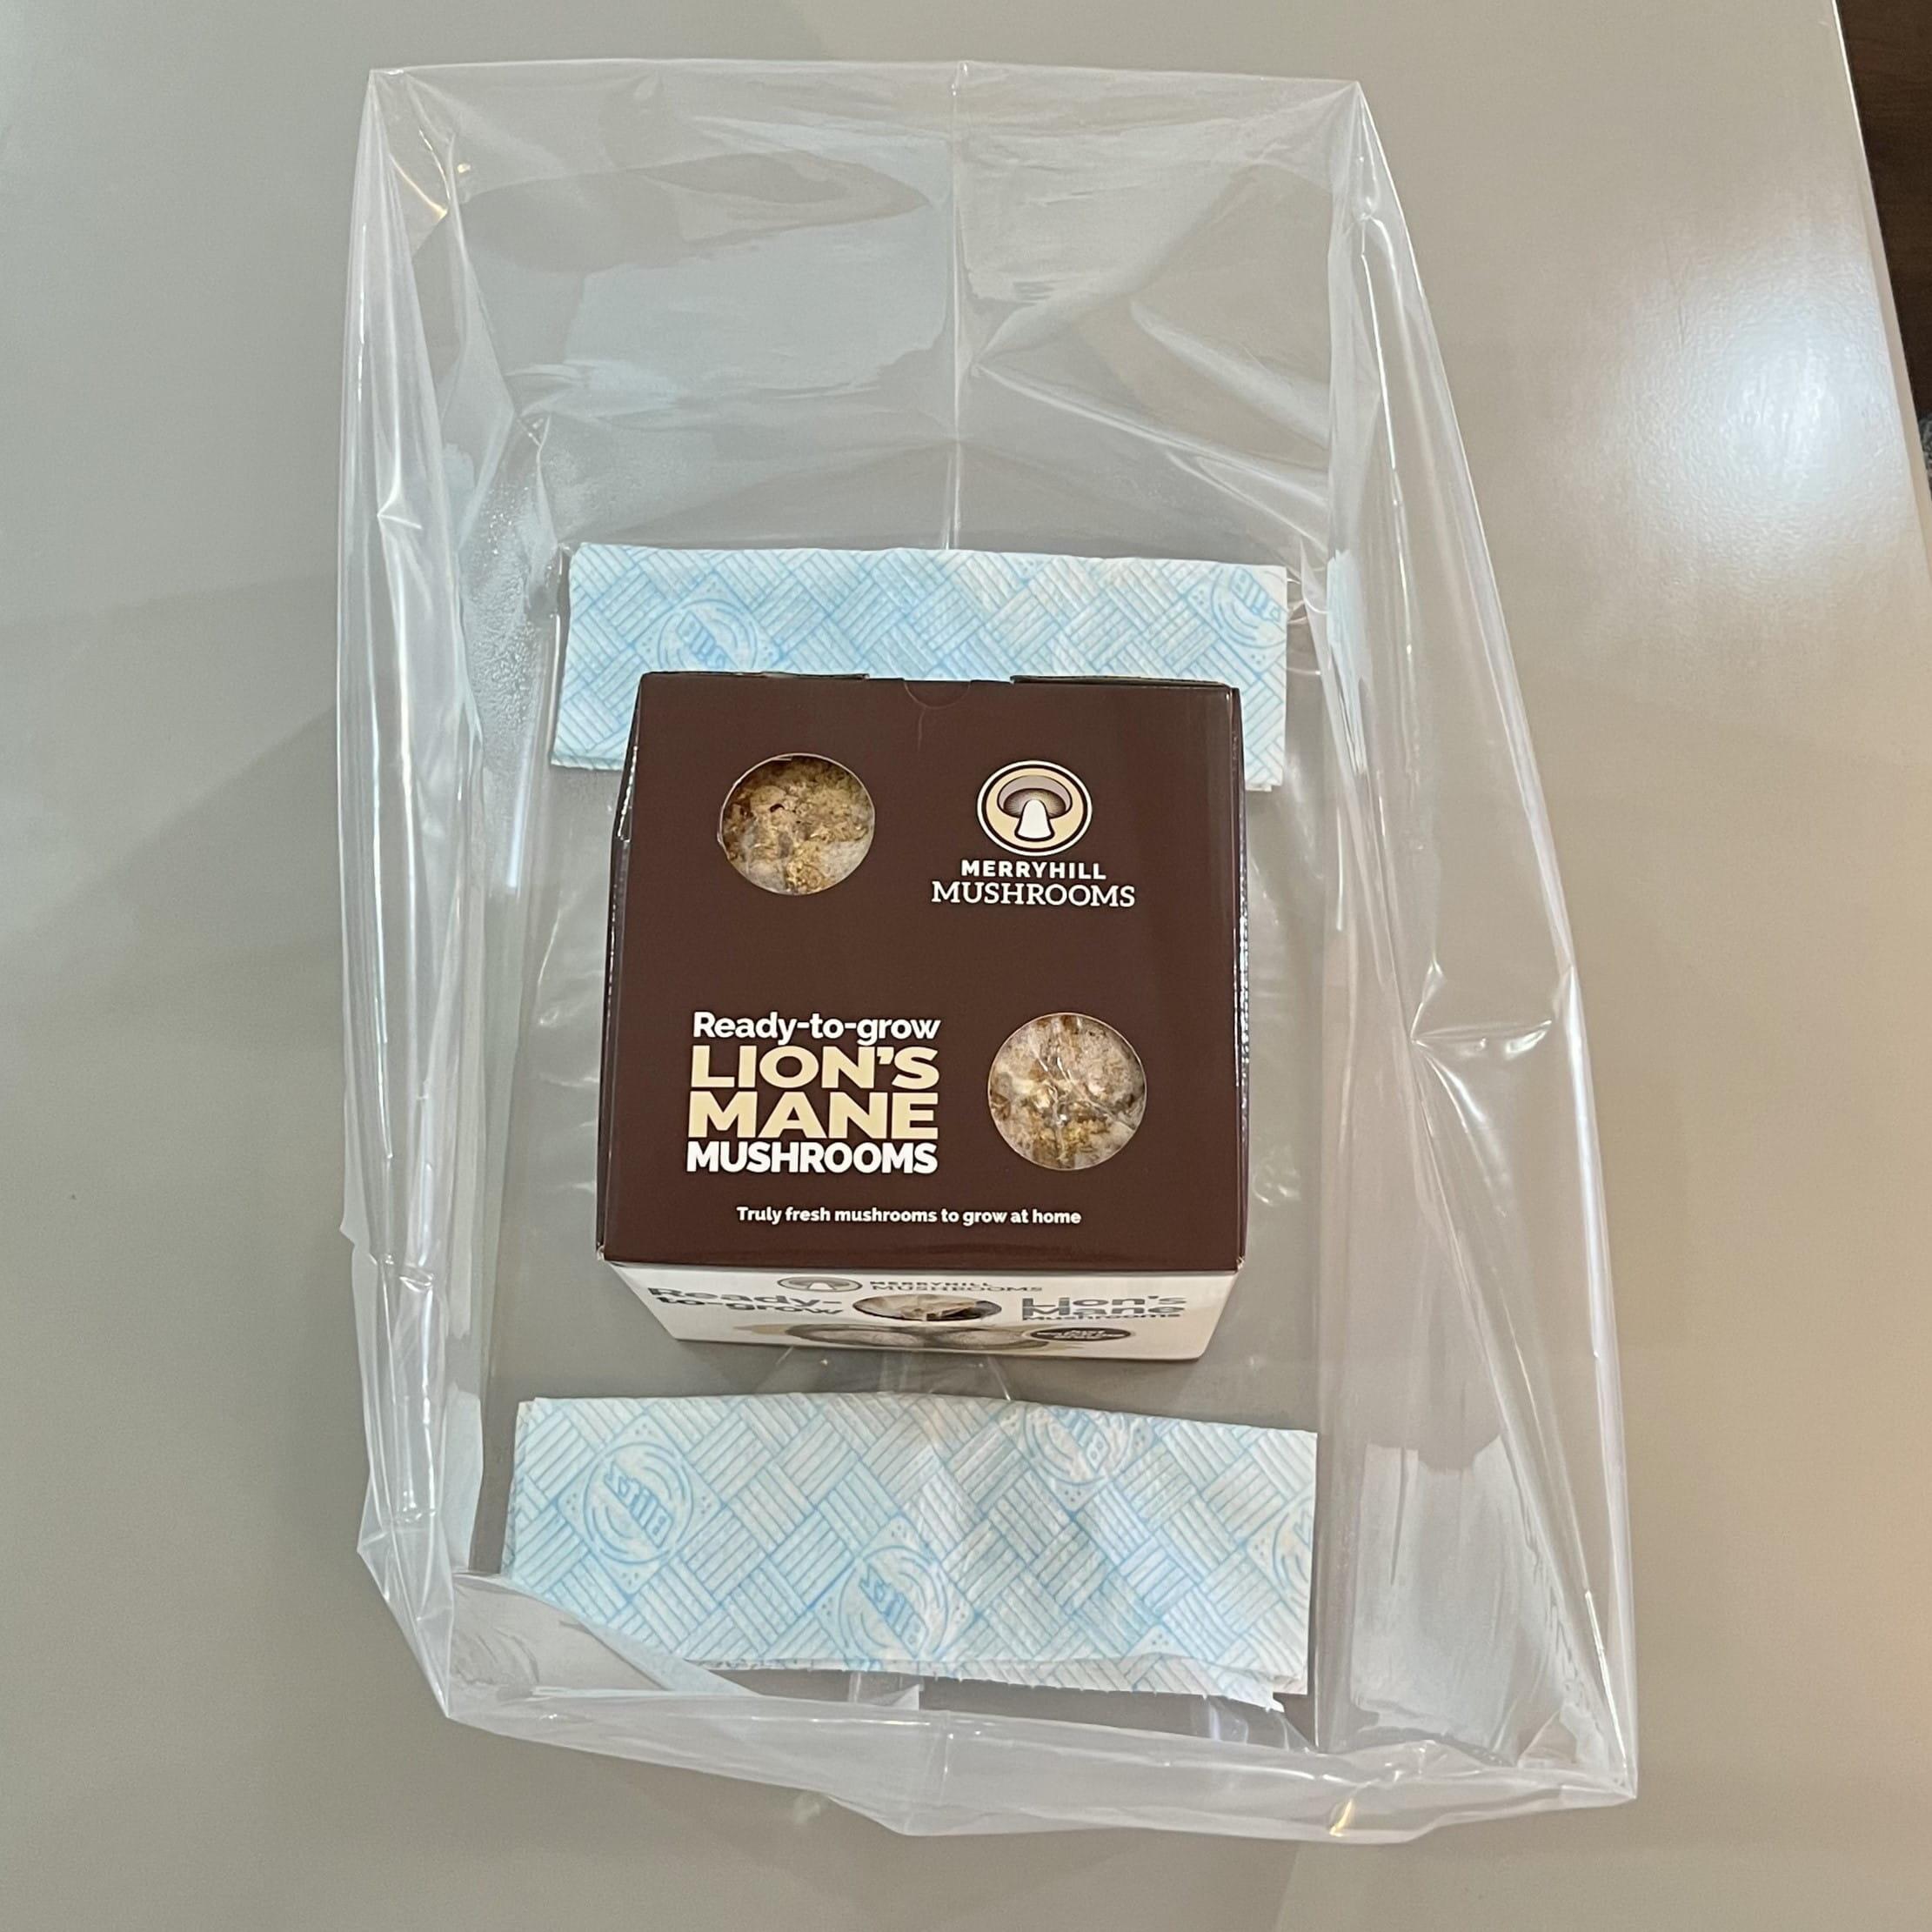
Day 1 - Setup
Setup uses a humidity bag rather than direct open-air misting. Paper towels inside the bag should be misted to hold moisture in the air, while the block itself should not be sprayed directly. A cool room with indirect light suits Lion's Mane best, usually around 10 to 20 degrees Celsius.
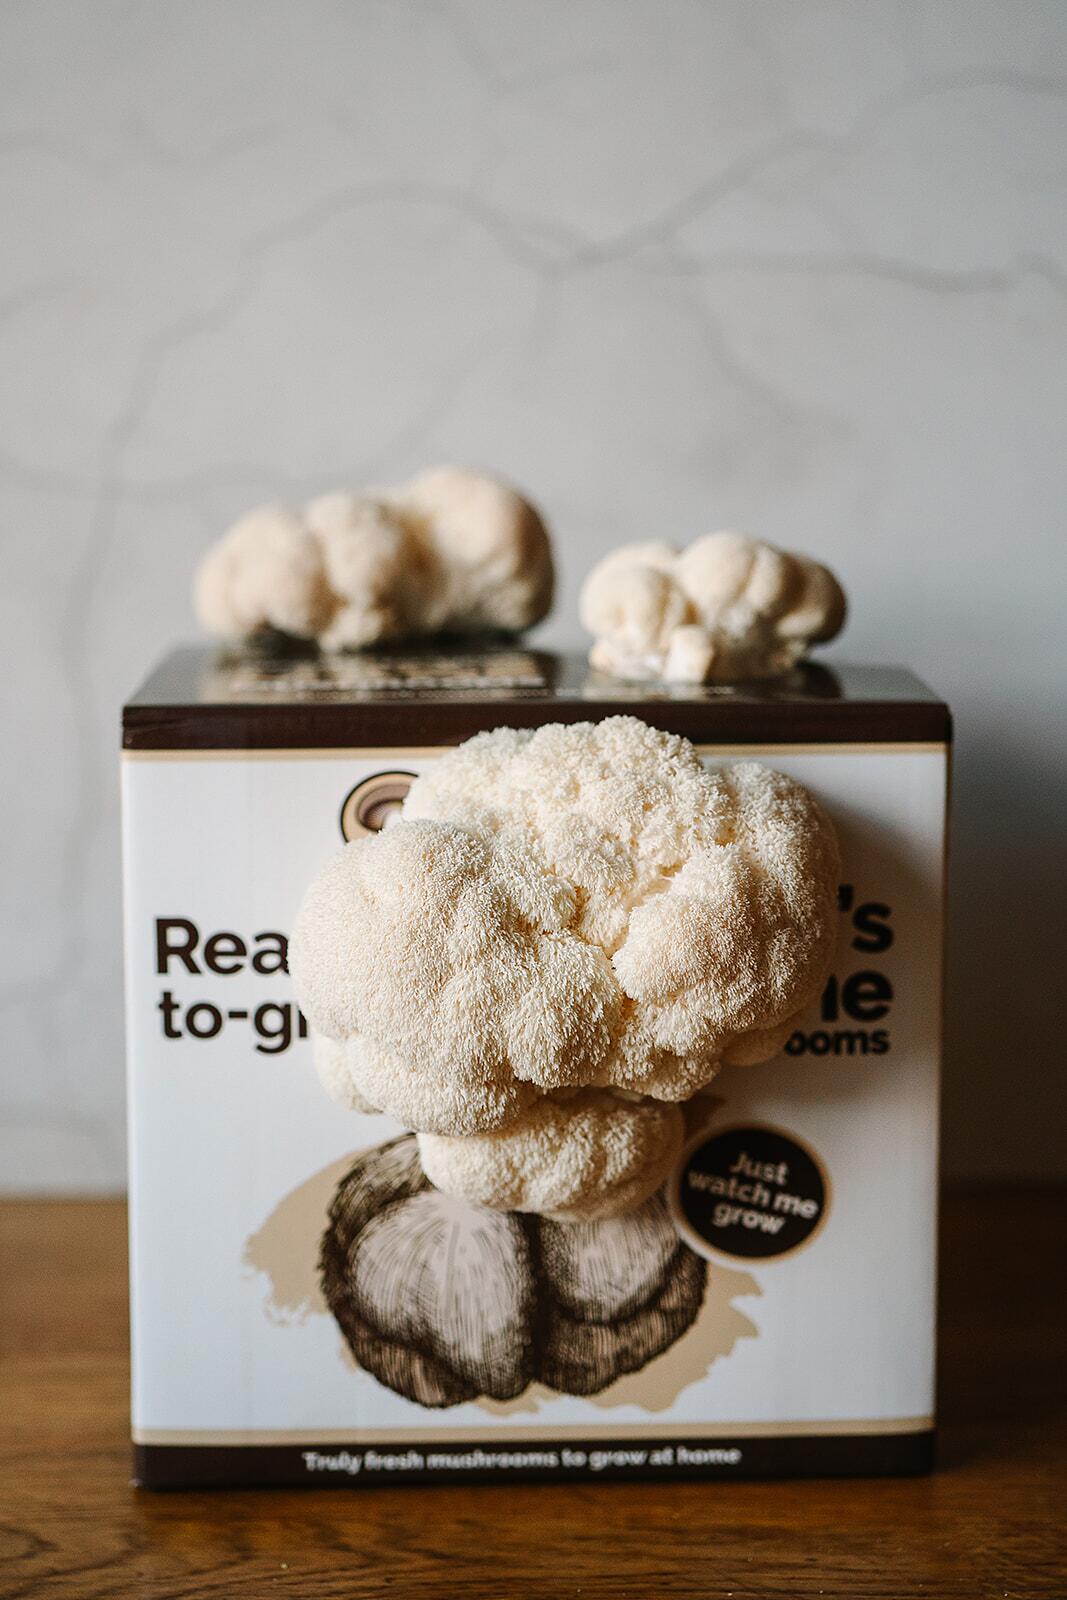
Day 4-5 - Early fruit body forms
Fruiting often starts as a small lumpy mass with a pale pink or yellow tint. Early colour variation can be normal at this stage and does not always mean a problem. Size should begin increasing once conditions stay stable.
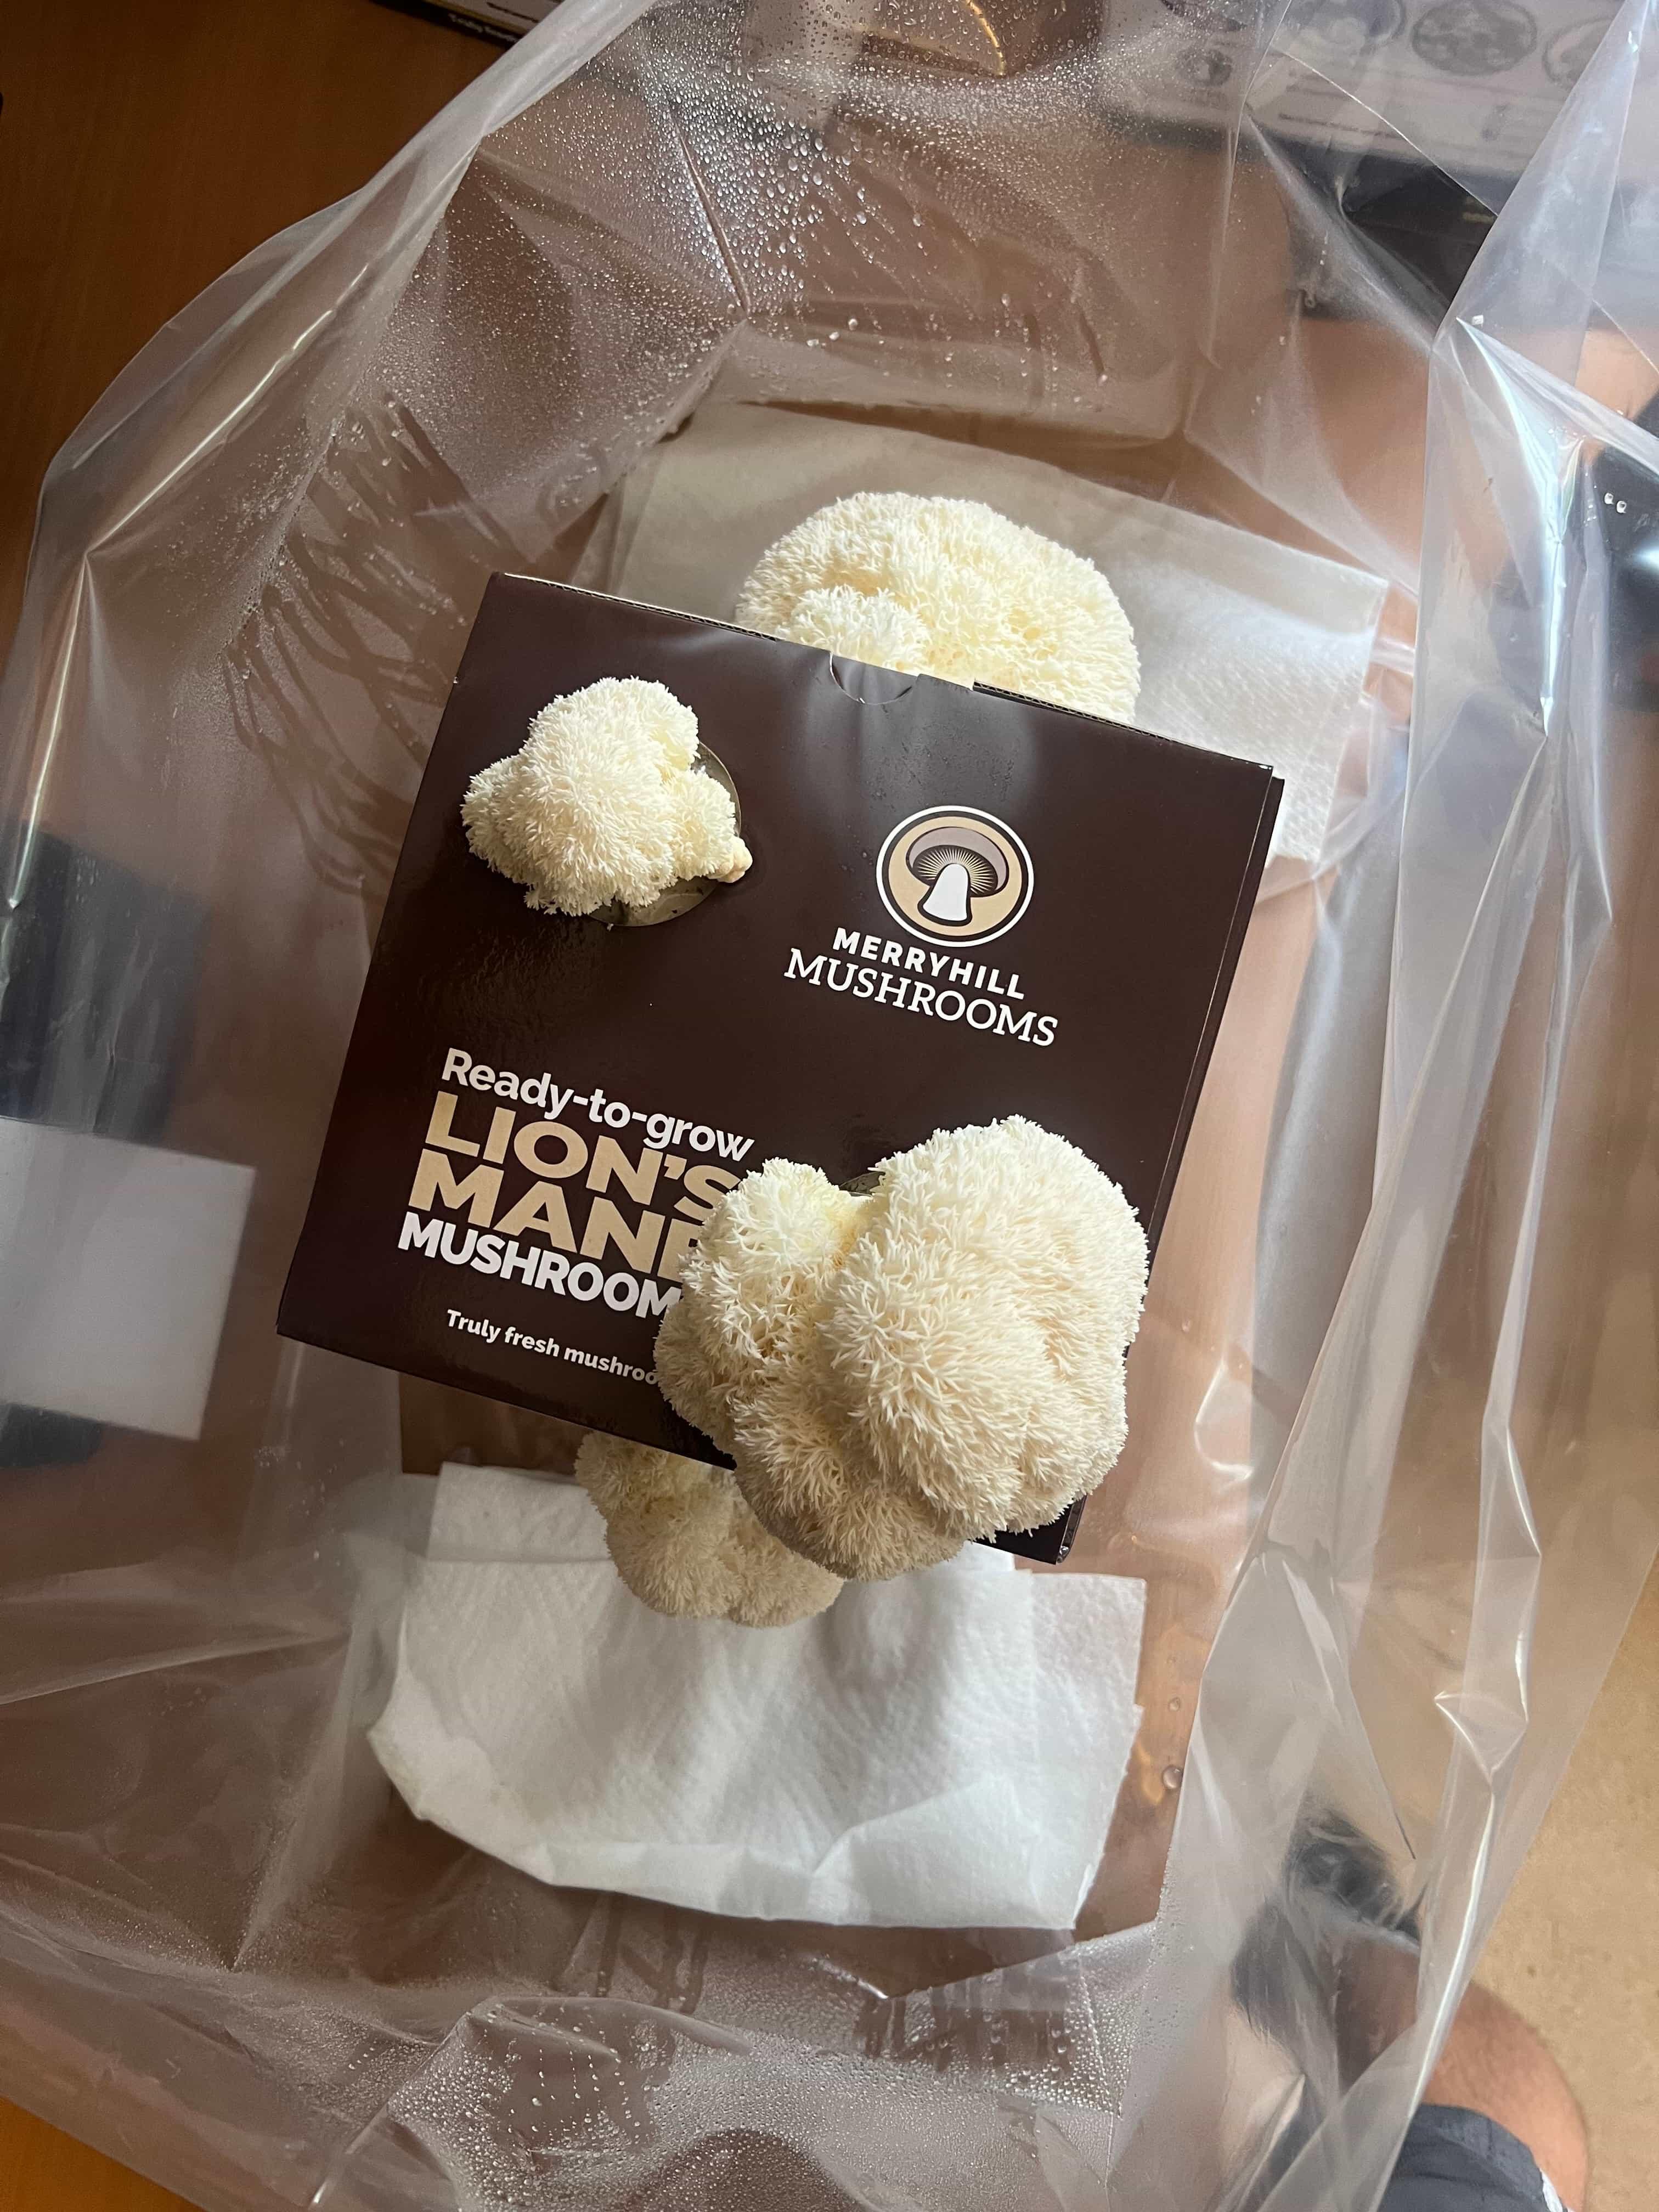
Day 6-7 - White body expands
Growth turns into a fuller white bulbous form pushing from the opening. Surface texture remains smooth at first. If no growth by day 6, check the Lion's Mane tips.
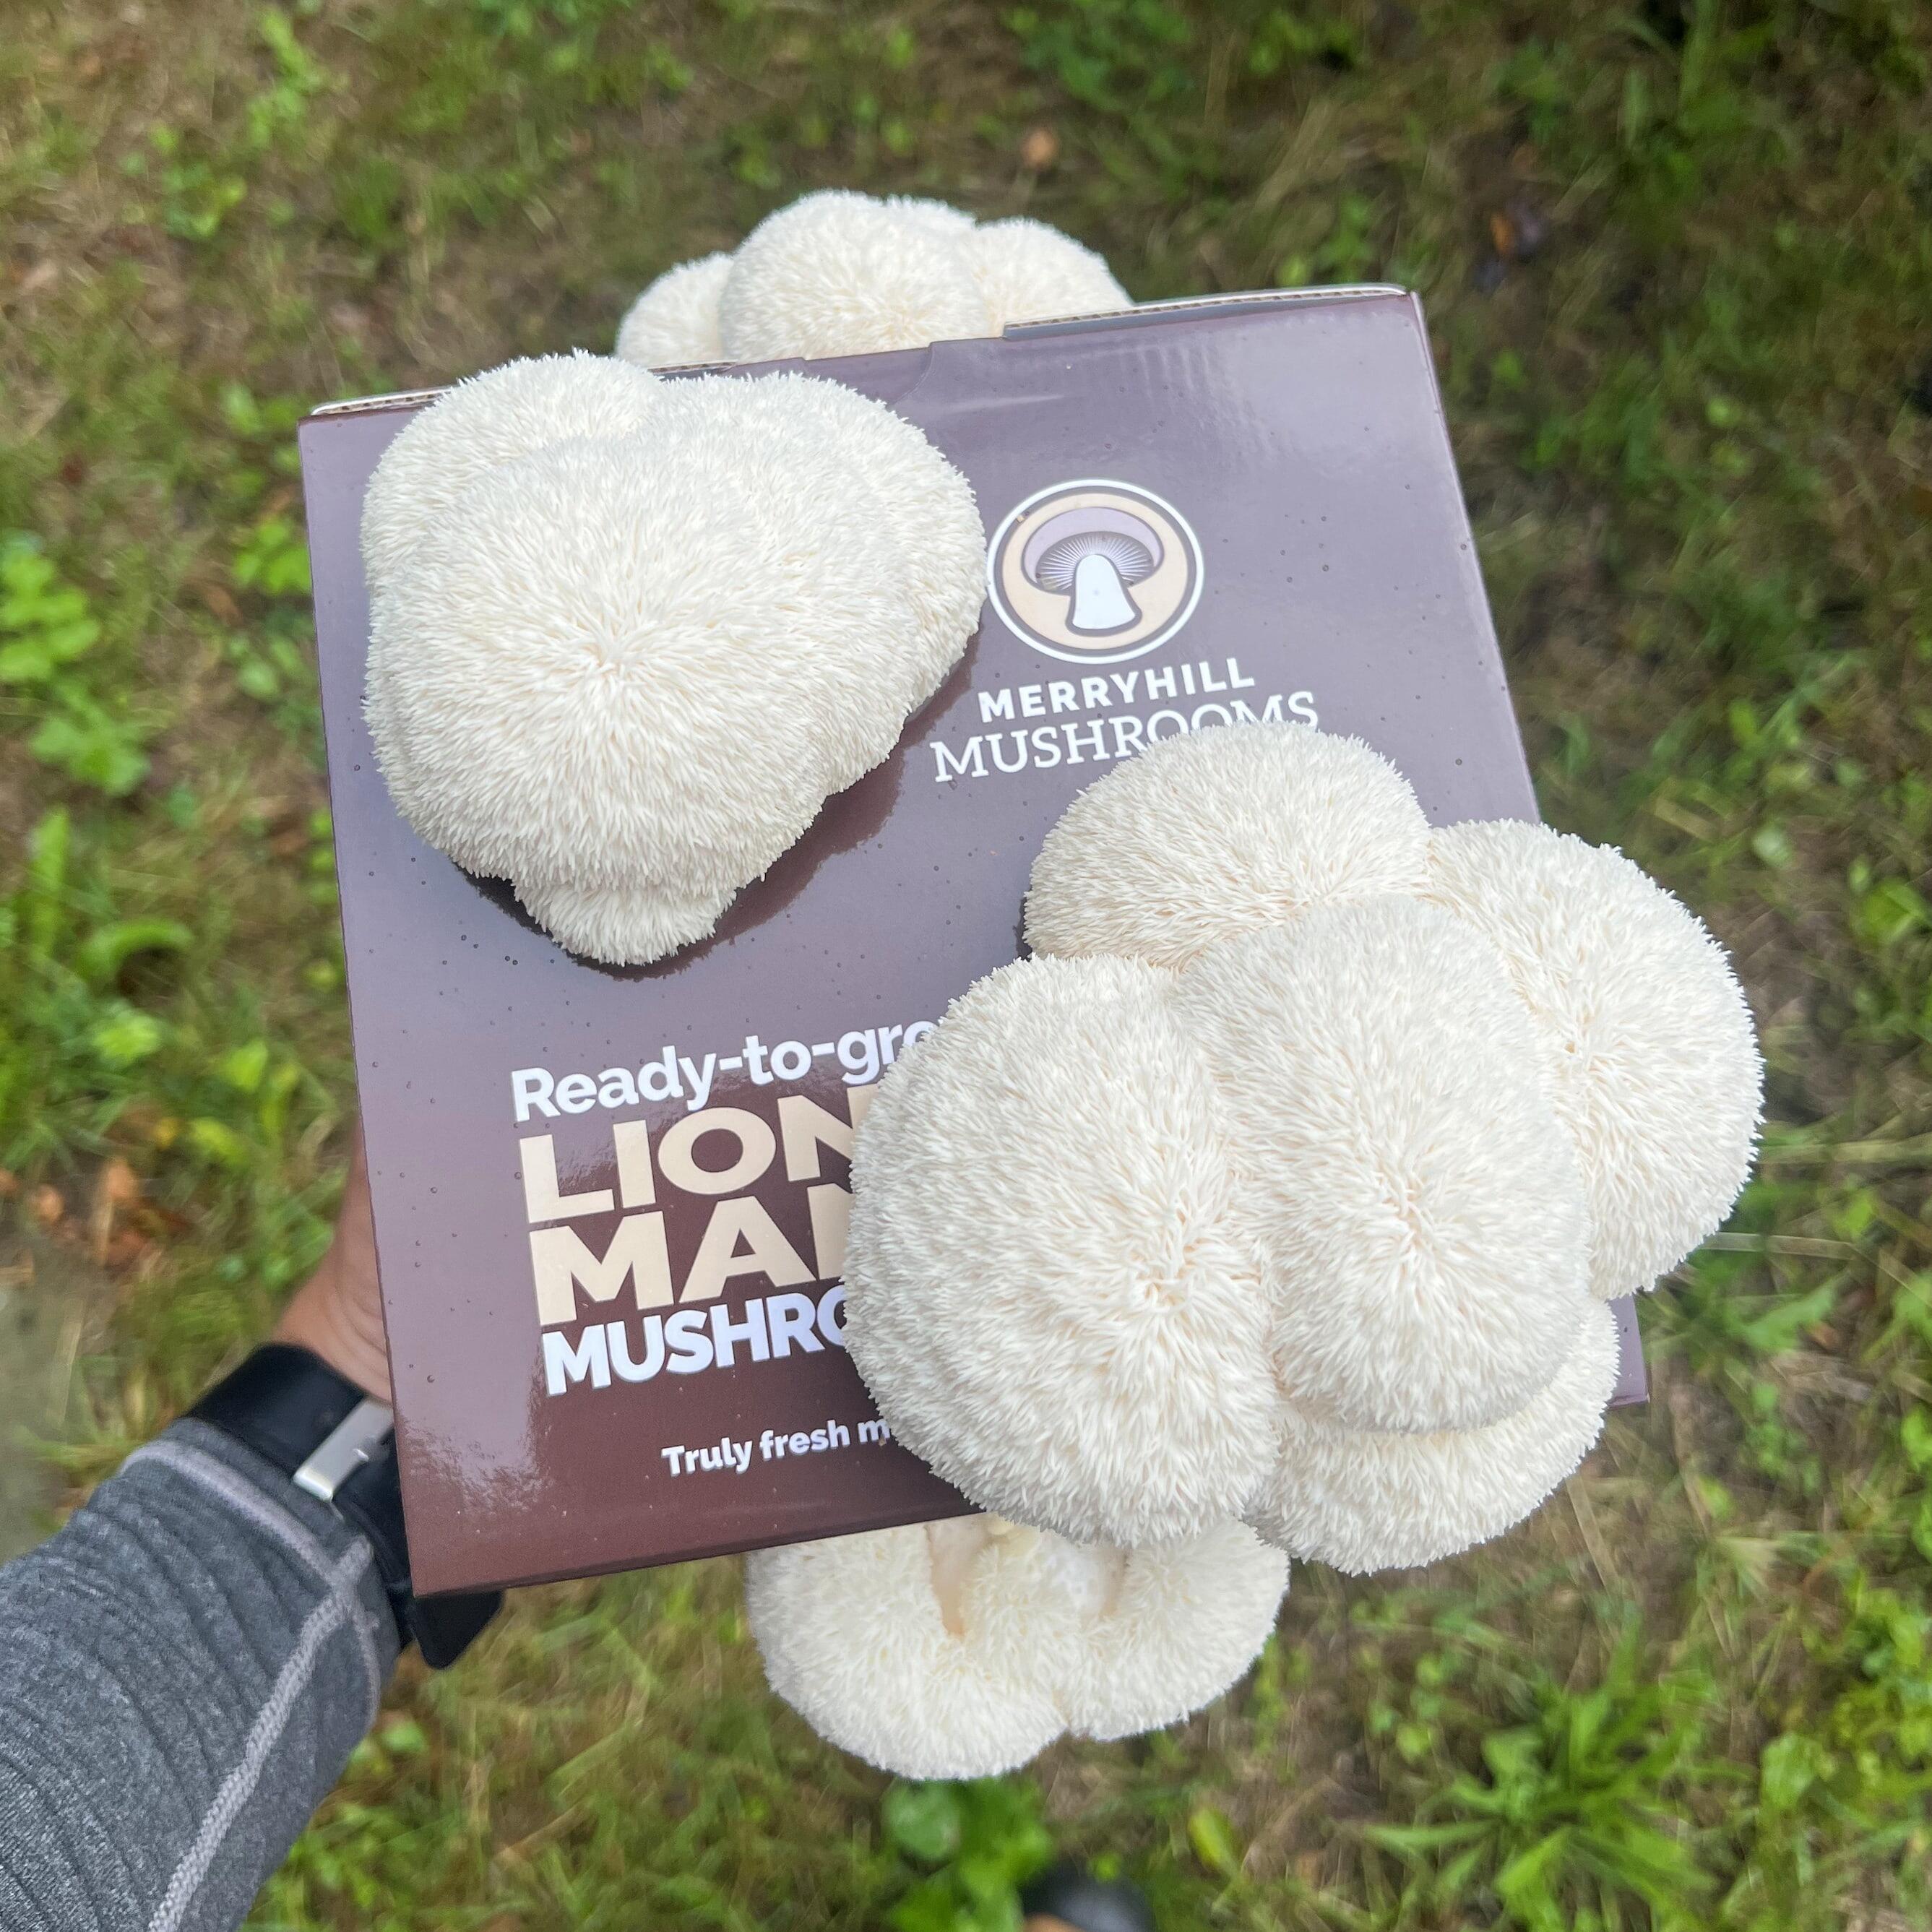
Day 7-8 - Spines begin
Spine development starts once the fruit body reaches a stronger size. The cluster becomes more recognisable as Lion's Mane as the texture changes from smooth to shaggy.
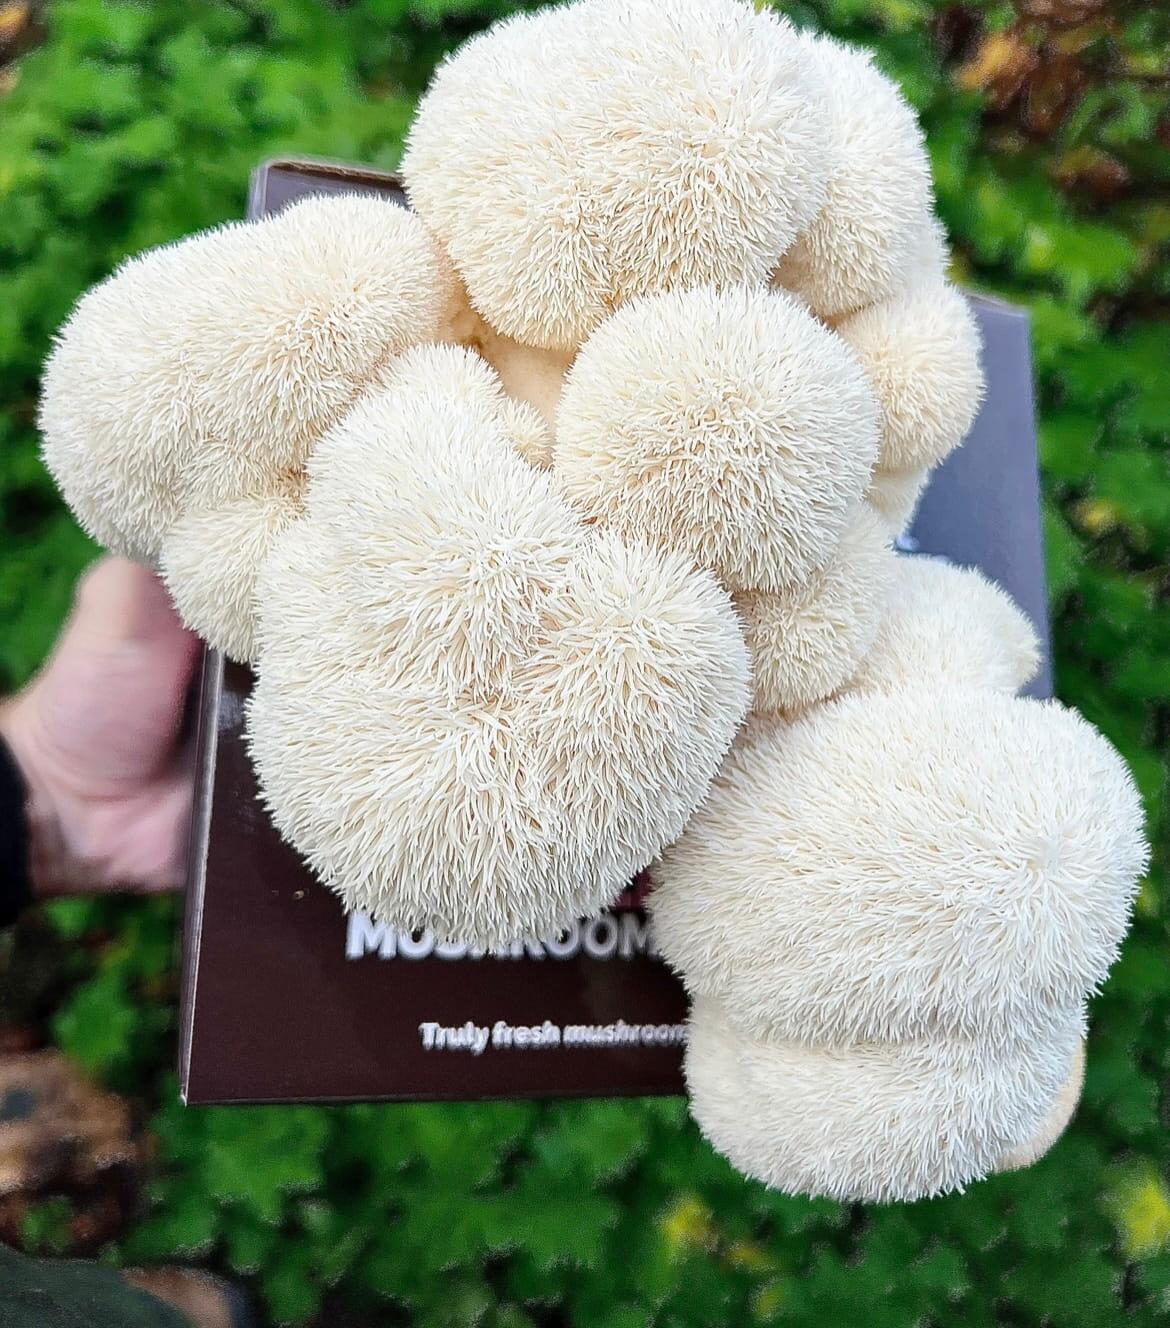
Day 8-10 - Harvest
Harvest works best when the mushroom is white, firm, and evenly formed. Long delays can lead to yellowing or drying, especially in warm rooms or under low humidity. A cut or twist at the base removes the cluster cleanly.
What should you see on a Shiitake mushroom kit from setup to picking?
Shiitake grows more steadily than Pink Oyster but still gives clear milestones across the first 10 days. Brown patches on the block are normal for this variety, so a mixed brown-and-white surface should not cause concern. The mushrooms develop a satisfying firmness when harvested at the right time.
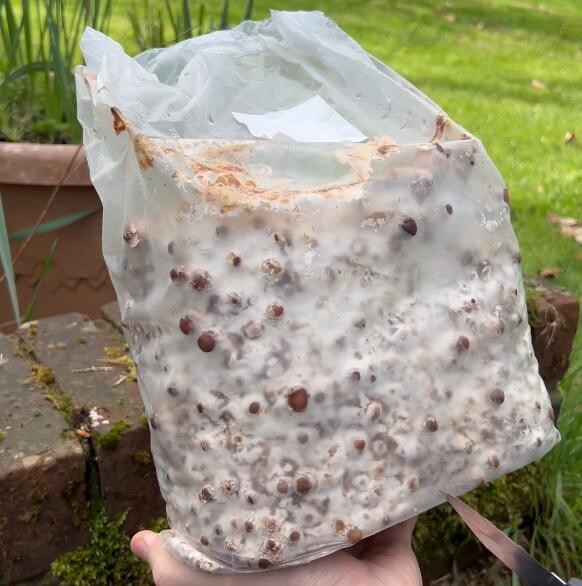
Day 1 - Setup
Setup starts with opening the kit and placing it in a cool bright room with indirect light and airflow. Brown areas on the block are part of normal Shiitake development. Misting twice a day helps maintain the right surface conditions.
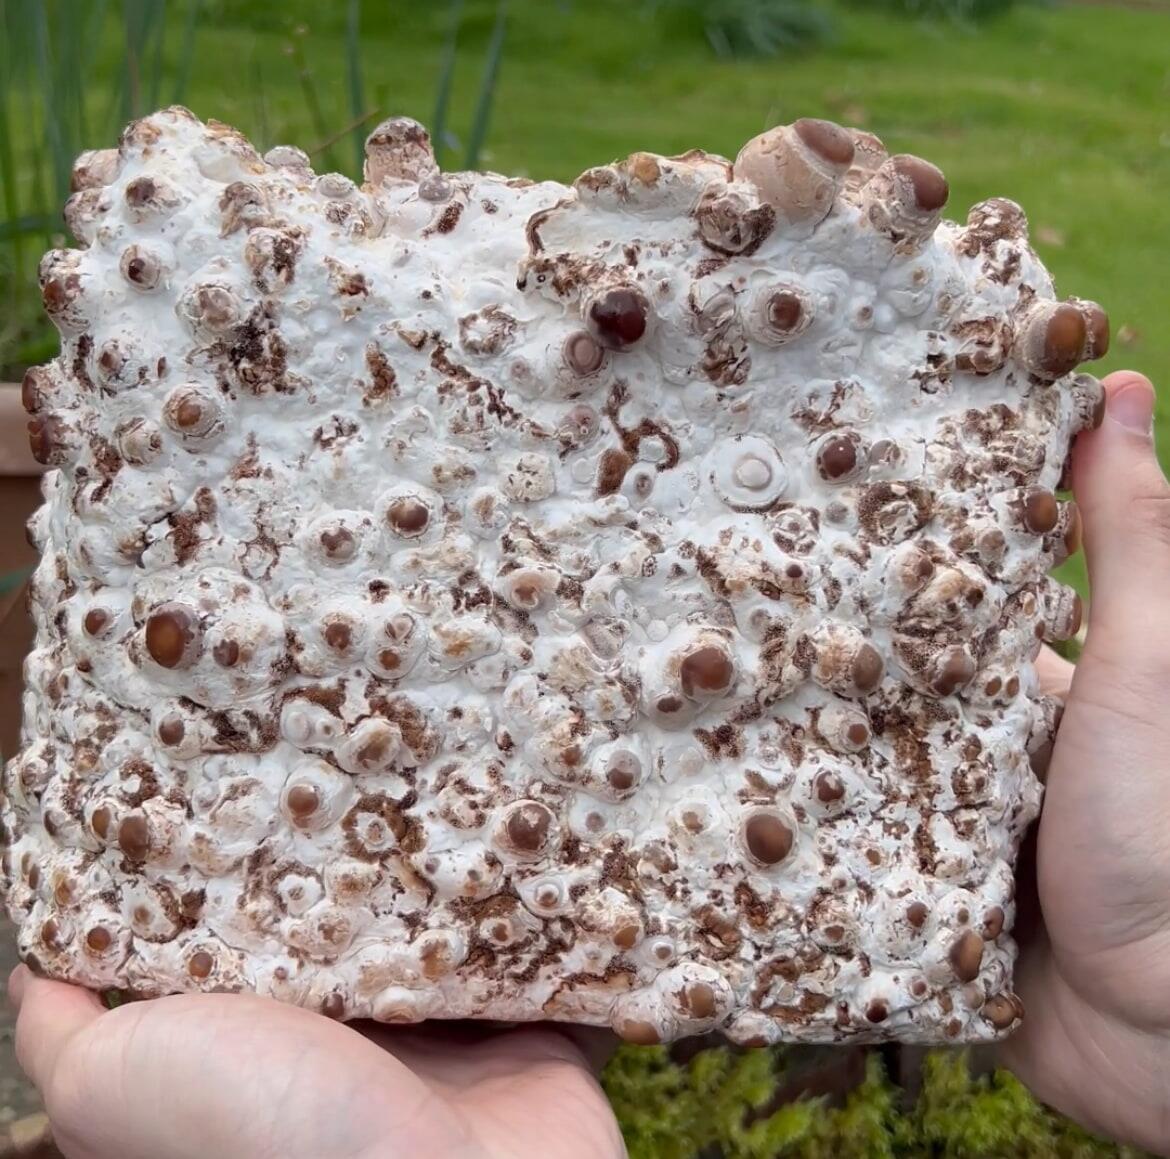
Day 2 - Pins visible
Pinheads often feel firm and look darker than many other mushroom types. Hard little bumps across the surface are a good sign that fruiting has started. Shiitake pins are darker than other varieties from the start.

Day 4-5 - Shapes become clear
Mushroom form becomes more obvious as the dark pins expand into small caps and stems. Size can change quickly over 24 hours once the first proper shapes appear.
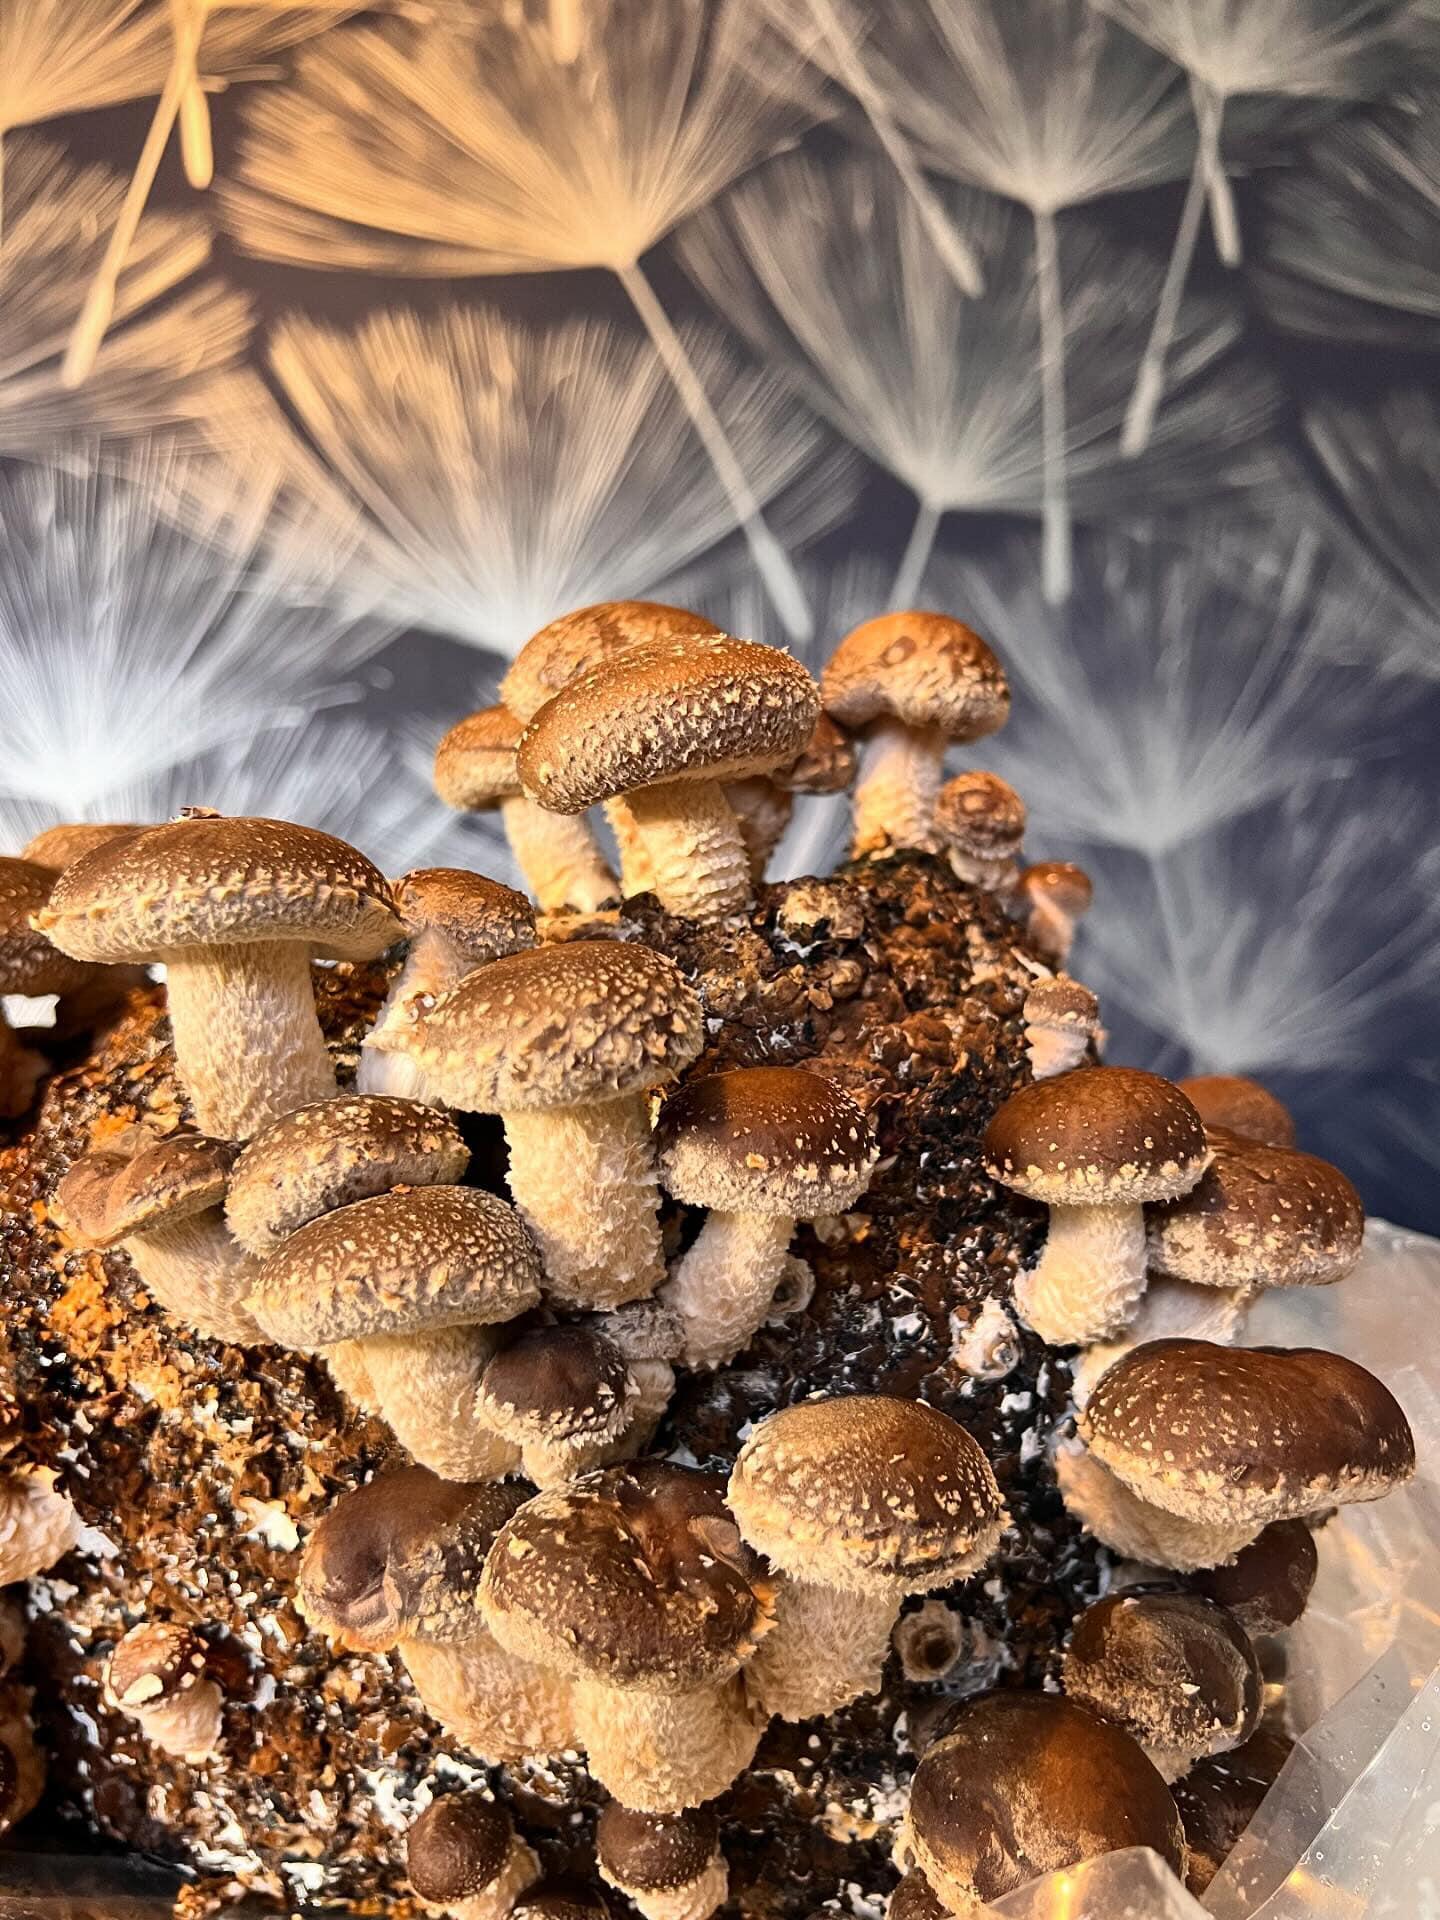
Day 6-7 - Mushrooms mature at mixed speeds
Maturity often looks uneven because some Shiitake fruit bodies move faster than others. Mixed sizing across the block is common, so patience helps smaller mushrooms catch up. Continue spraying and allow slower mushrooms time to develop.
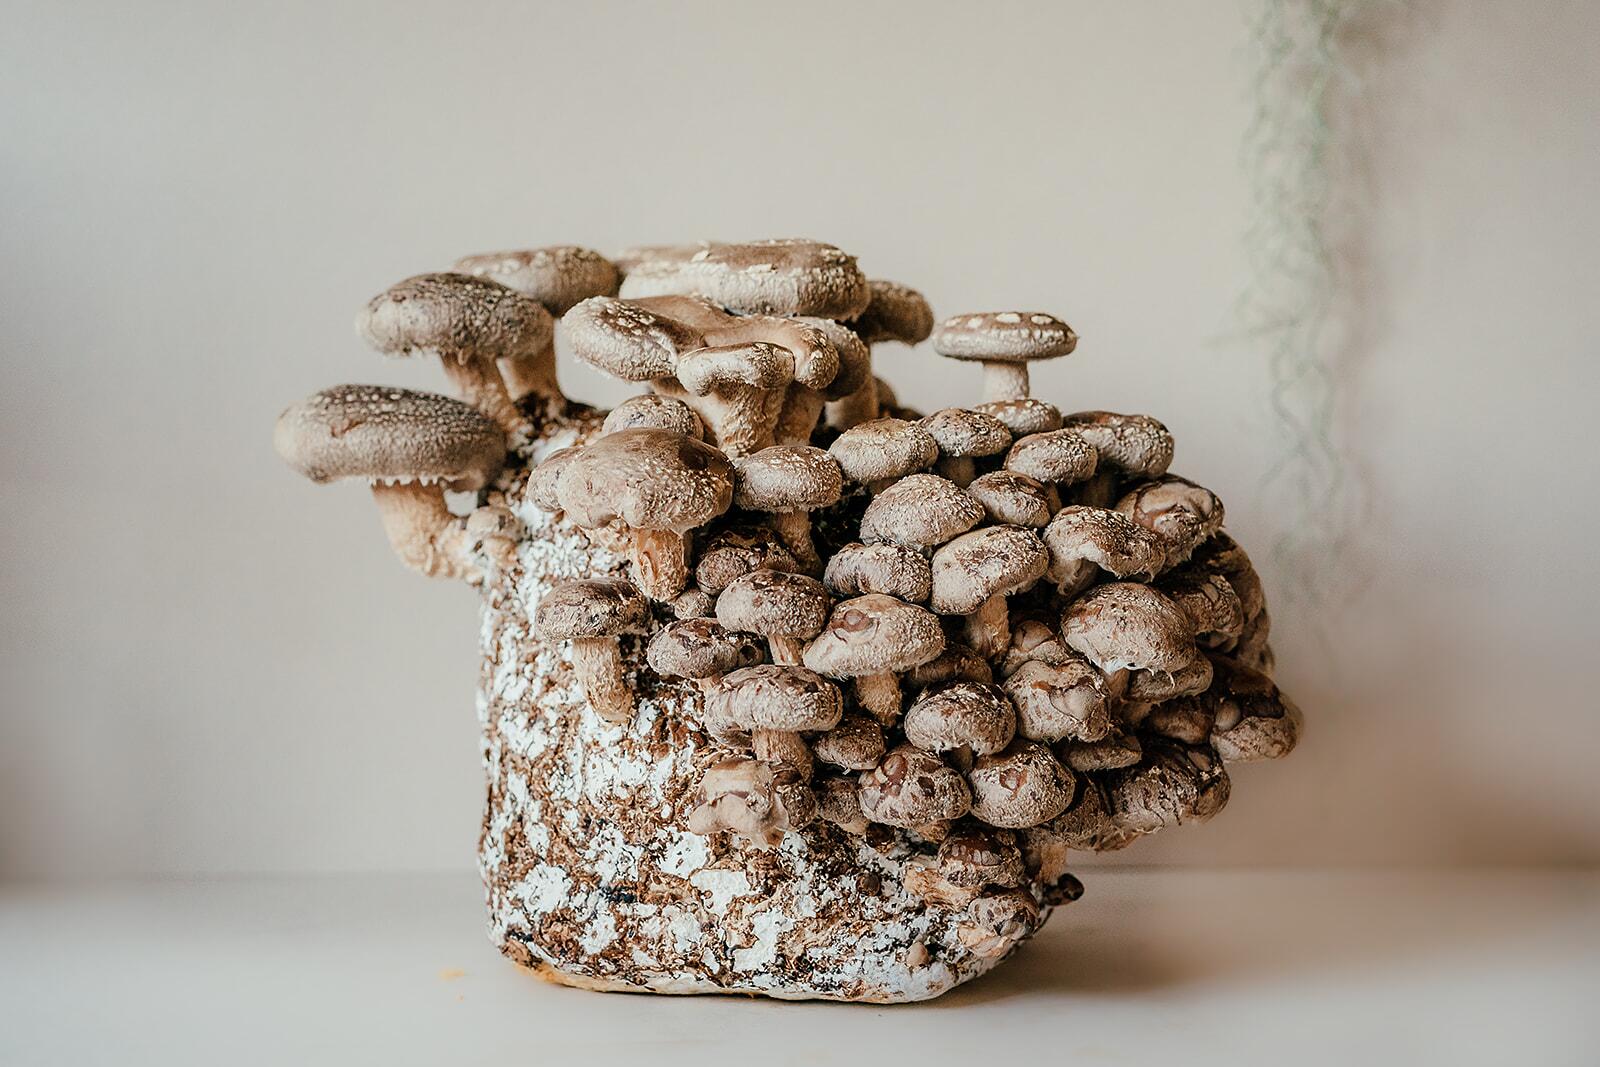
Day 8-10 - Picking point arrives
Harvest usually comes when the caps are formed and the edges still curl slightly under. A fully flattened cap often means the best picking point has already passed. Twist gently or cut at the base for a clean result.
How does a King Oyster mushroom kit develop during the first flush?
King Oyster produces thick stems and smaller caps, so the timeline looks very different from a standard oyster cluster. Stem size matters most with this variety because the dense meaty base is the part many growers want for cooking. The stems can be sliced into medallions for searing, shredded for "scallop-style" cooking, or roasted whole. The full King Oyster growing guide covers the setup process.
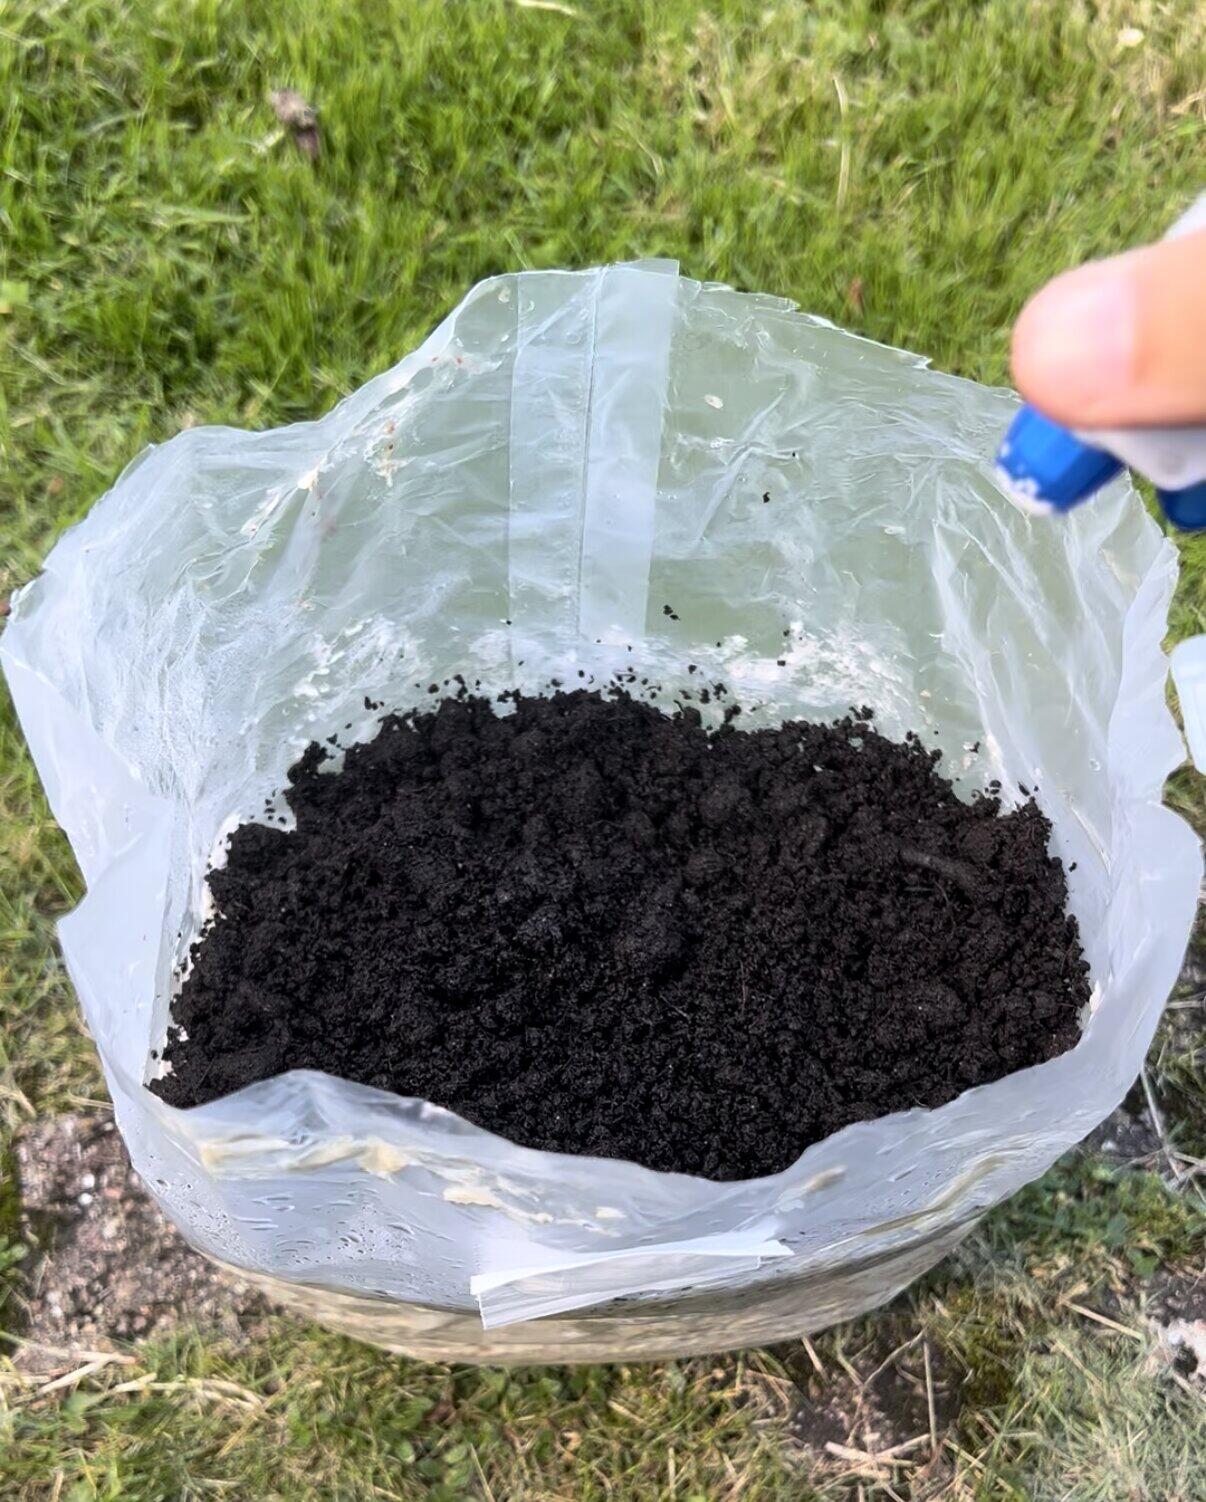
Day 1 - Setup
Setup begins with placing the kit in a cool room with indirect light and fresh air. Healthy white mycelium should already be visible in the block. Begin misting twice daily to keep the environment favourable.

Day 2-4 - Pins push through
Pinning often starts through the topsoil or surface layer rather than from a side opening. Small shapes begin to emerge and become easier to spot each day.
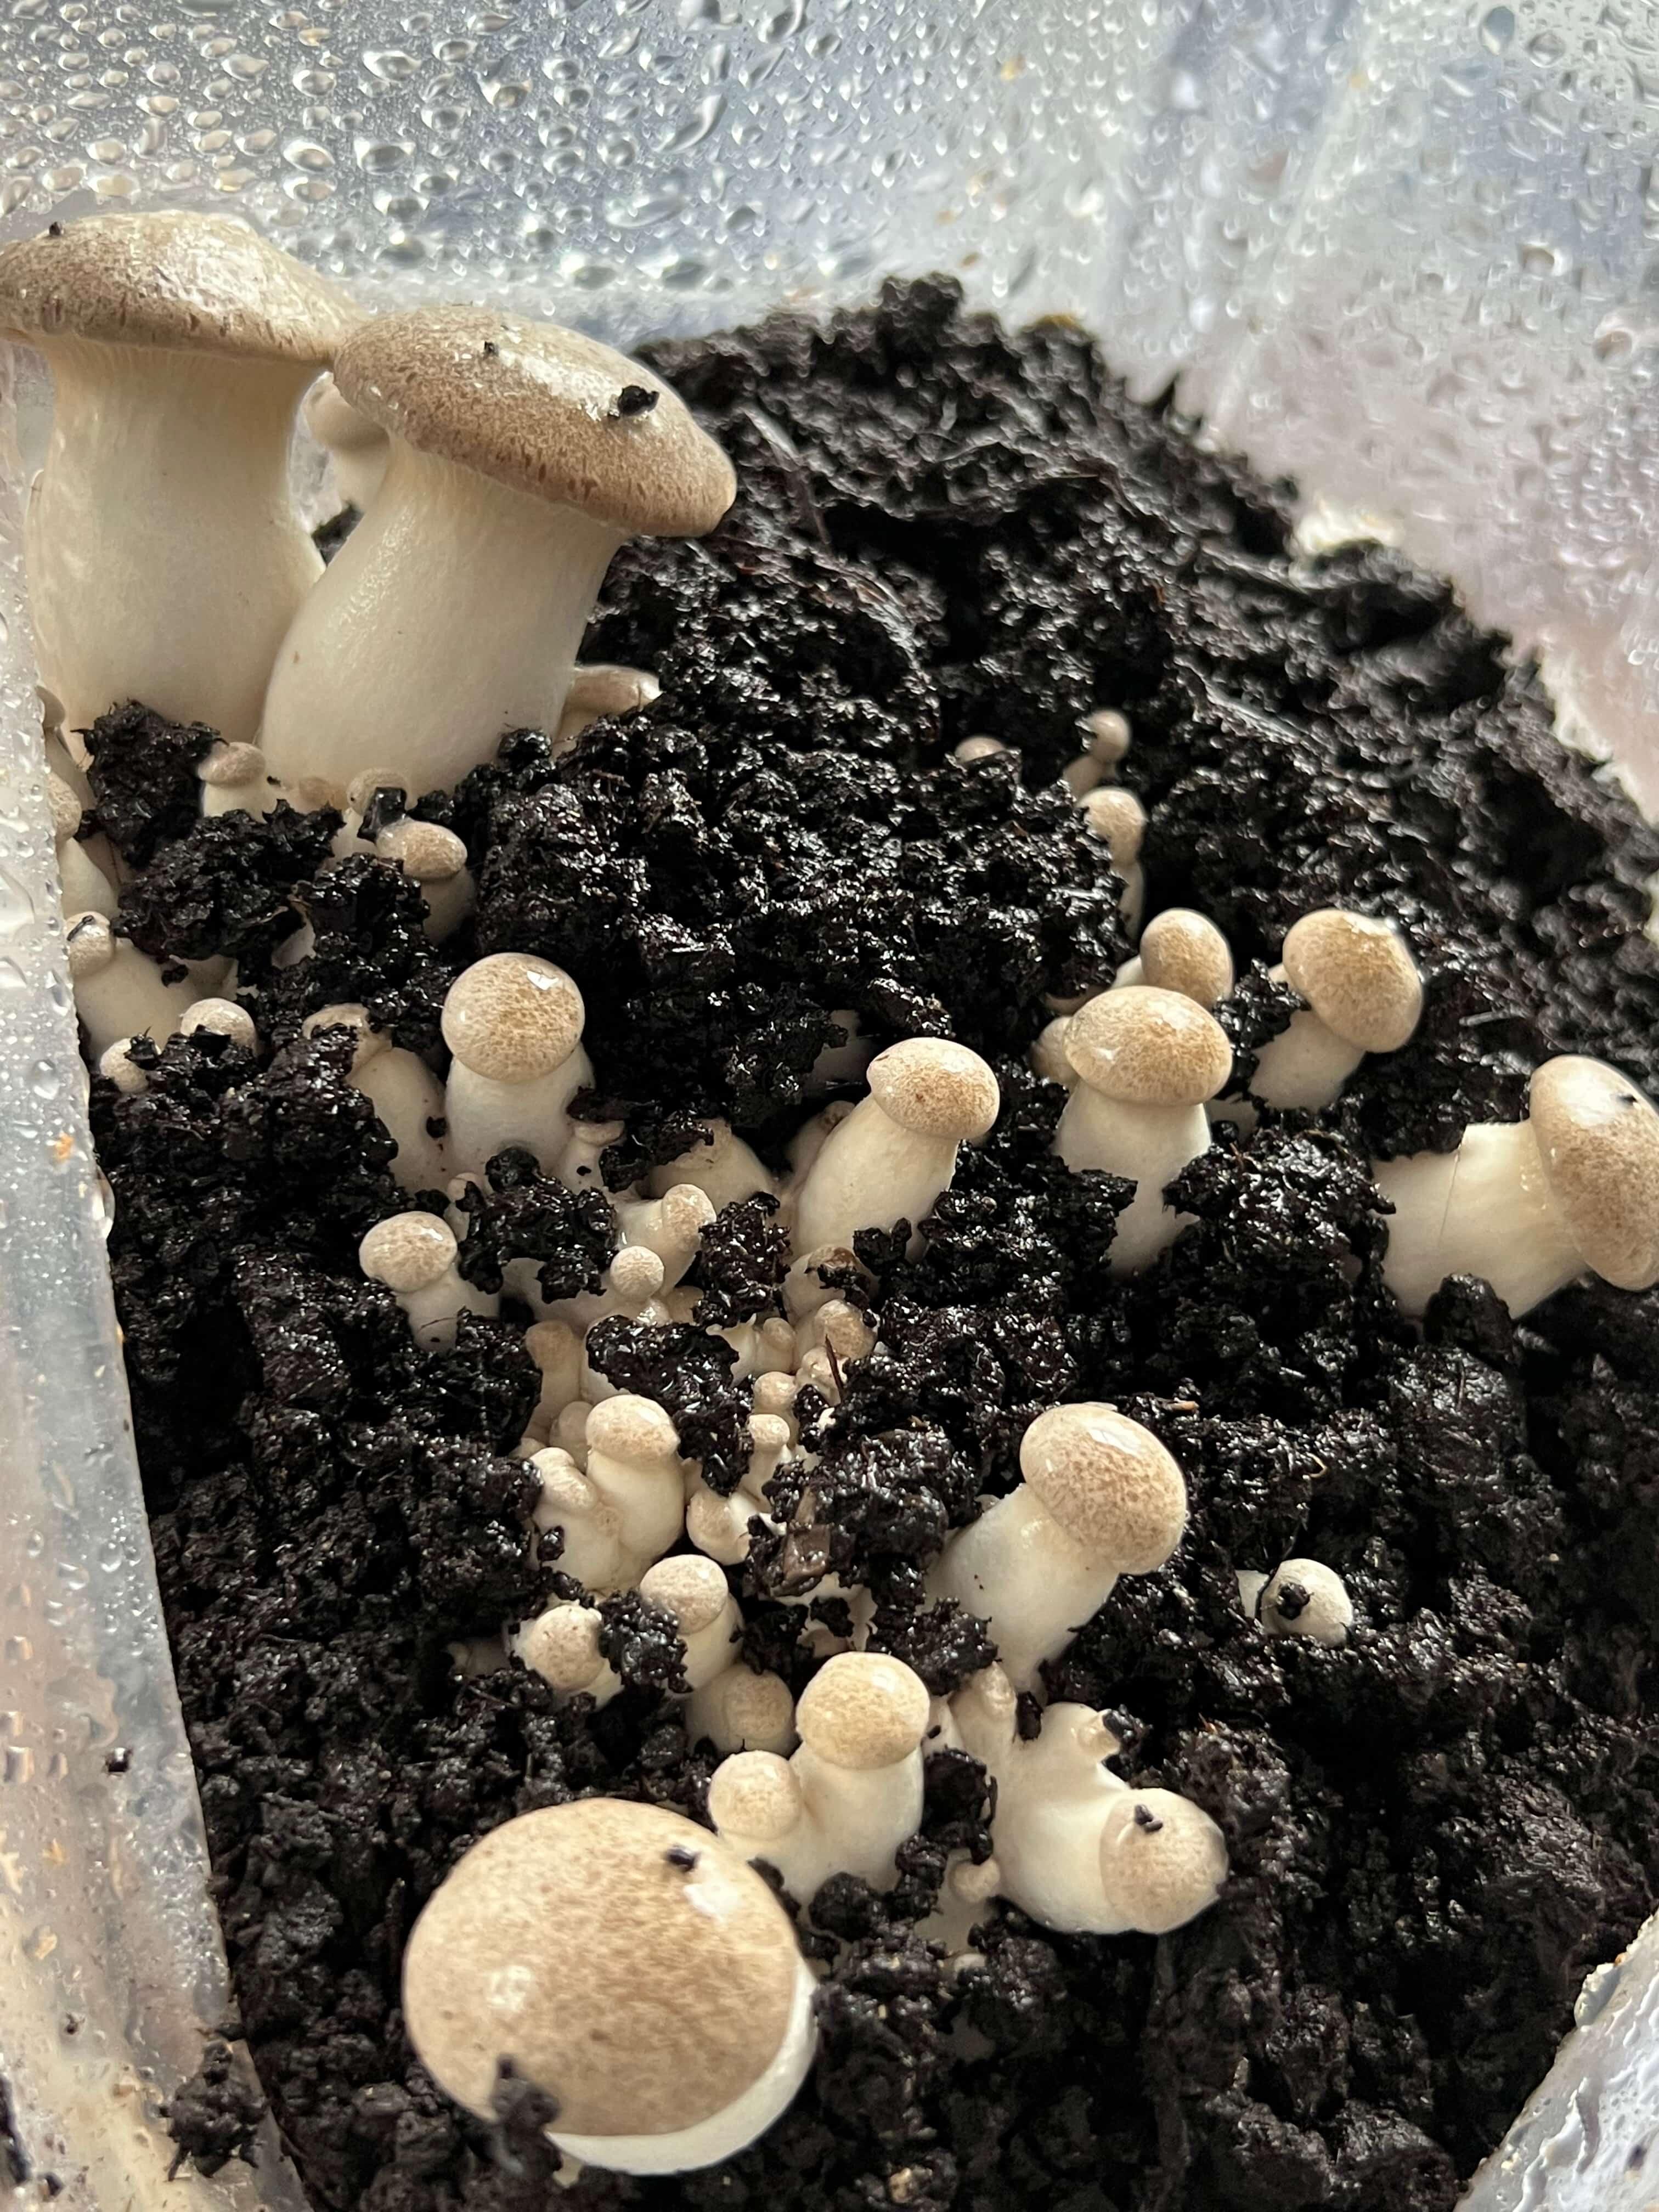
Day 5-6 - Stems thicken
Shape development becomes clearer as short chunky stems begin forming. King Oyster pins usually look larger and heavier than standard oyster pins, even at an early stage. Continue misting and maintain stable conditions.
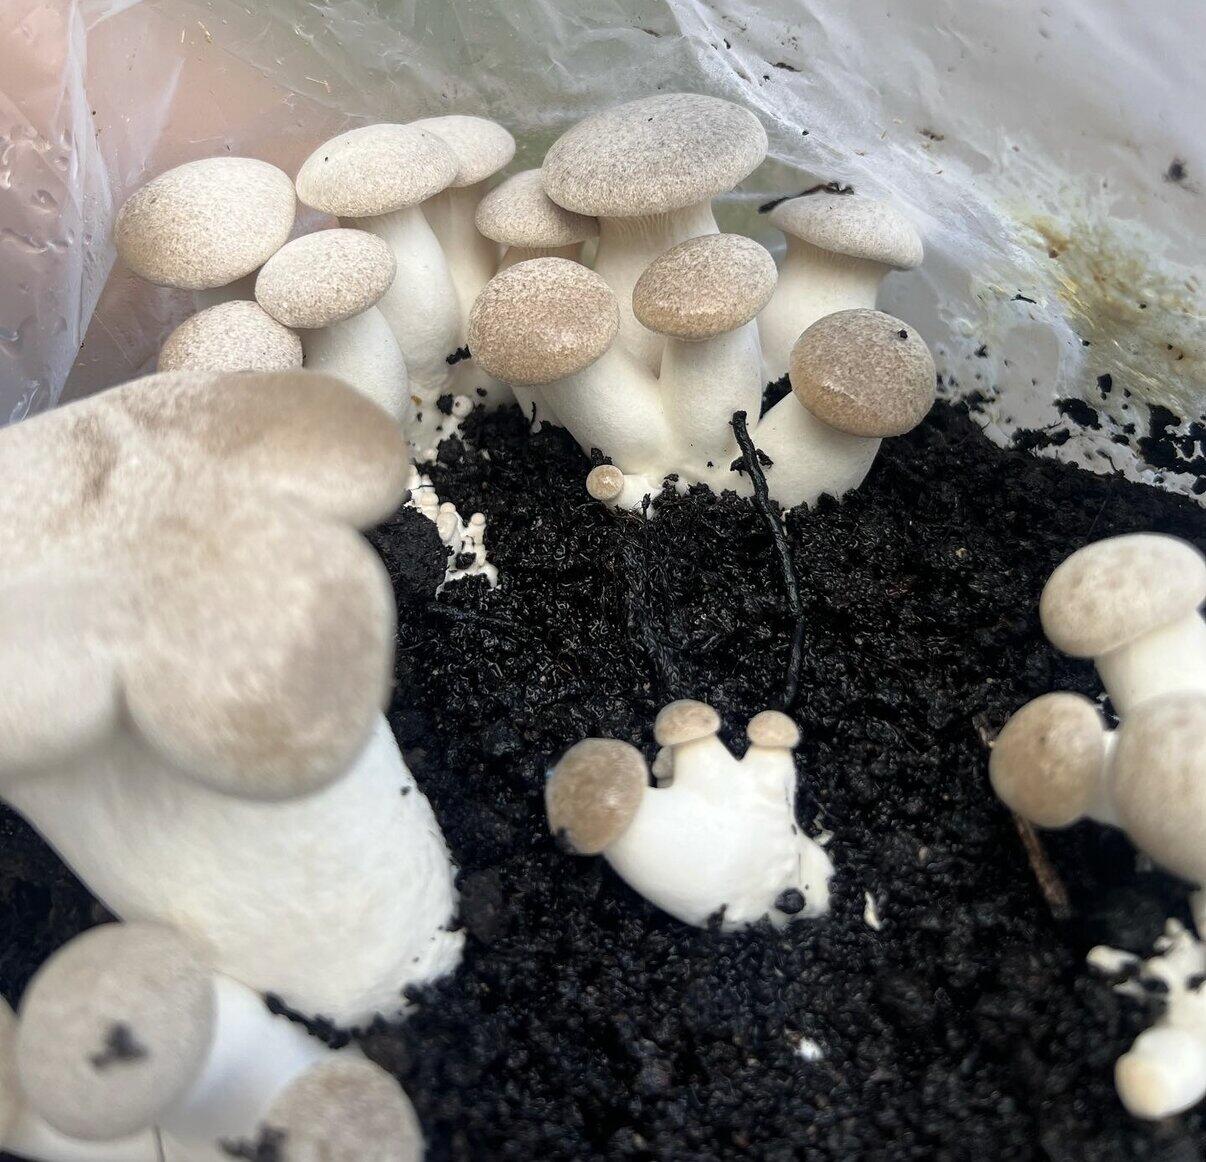
Day 6-7 - Growth continues
Mushroom bodies rise at different speeds and start taking on a recognisable stem-and-cap form. Stable airflow and regular moisture help prevent stalling during this stage.
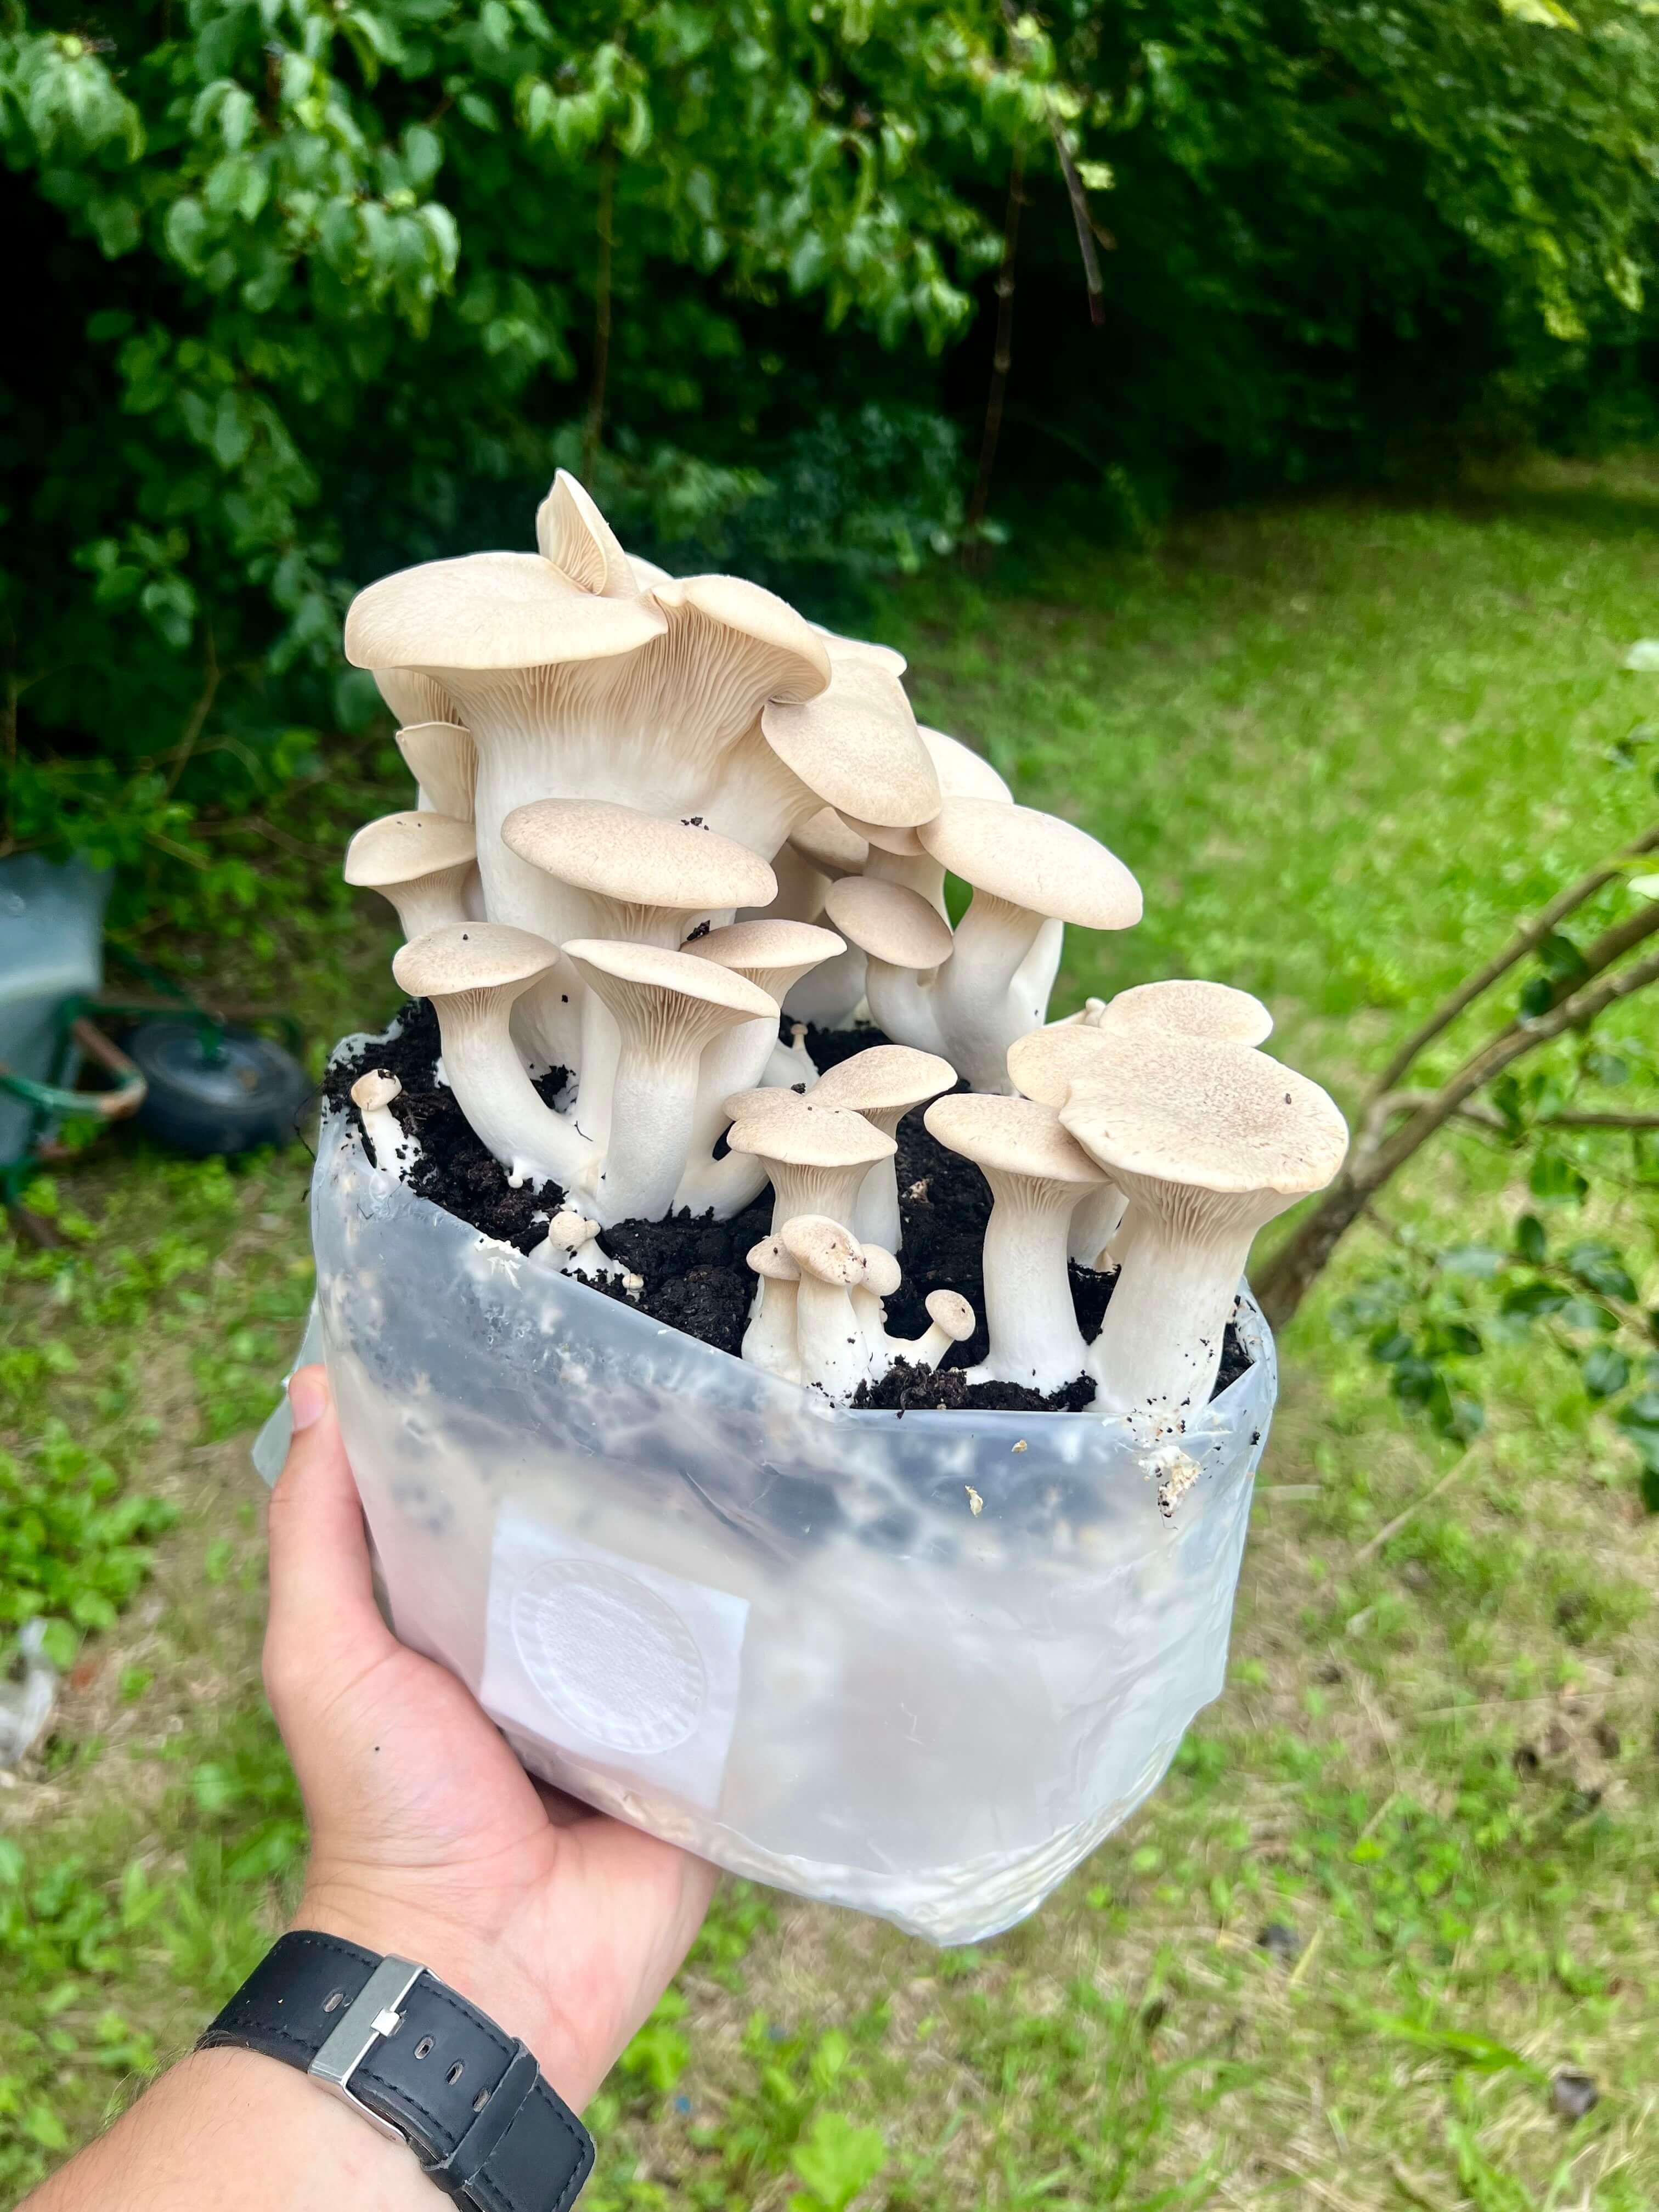
Day 8-10 - Harvest
Harvest works best when the stems feel firm, thick, and dense, with small flatter caps on top. A clean cut at the base gives the neatest removal and protects the rest of the surface.
What timeline should you expect from a Black Pearl Oyster kit?
Black Pearl Oyster behaves like a close relative of King Oyster, but the setup and pace can differ because this kit uses a log-style format with wrapper, plate, and topsoil rather than the standard three-hole lid box. First harvest usually takes longer than Pink Oyster or Shiitake.
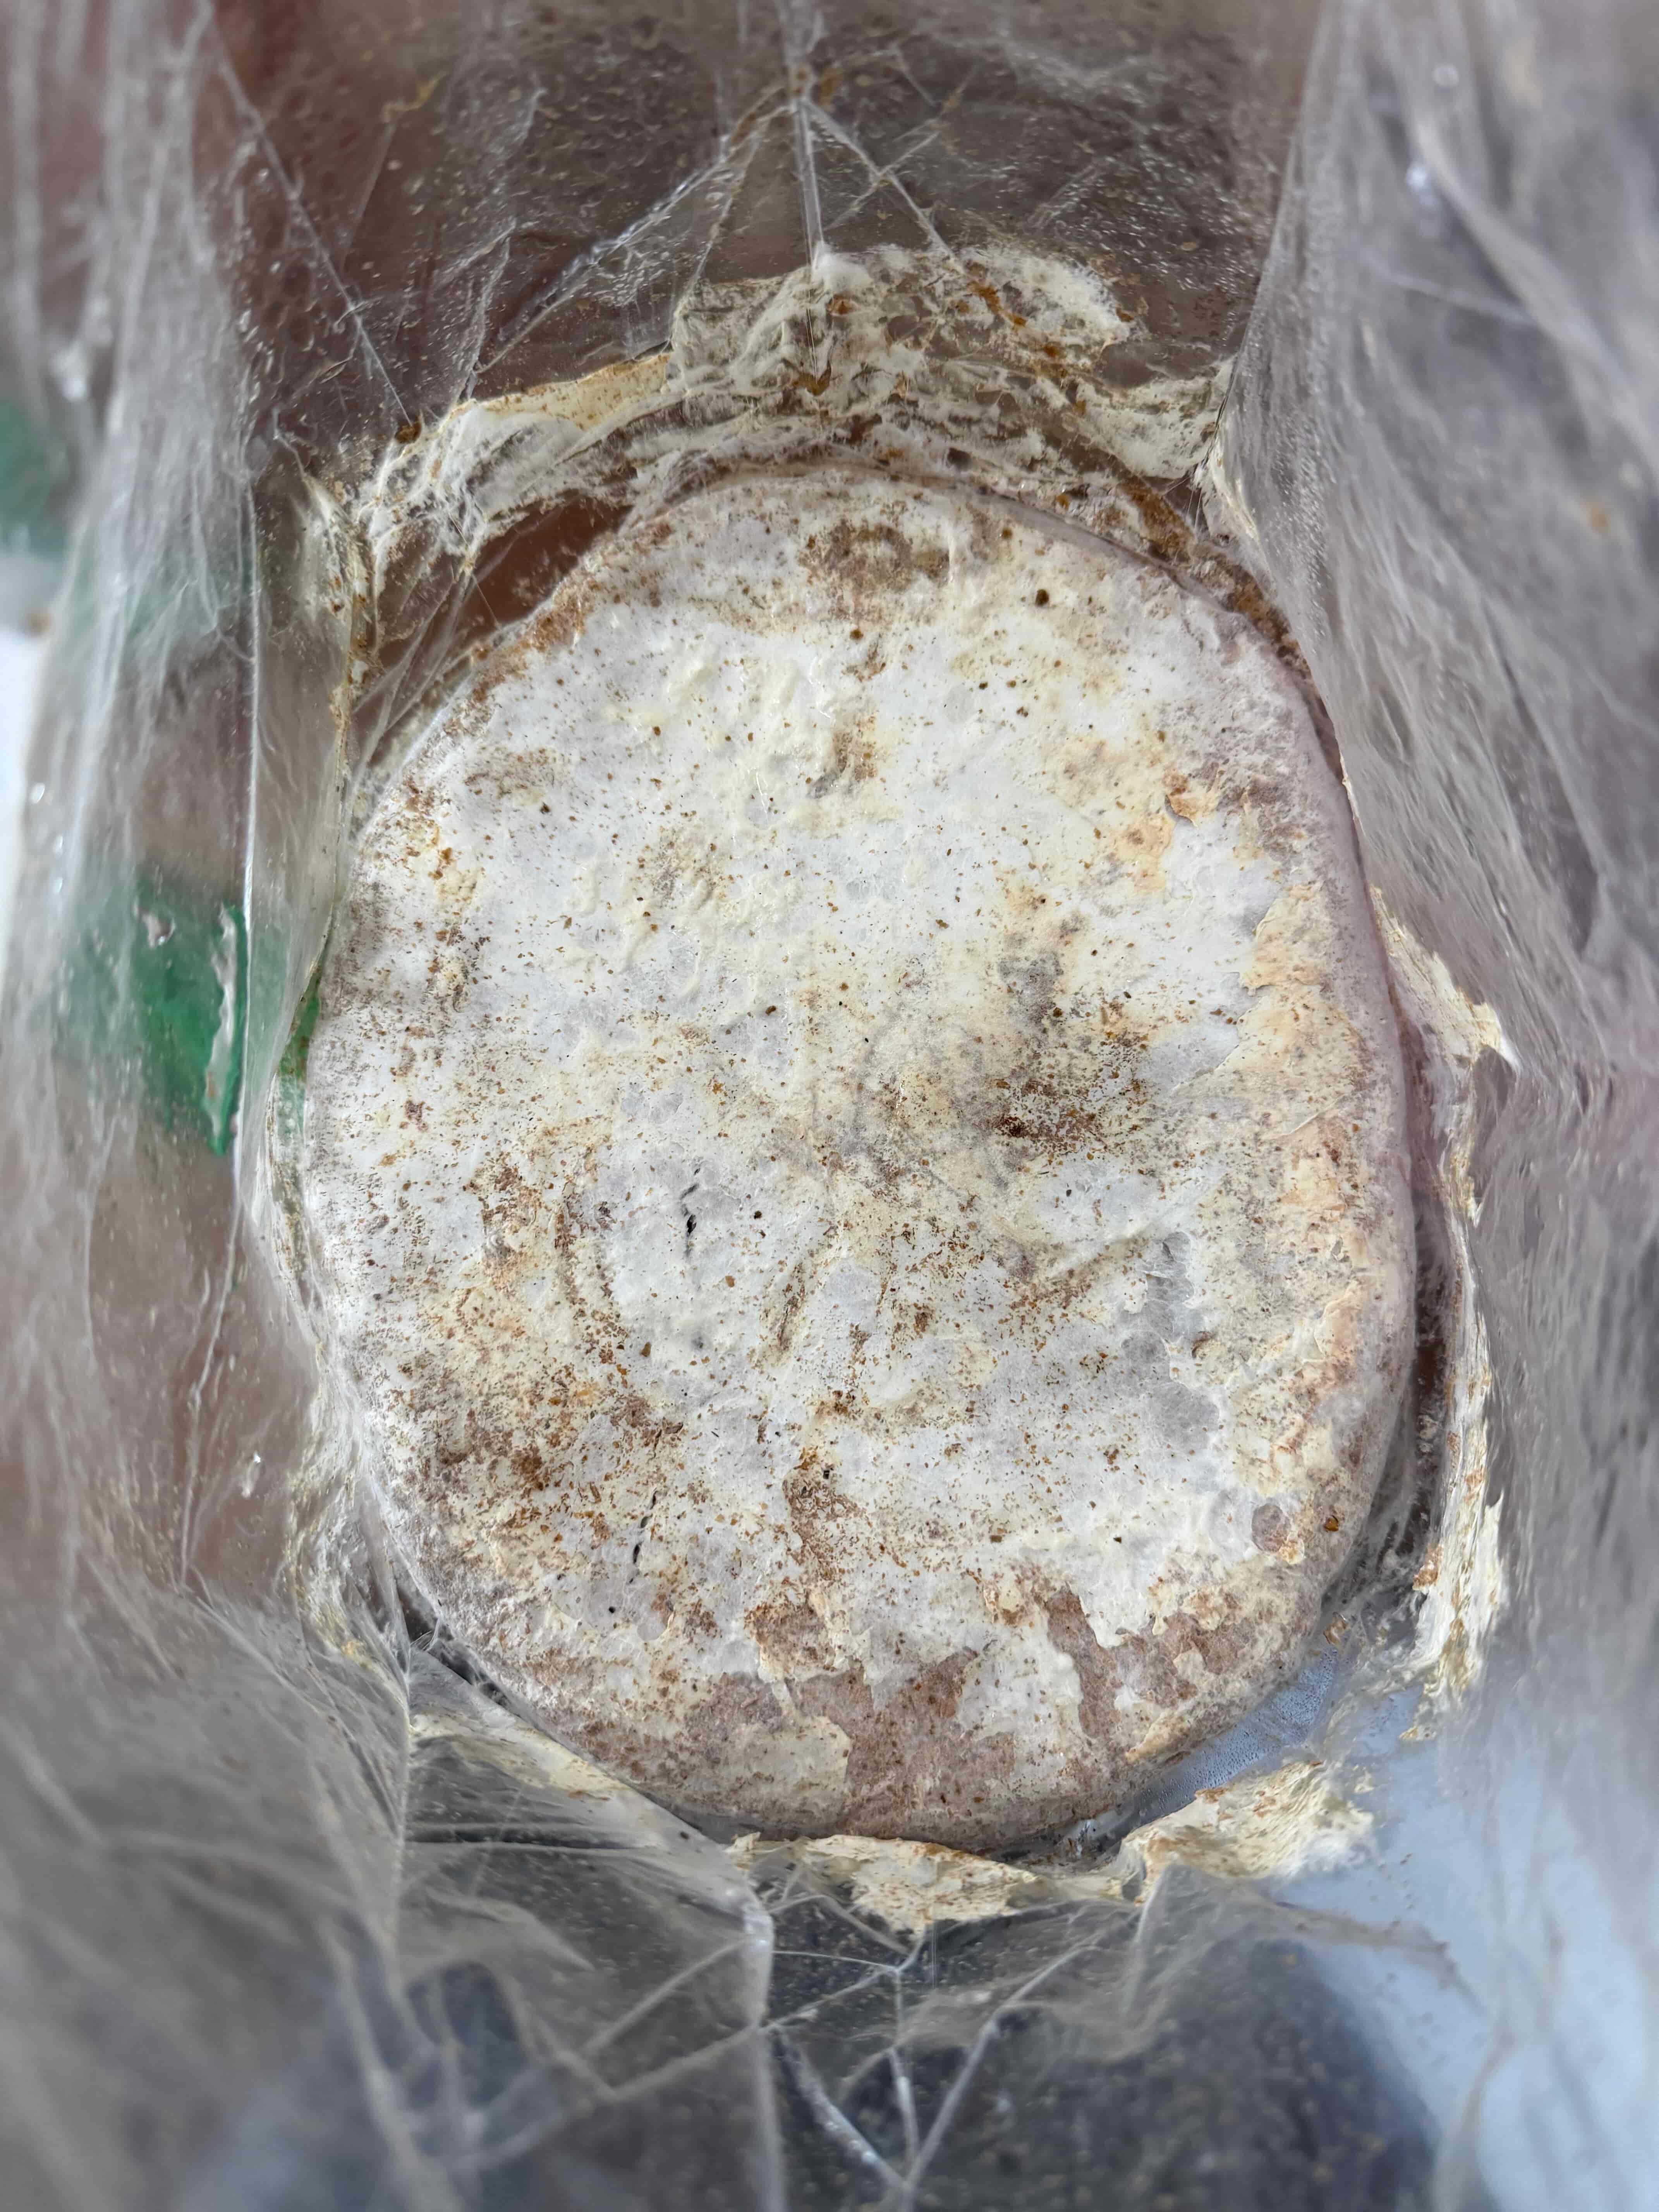
Day 1 - Setup
Setup starts by following the Black Pearl growing method for the log-style kit. Healthy white mycelium is usually visible, and the block should sit in a cool room with indirect light and steady airflow. Begin misting twice daily.
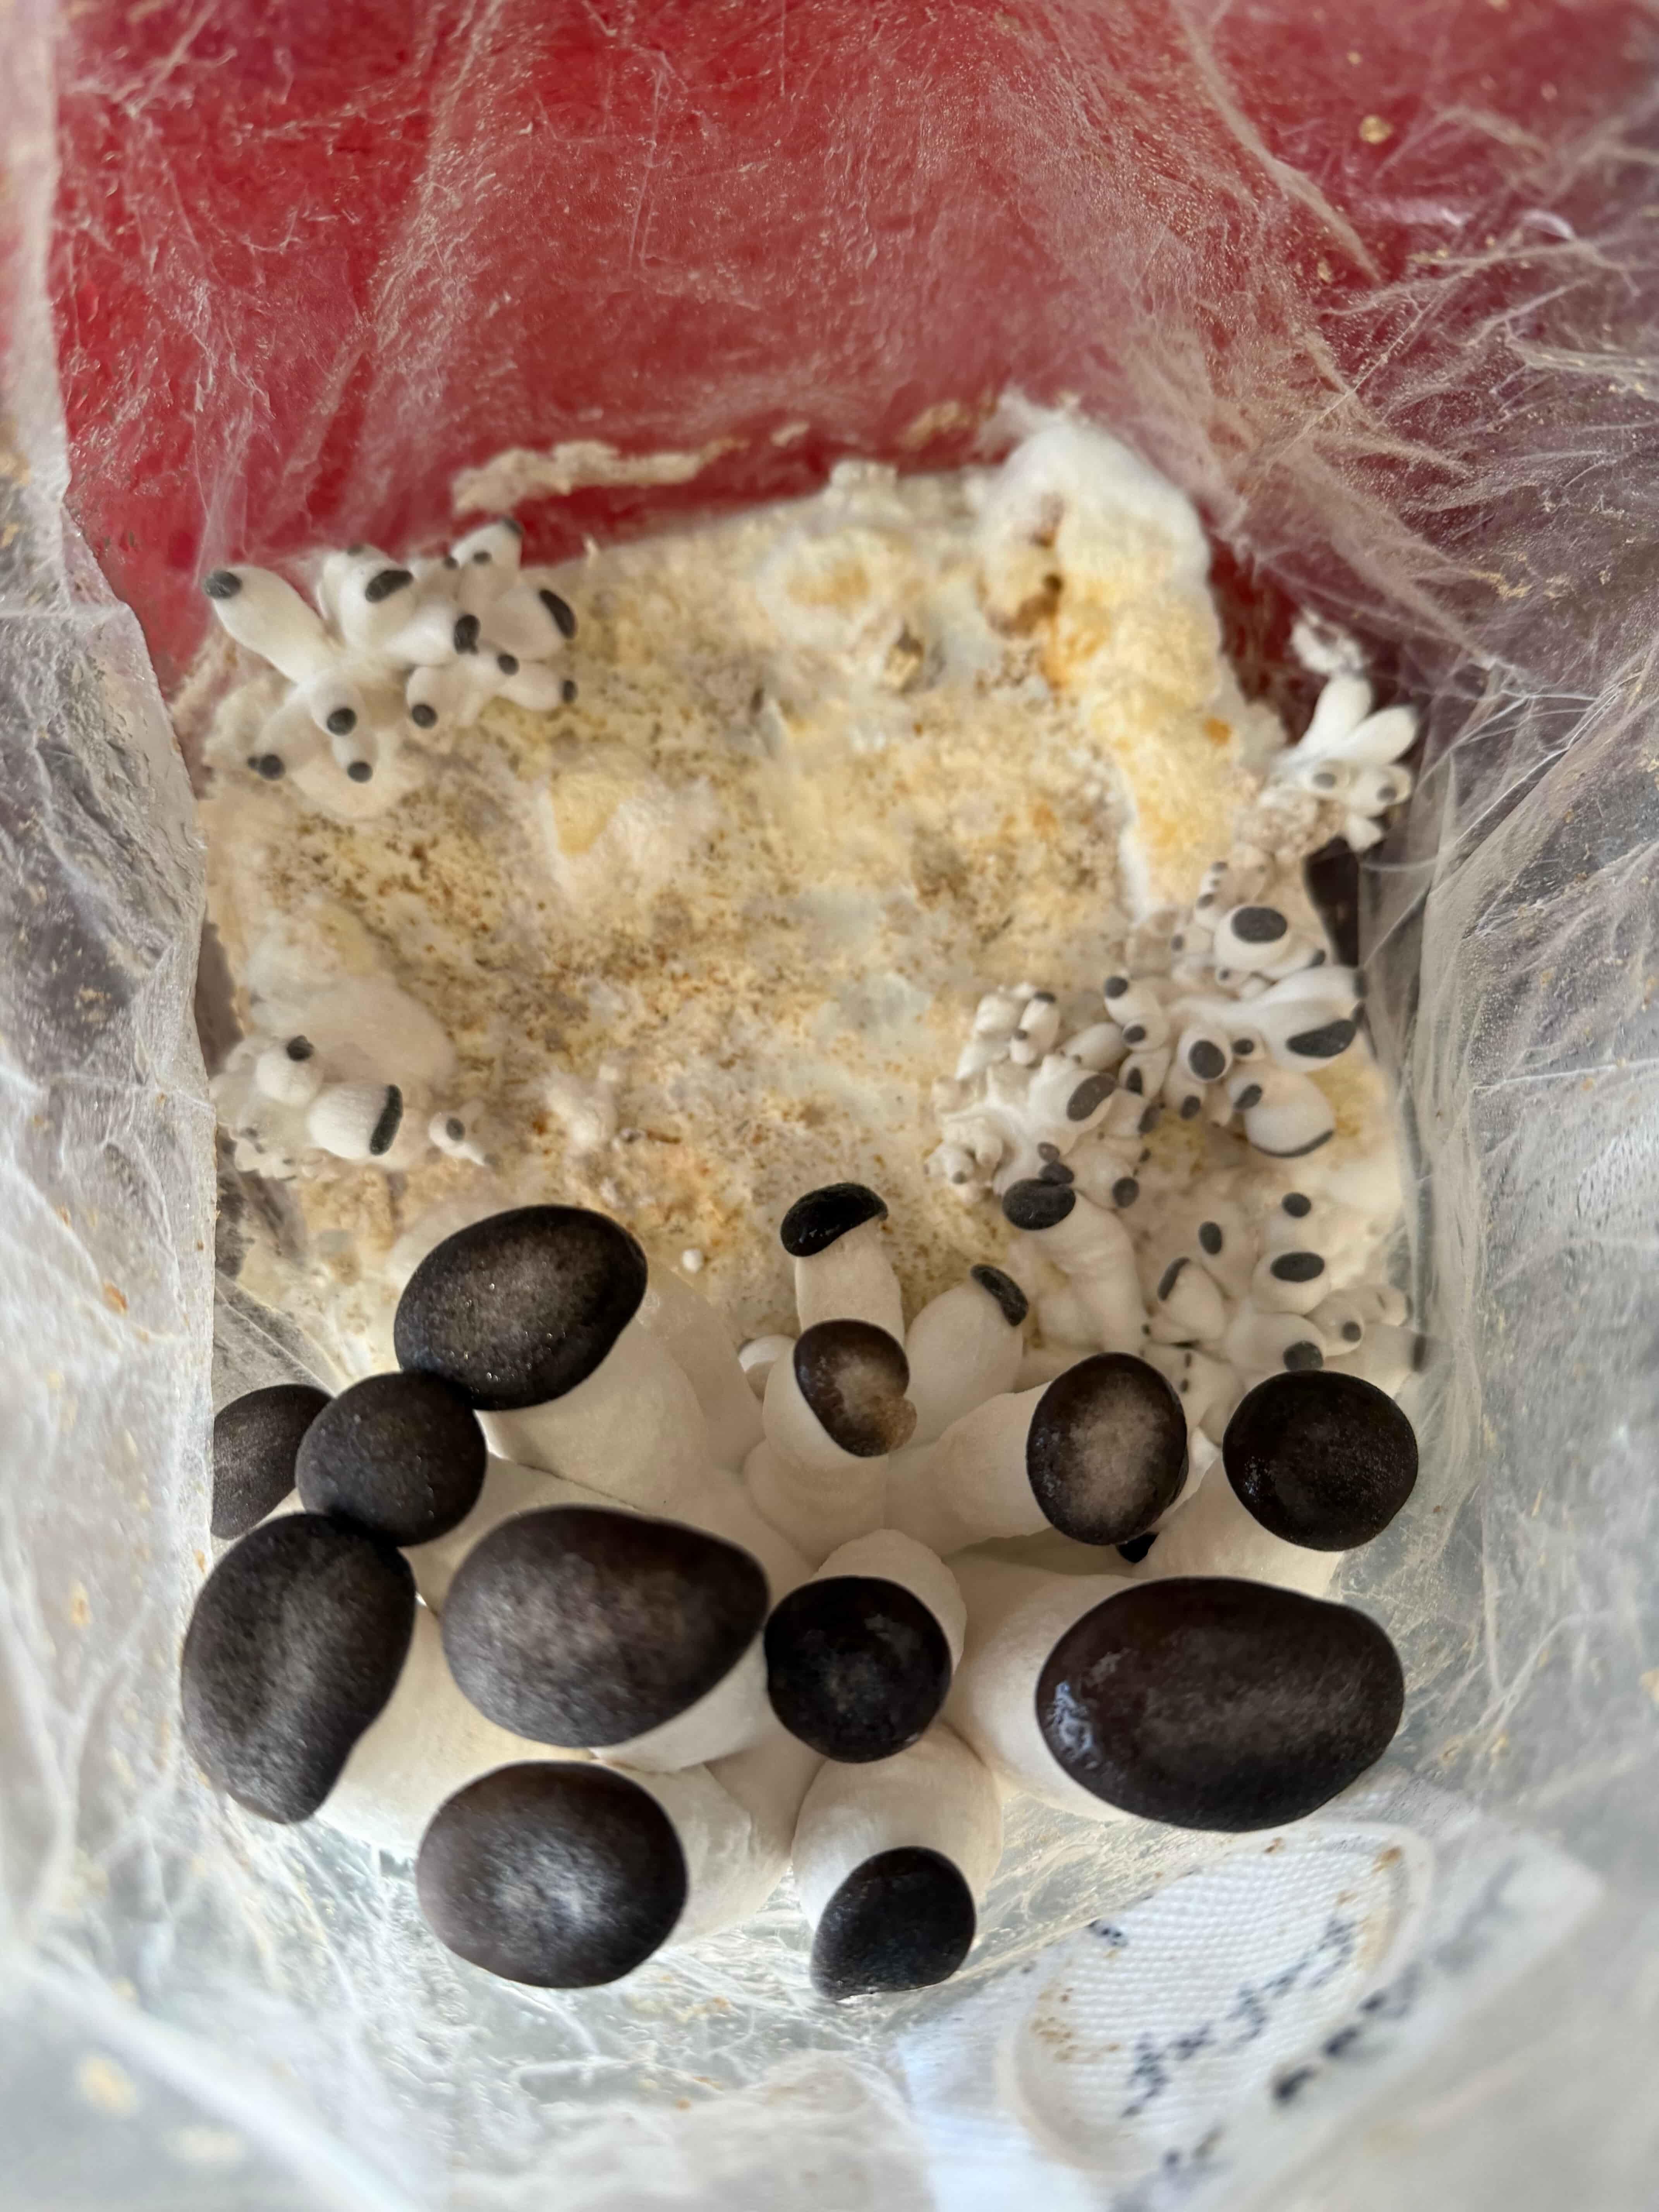
Day 5-10 - Pins form
Pinning often starts more slowly than in faster oyster varieties. Small heads can appear at different points across the compost and may not emerge evenly.
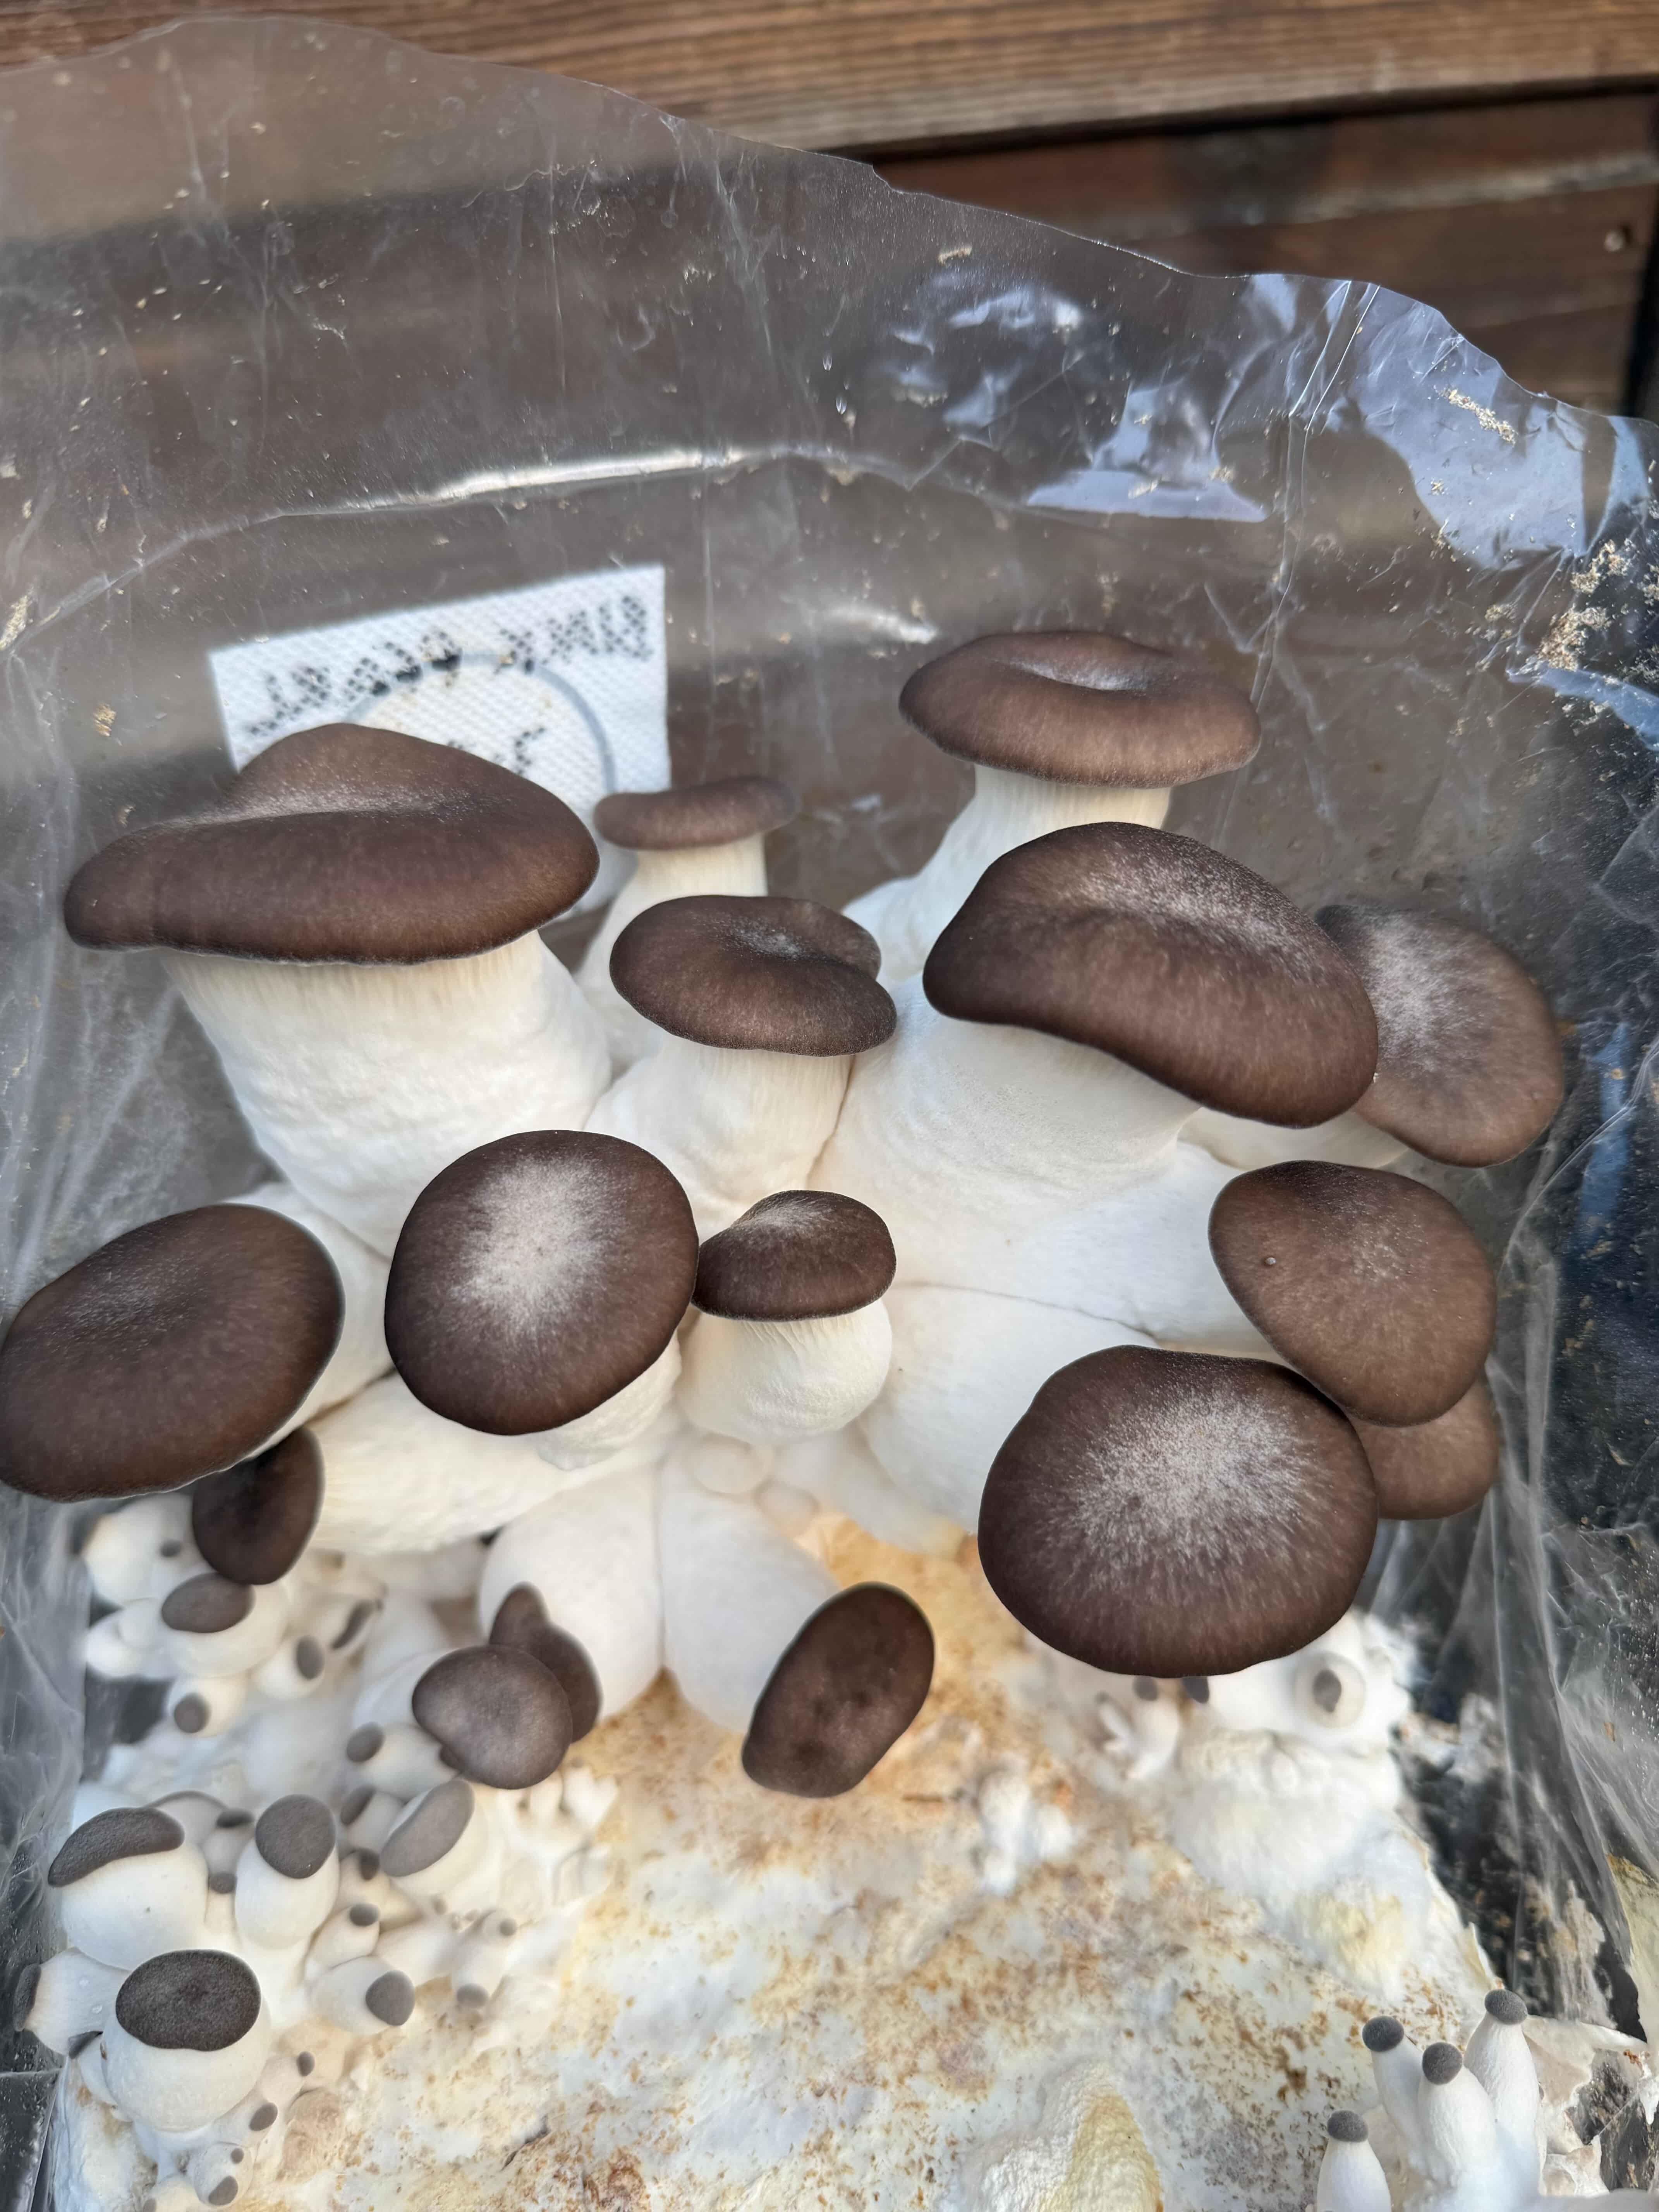
Day 11-12 - Mushrooms take shape
Shape development becomes clearer as dark-capped young mushrooms begin to lengthen and thicken. Overnight change can be strong once the first proper forms appear.
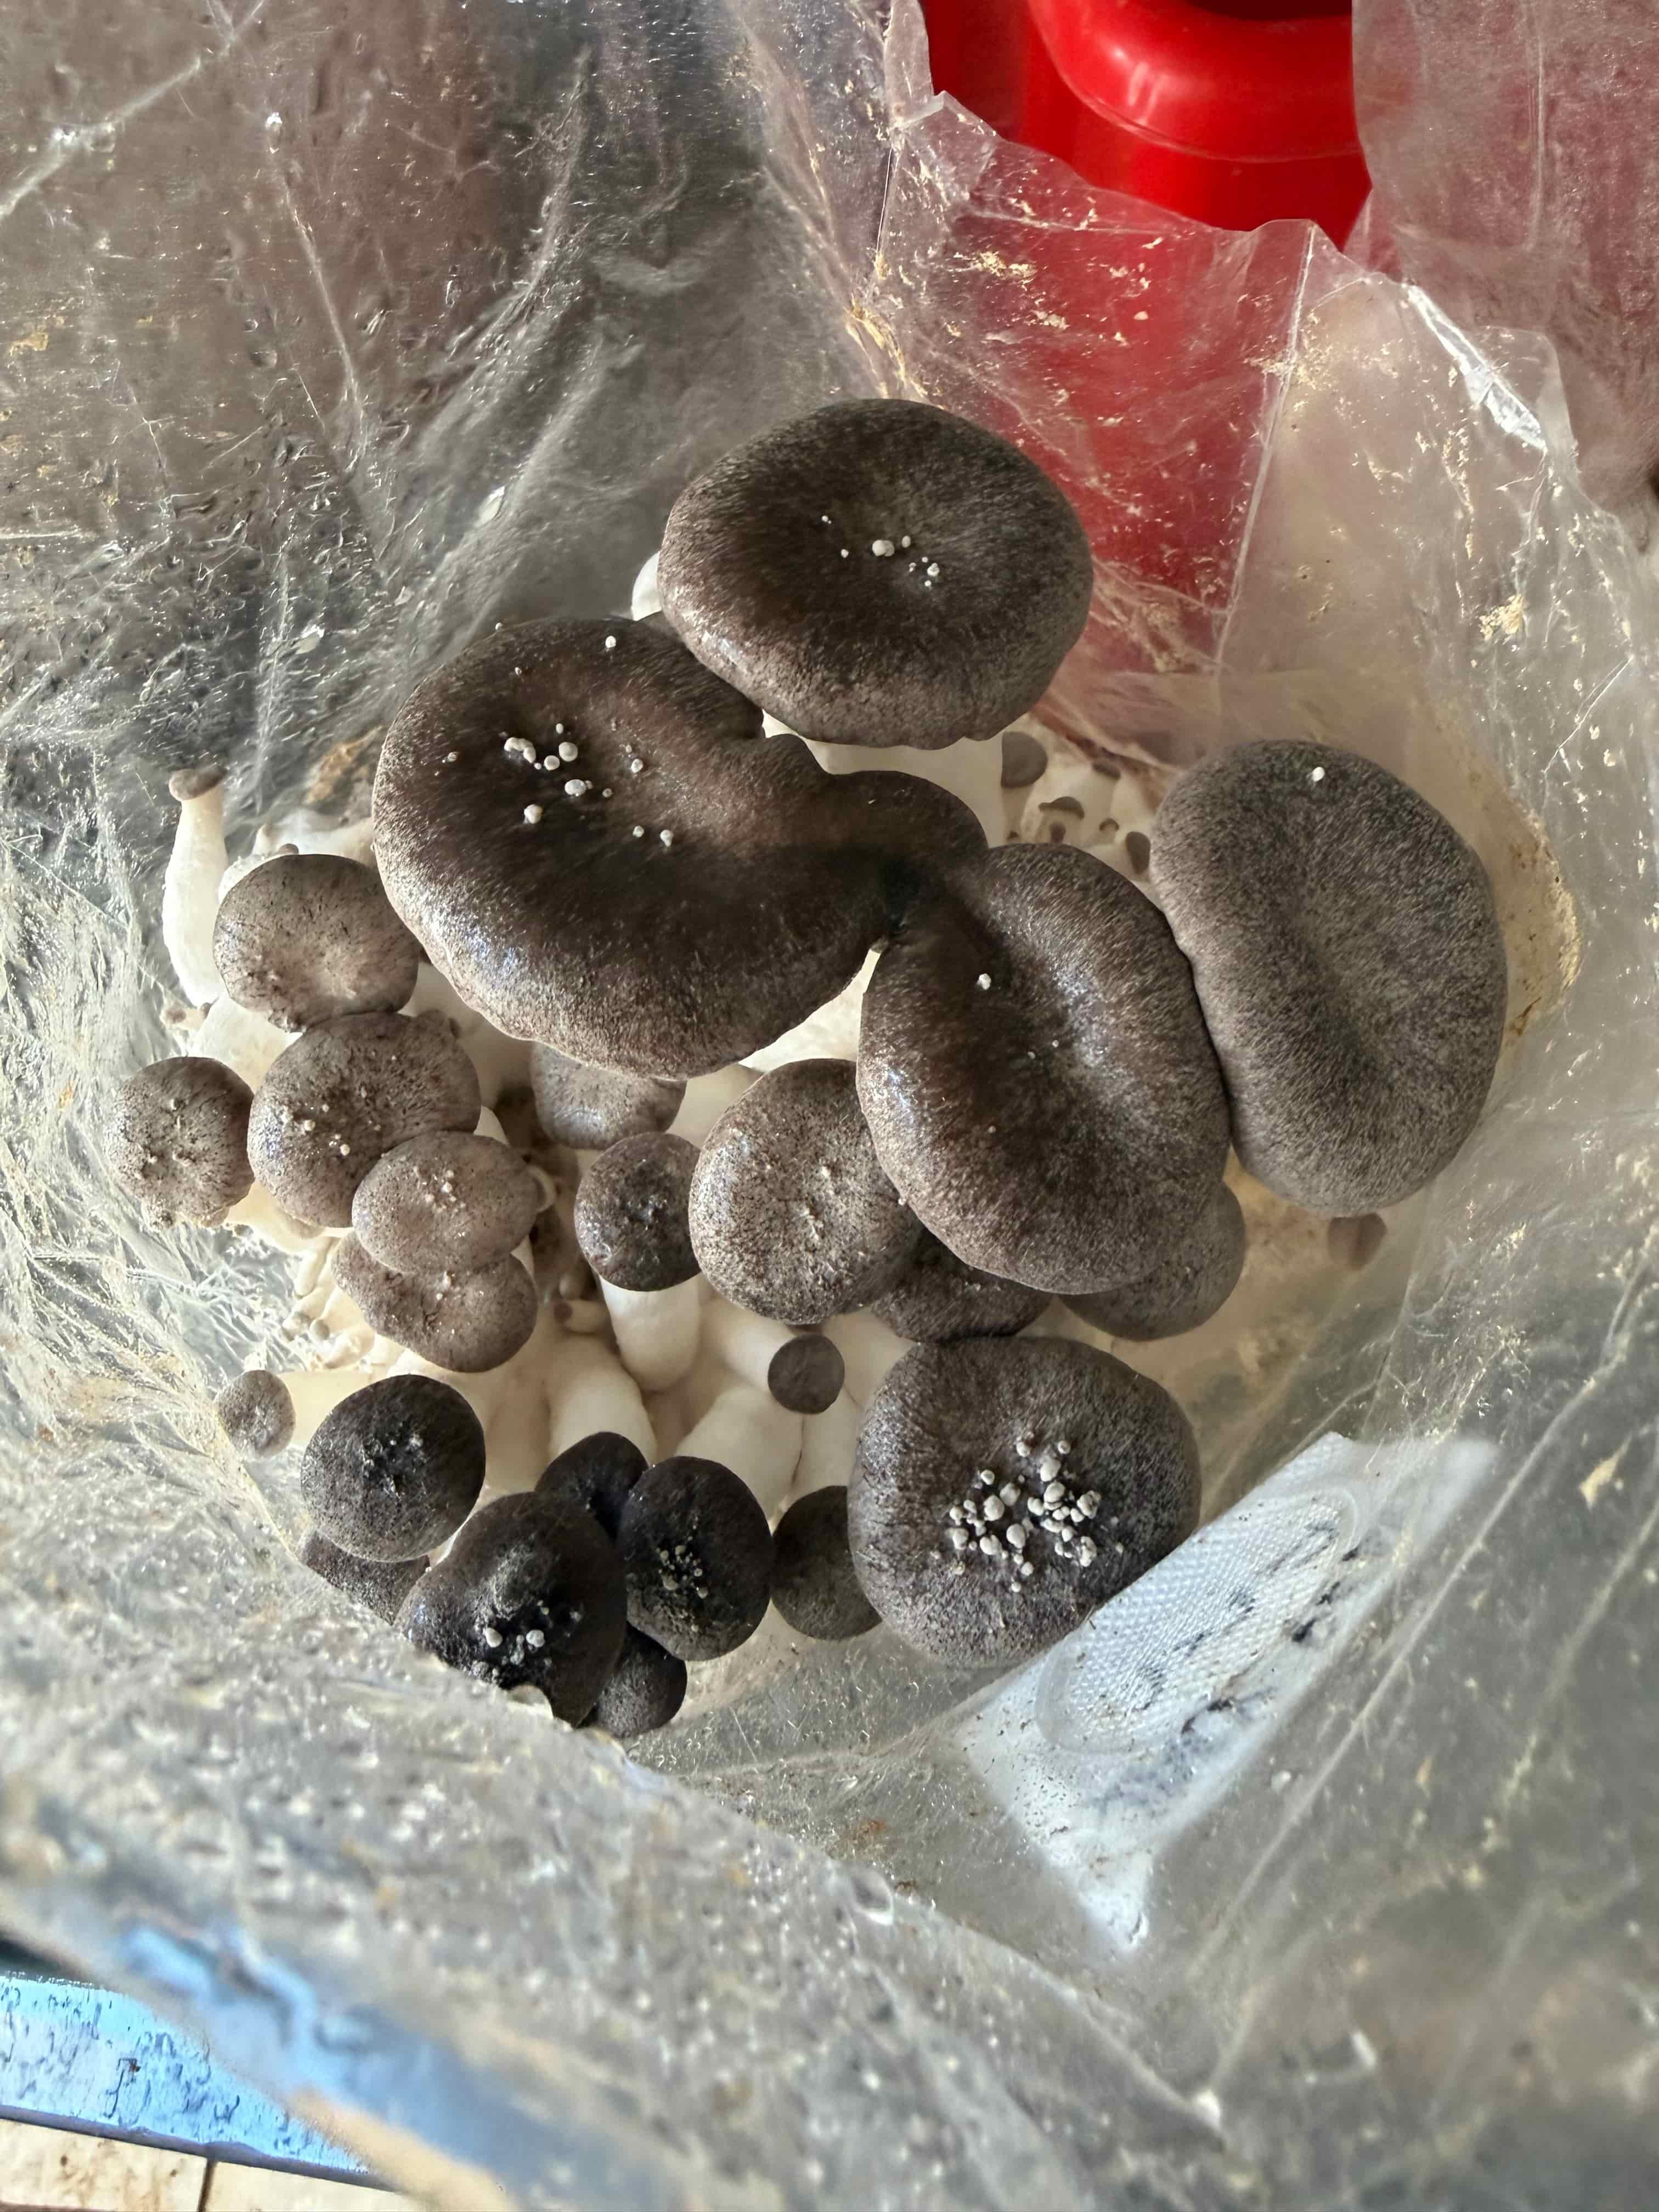
Day 13-14 - Size builds fast
Growth becomes more obvious during this period. Mid-sized mushrooms are common now, but full maturity still needs a little more time.
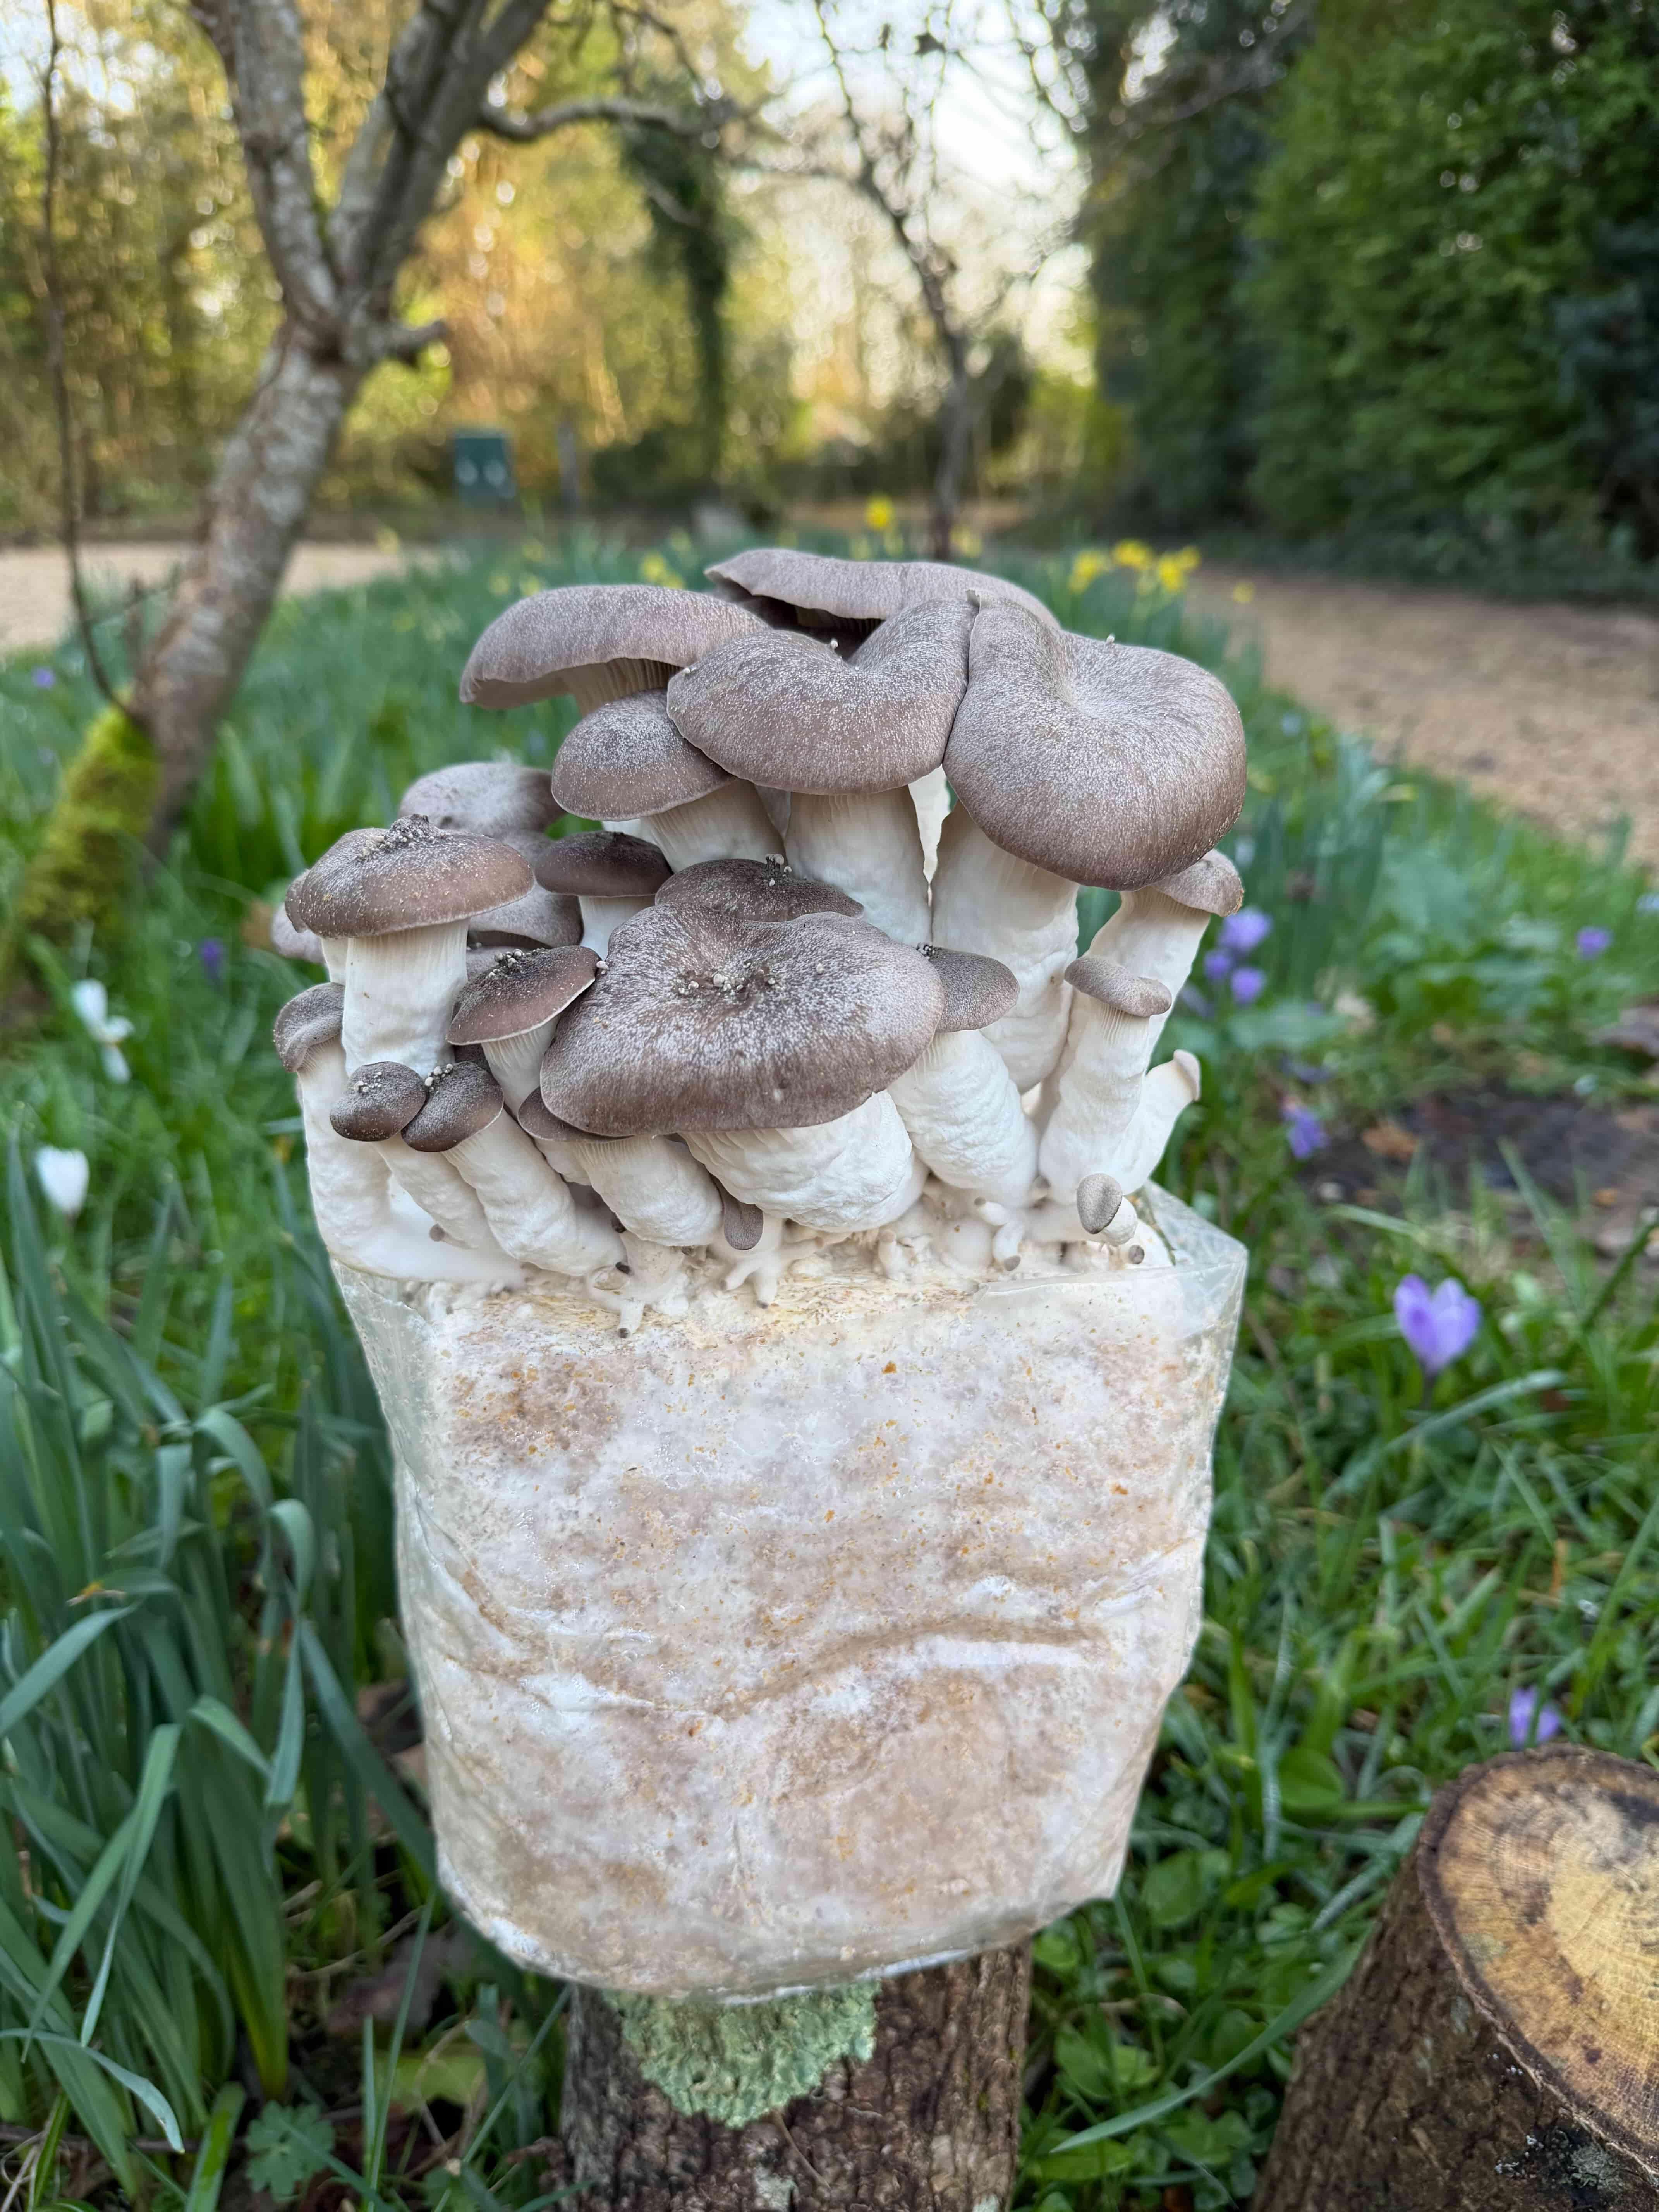
Day 15-20 - Harvest
Harvest is best when the stems feel dense and the caps remain relatively small. A clean blade at the base gives the tidiest result and suits the thicker stem structure well.
Shop Black Pearl Oyster Growing Kit
How does an Enoki mushroom kit progress from opening to harvest?
Enoki grows as long thin stems with tiny caps, so the kit looks delicate even when healthy. A staple in Japanese cuisine, they add wonderful texture to hot pots, soups, and stir-fries. Orange colouring on parts of the substrate can be normal for this variety and does not automatically mean contamination.
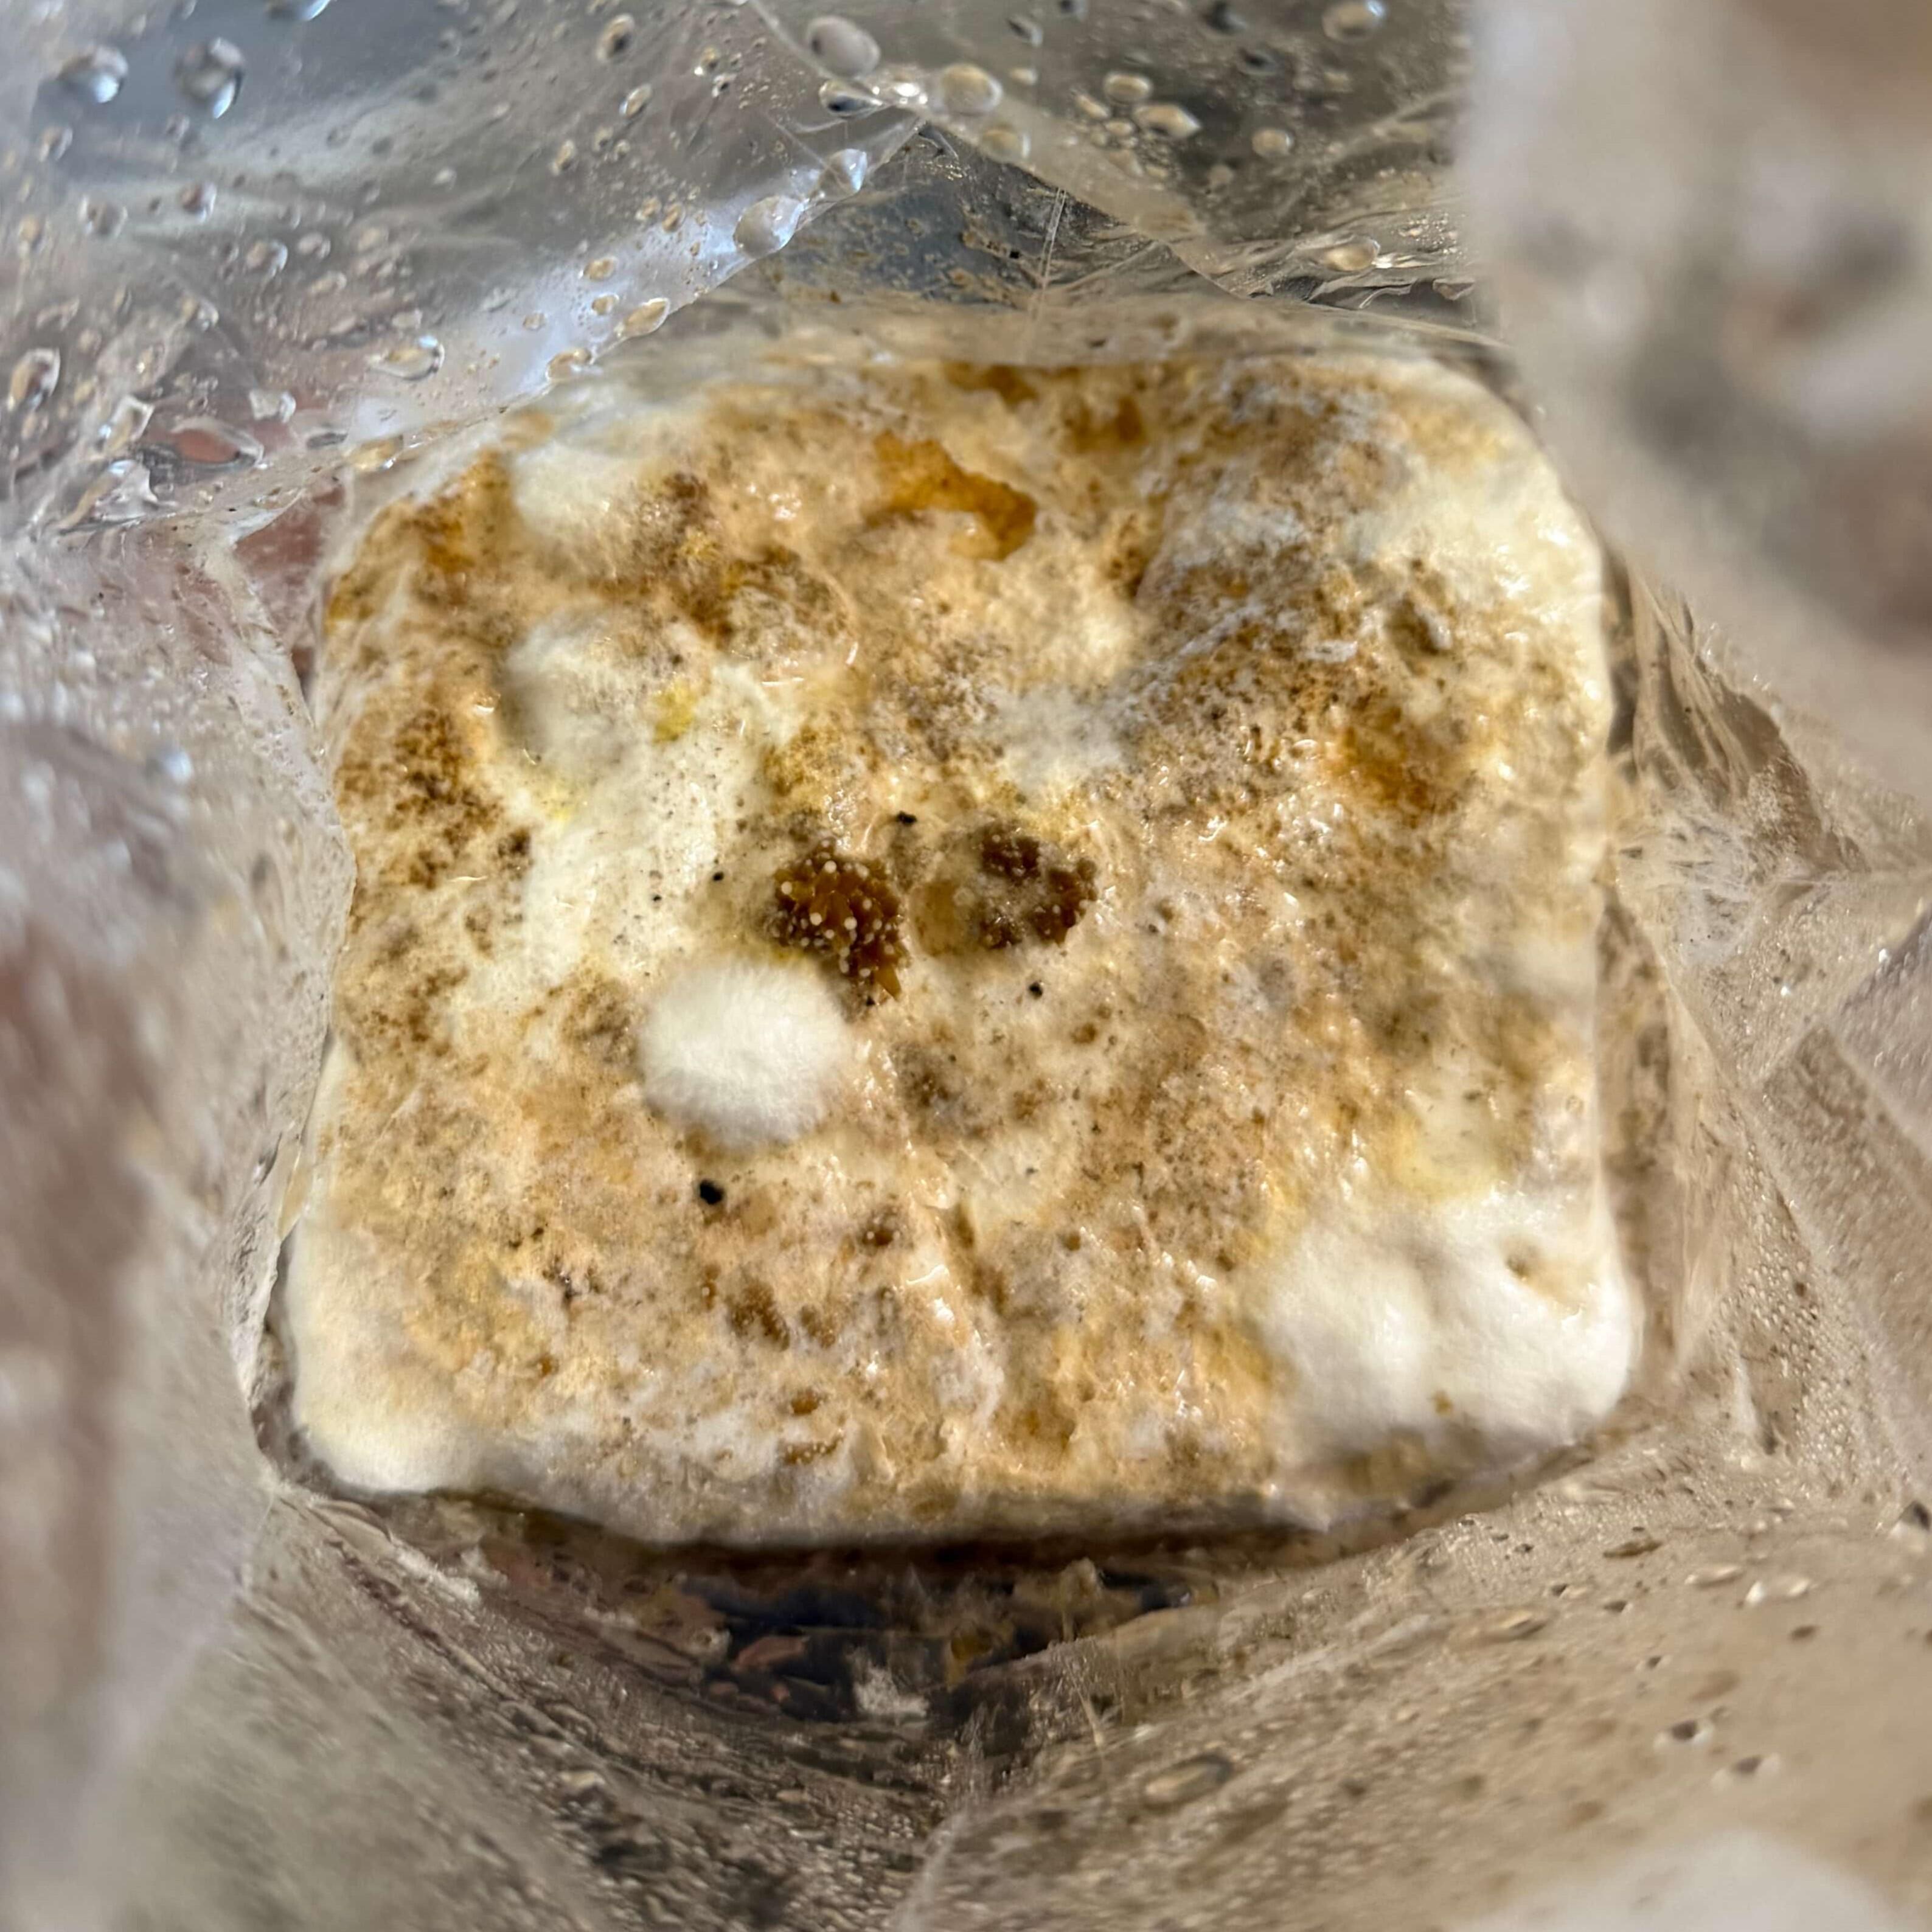
Day 1 - Setup
Setup begins with opening the kit and checking the block surface. White substrate with an orange tint can still be normal for Enoki mycelium. Follow the kit method and keep conditions steady from the start.
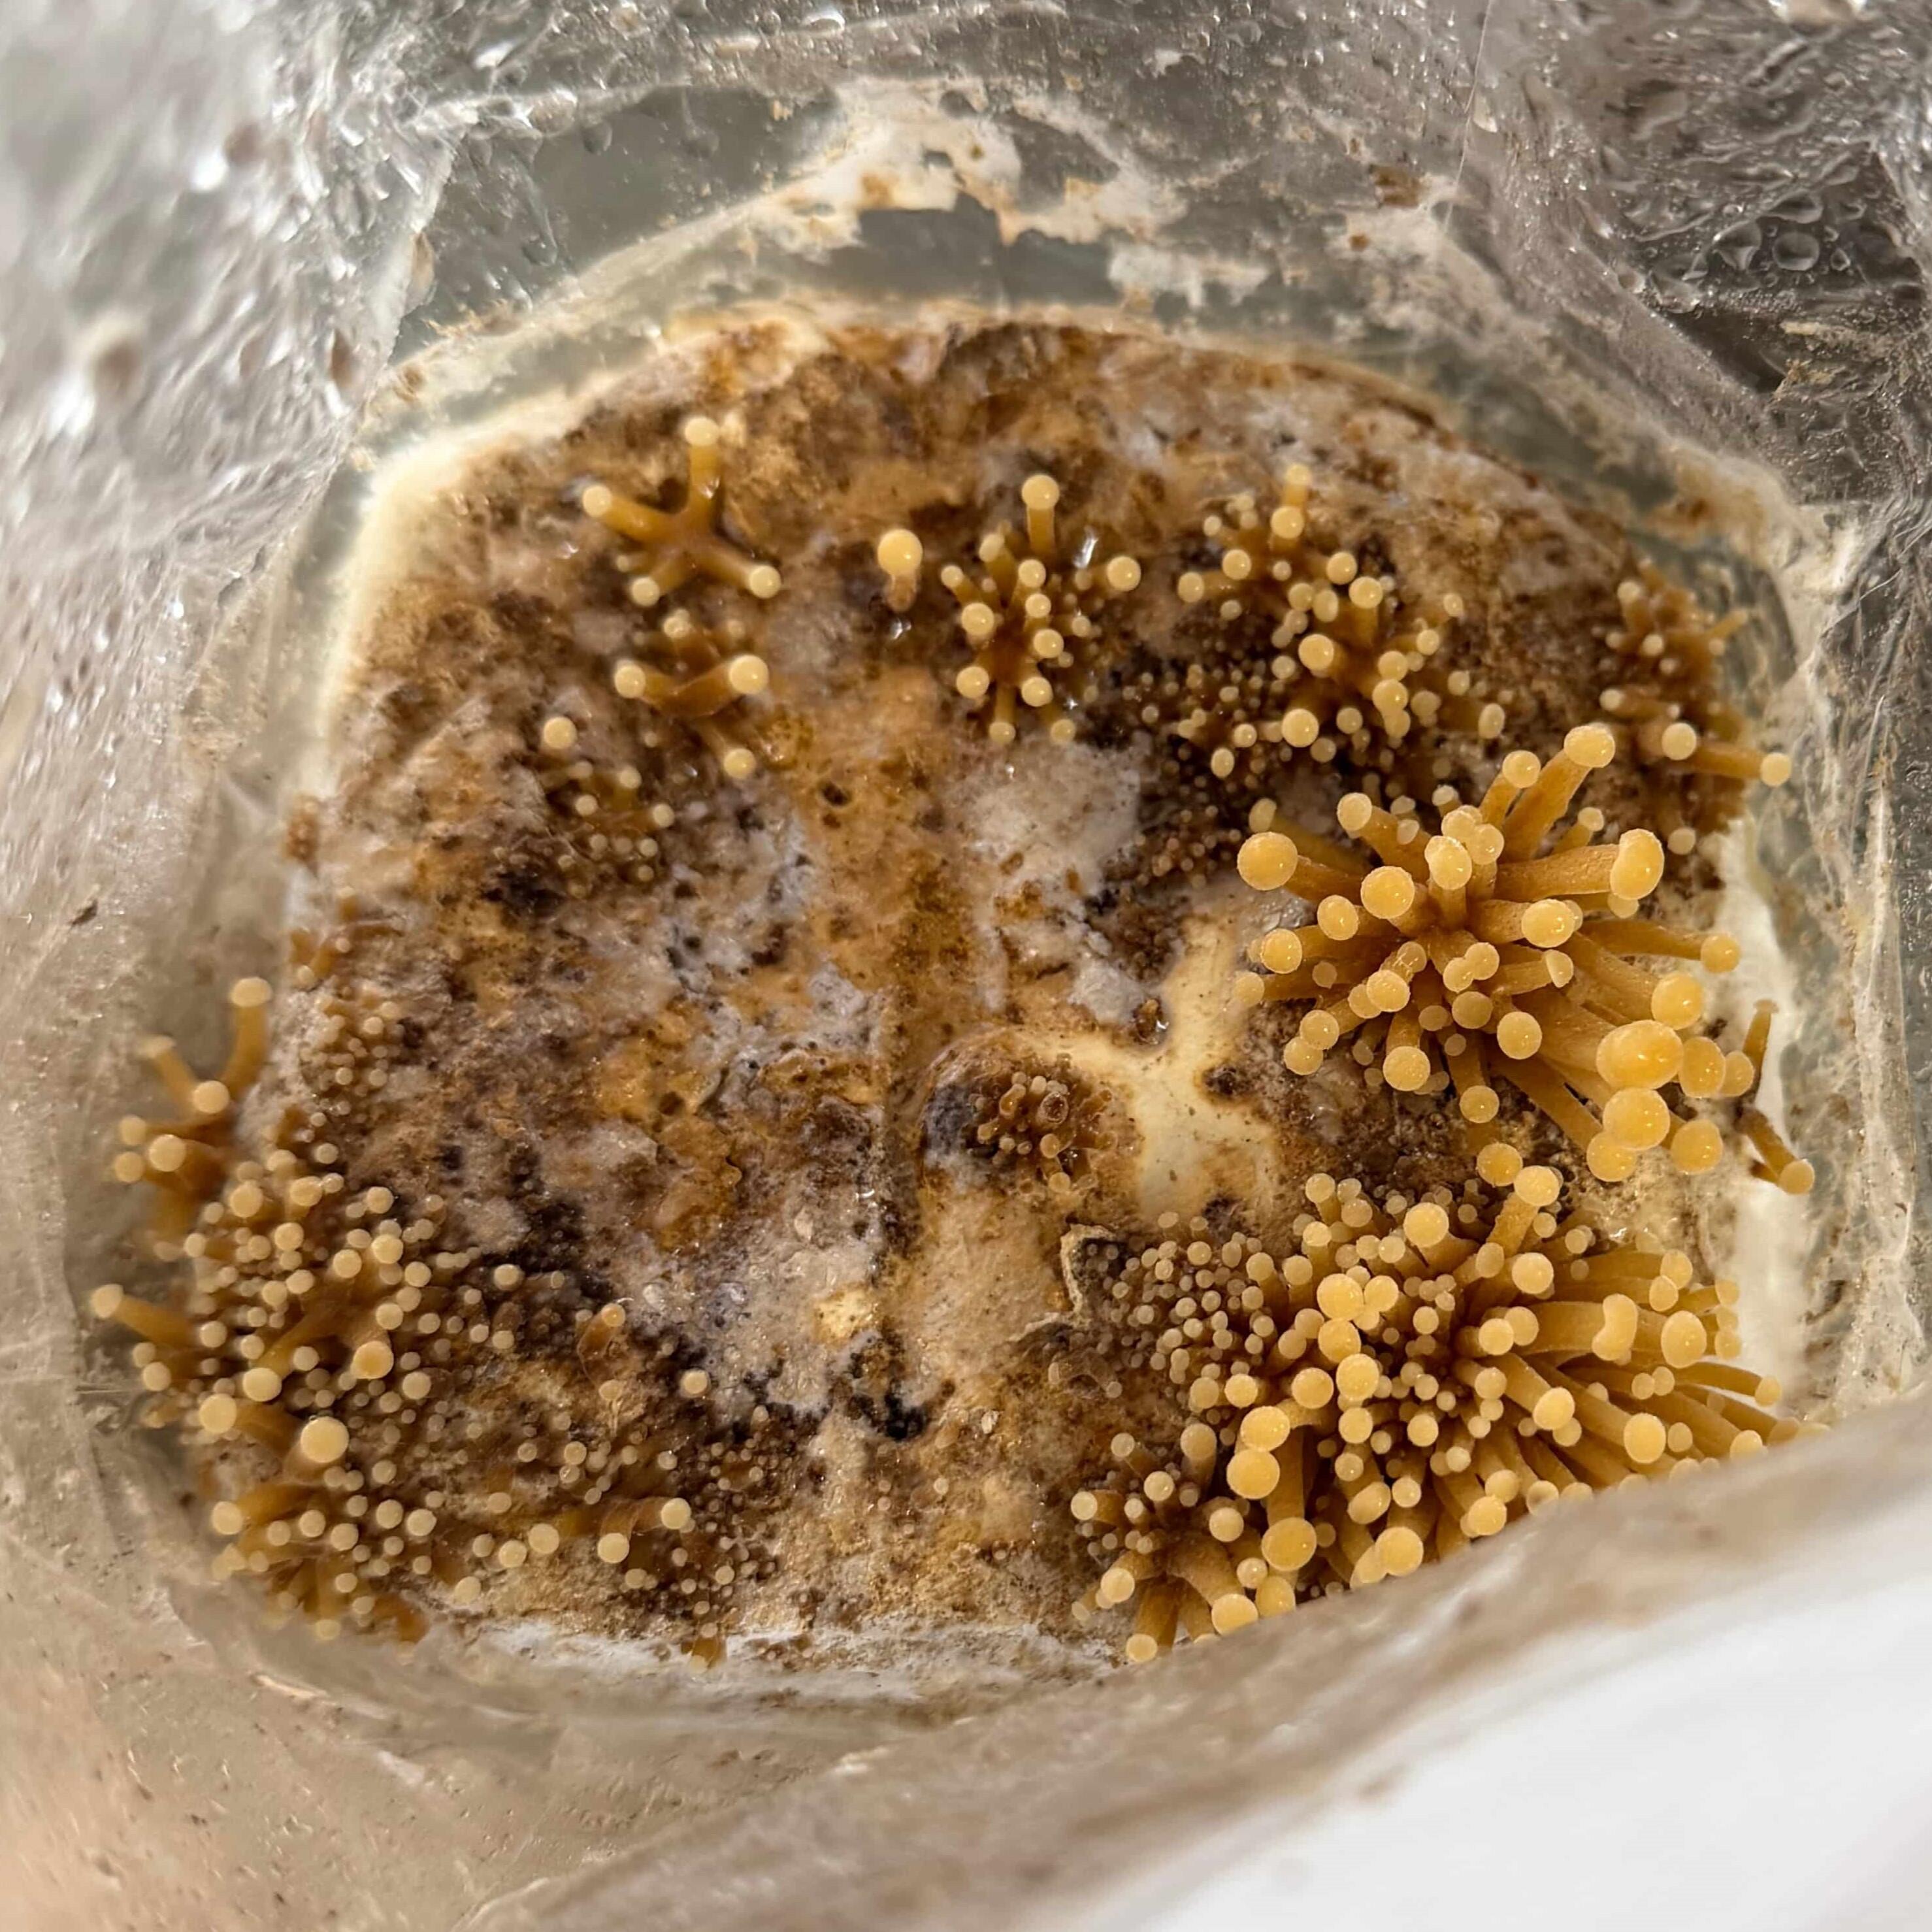
Day 5-10 - Pins appear
Pinning starts across the top surface when moisture levels are right. Small points emerge first and can look tightly packed before the stems lengthen. With twice daily spraying, pins form steadily.
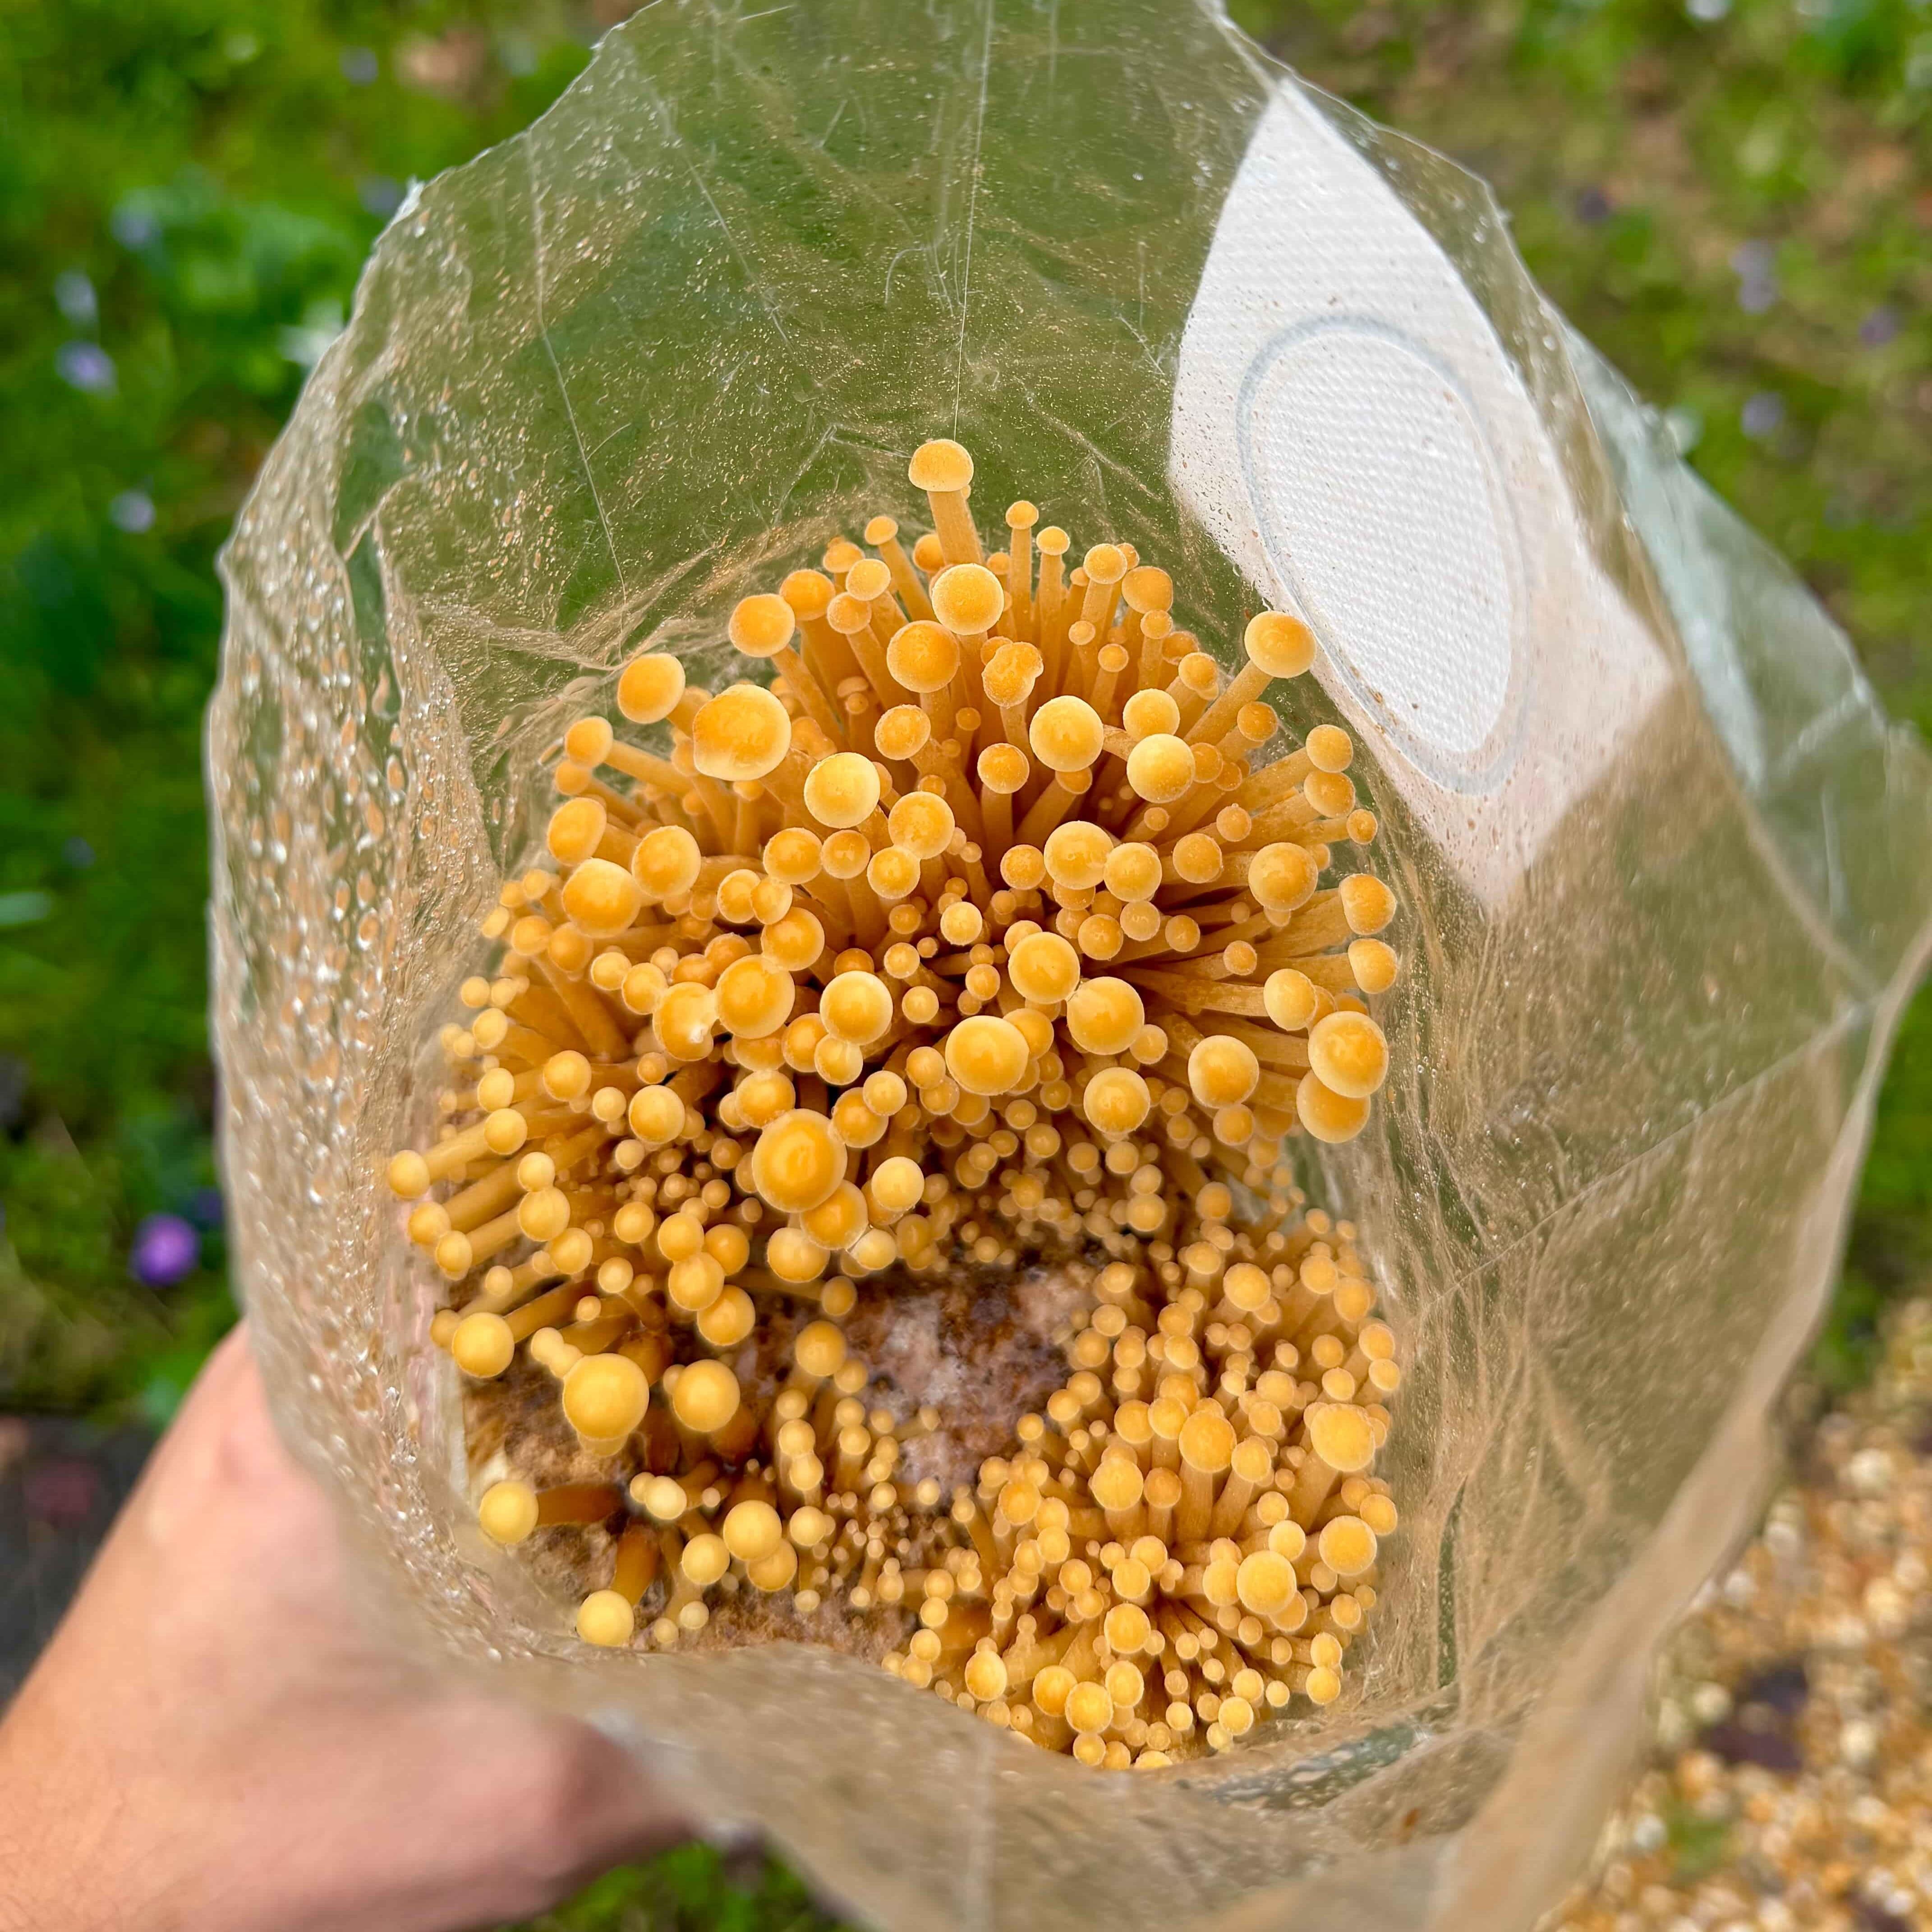
Day 11-12 - Stems extend
Elongation becomes clear once the young mushrooms push upward. Tiny caps sit on top of thin stems and begin forming the familiar Enoki look.
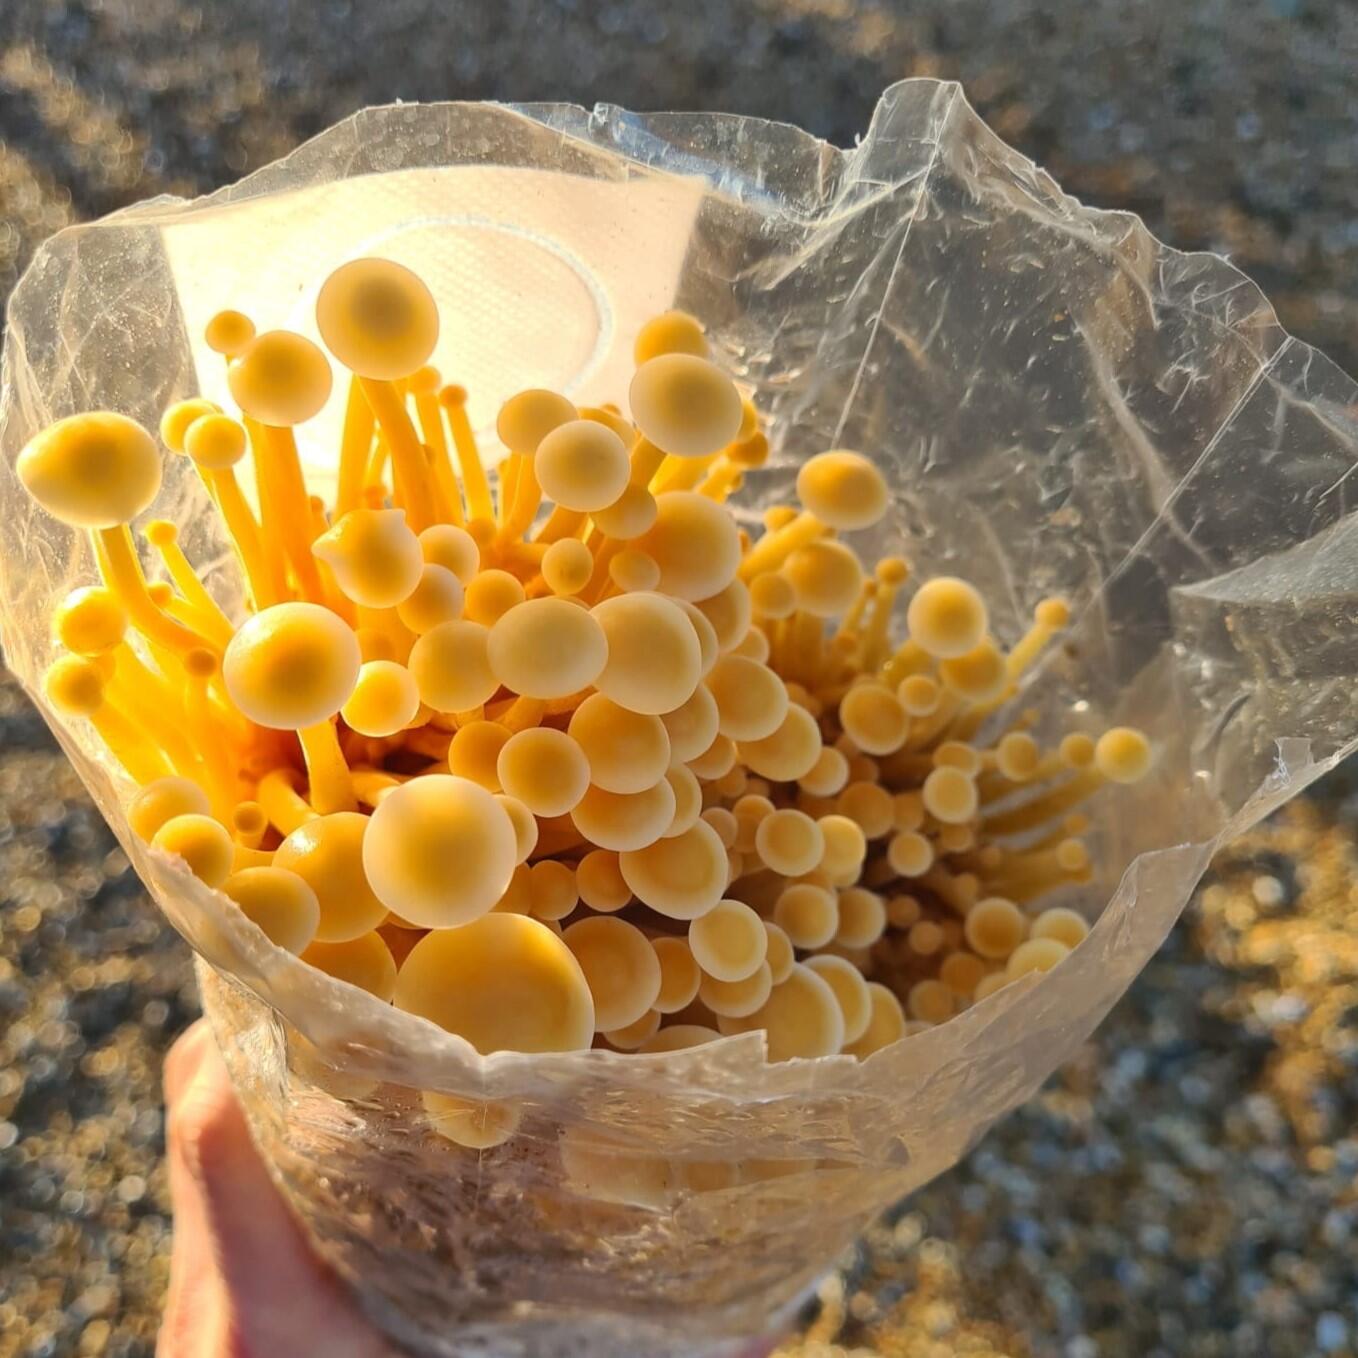
Day 12-13 - Rapid growth
Stems grow in size and mushrooms push towards the top of the bag. Taller clusters usually rise toward the top of the growing space as the kit matures.
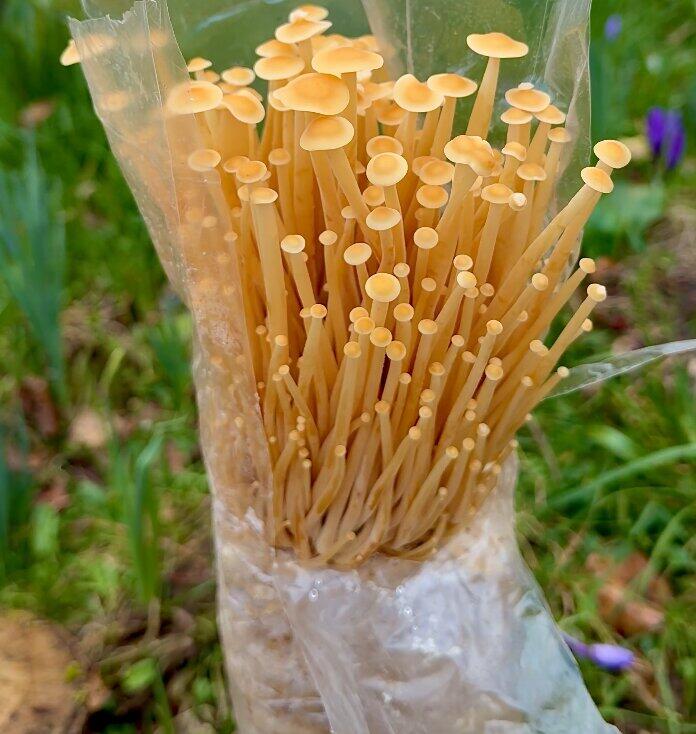
Day 14-15 - Harvest
Harvest works best when the stems are formed, tidy, and still firm, with small caps on top. The whole cluster can be twisted away in one movement when it reaches full size.
Enoki Mushroom Growing Kit - Coming soon
What should you expect from Chestnut and White mushroom kits?
Chestnut and White mushrooms (Agaricus bisporus) follow the same timeline because they are the same species at different maturity stages. These kits take longer than oyster or Lion's Mane because the topsoil casing layer needs time for the mycelium to colonise before pins can form. The full chestnut and white growing guide covers the process in detail.
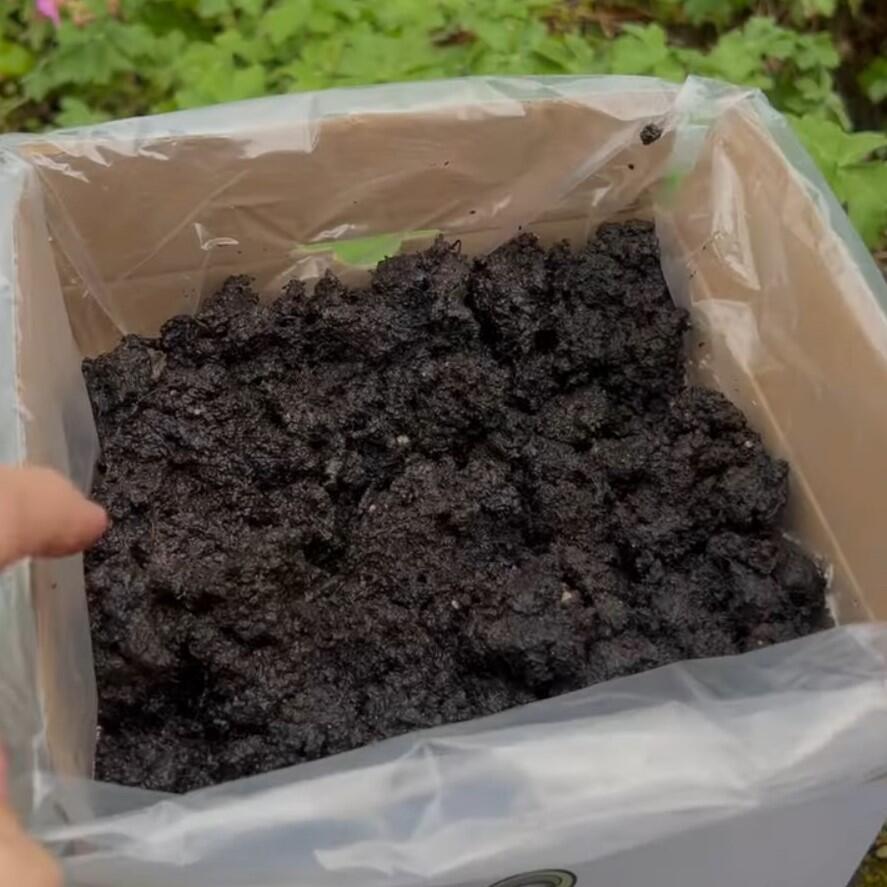
Day 1 - Casing and setup
Setup starts by adding around 100ml of water to the topsoil bag and laying that casing loosely over the compost. Loose structure matters because compact soil can slow colonisation. The lid should stay on loosely for about eight days while the kit sits between 14 and 21 degrees Celsius.
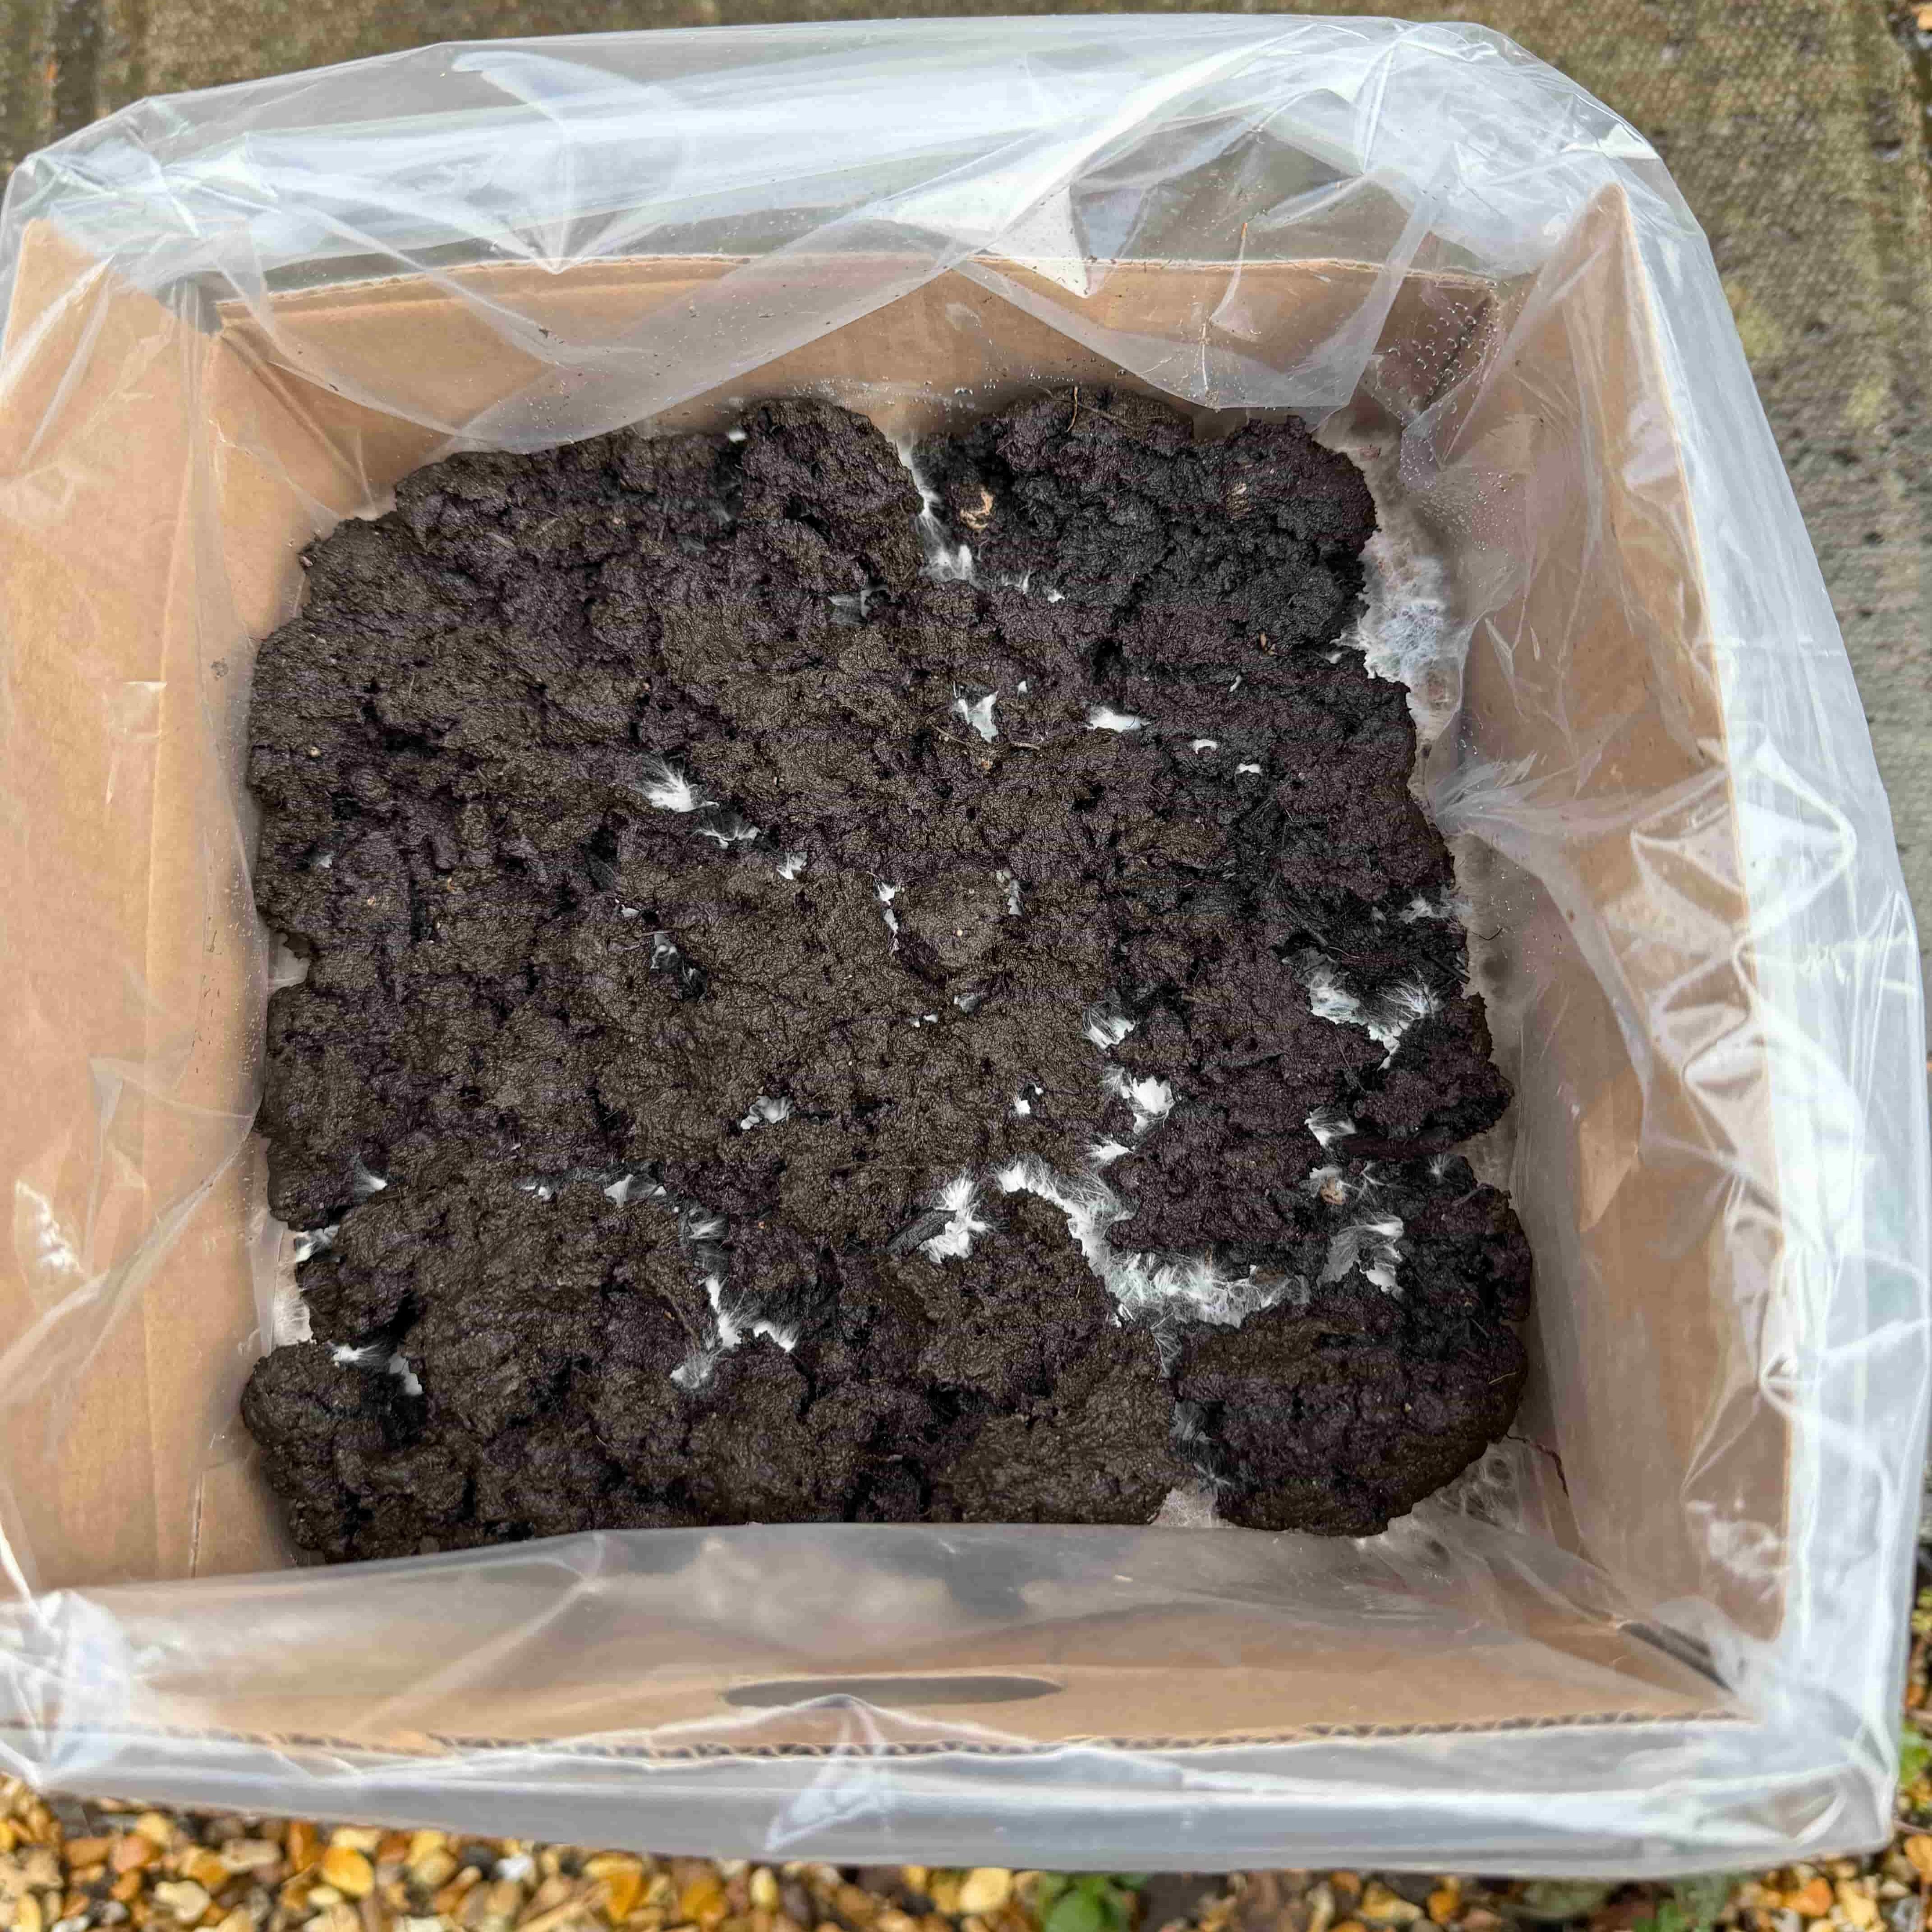
Day 7 - Mycelium reaches the topsoil
White threads in the casing show that colonisation is under way. Lid removal usually happens at this stage, followed by twice-daily spraying to keep the topsoil moist but not waterlogged. If it dries out, see the hydration guide.
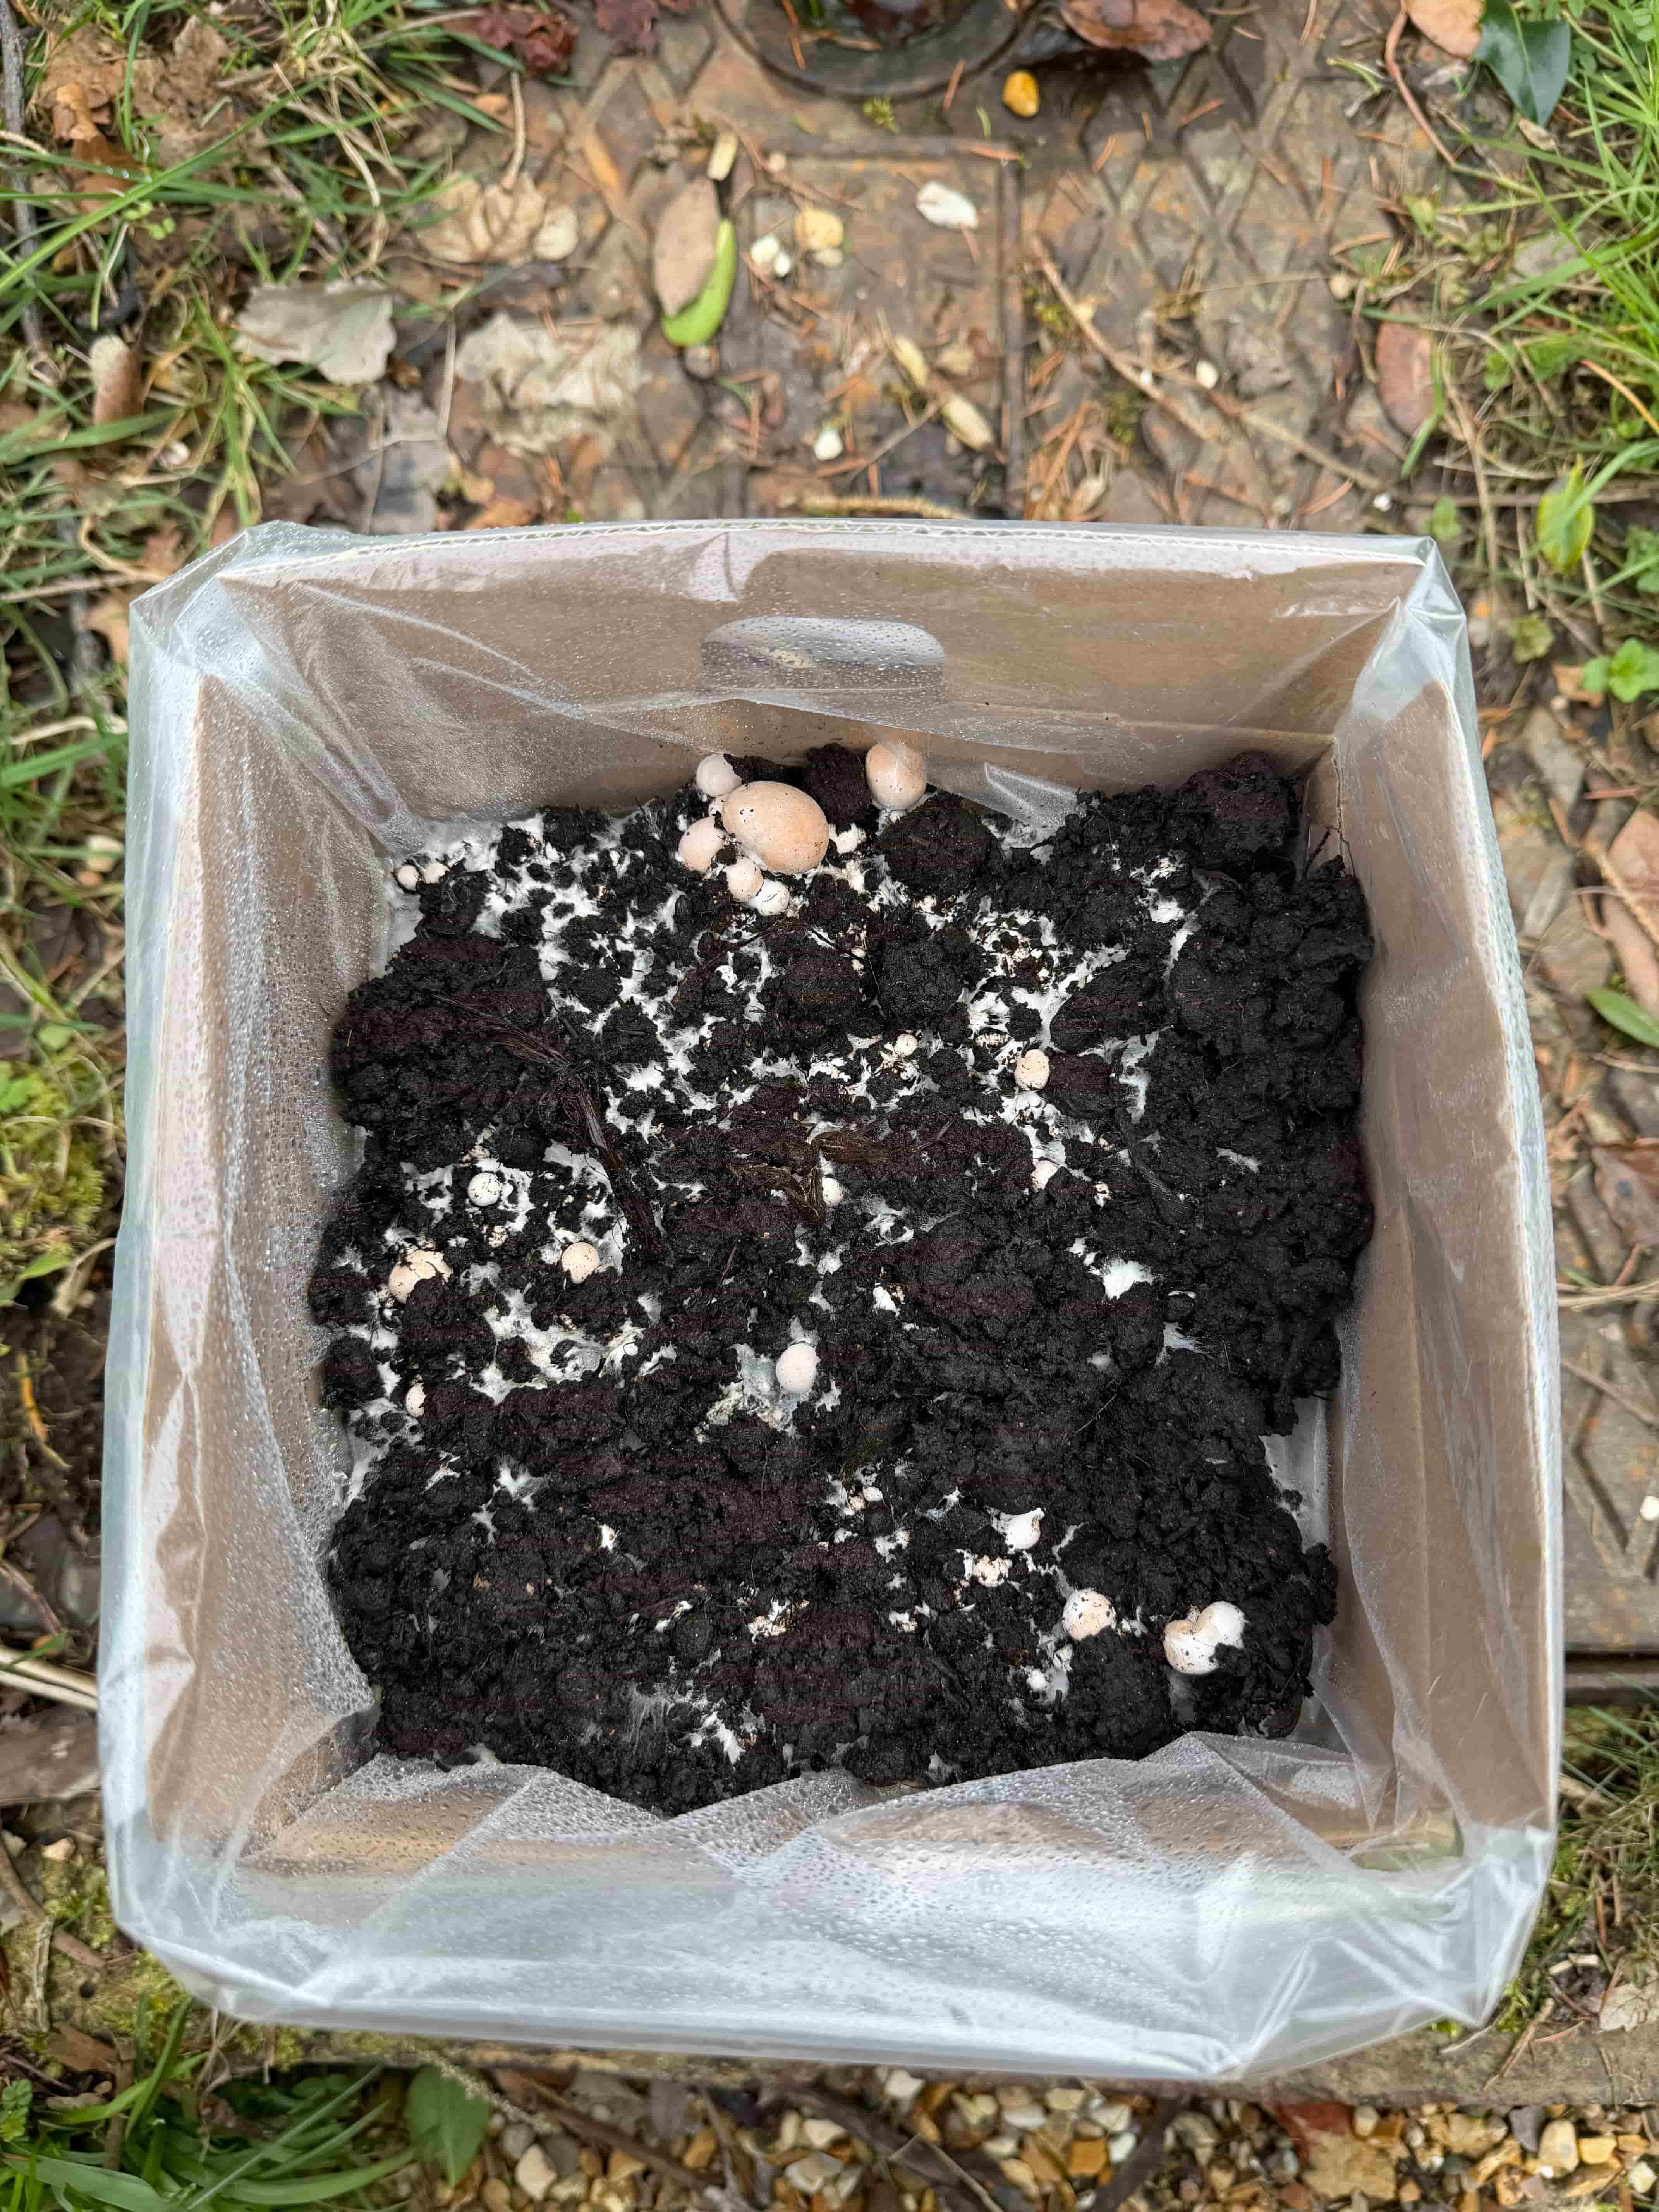
Days 8-10 - Casing becomes active
Surface spread becomes more obvious as mycelium moves across the top layer. Pins begin to form and will begin to double in size over night, keep spraying twice daily.
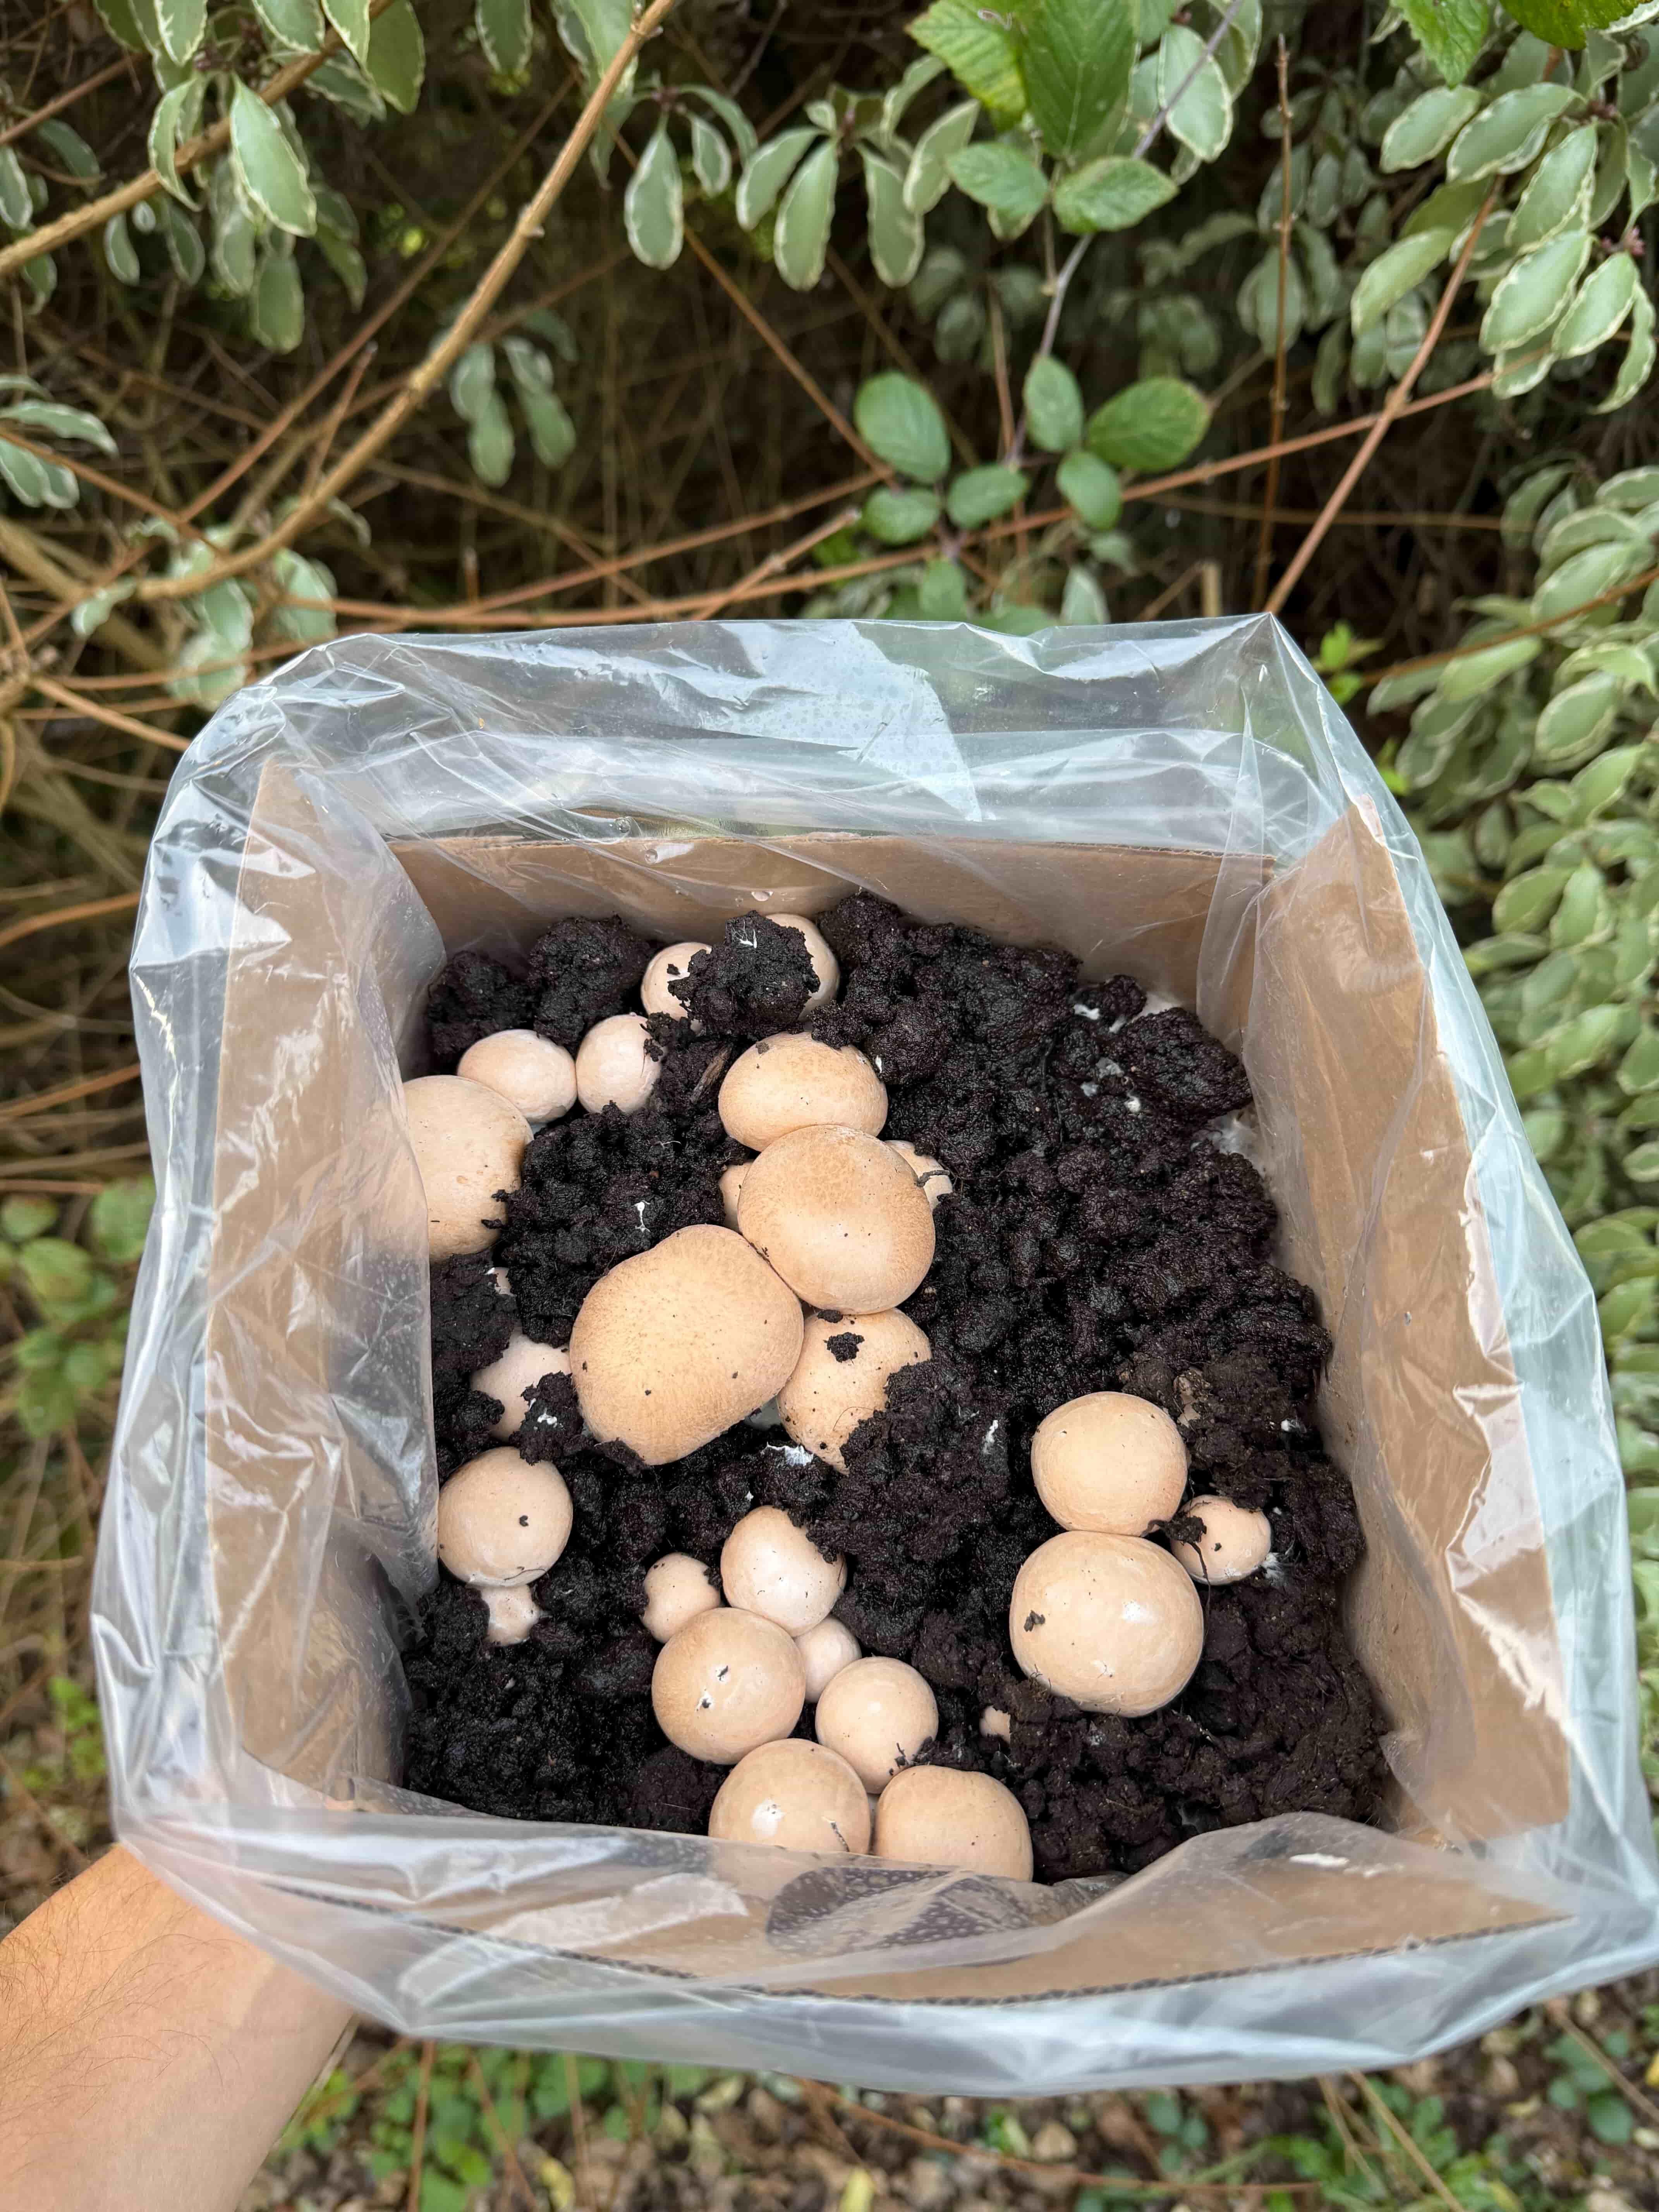
Days 12-15 - Pins begin to form
Small mushroom fruit bodies form swelling quickly once conditions hold steady. Continue spraying twice daily and keep conditions stable.
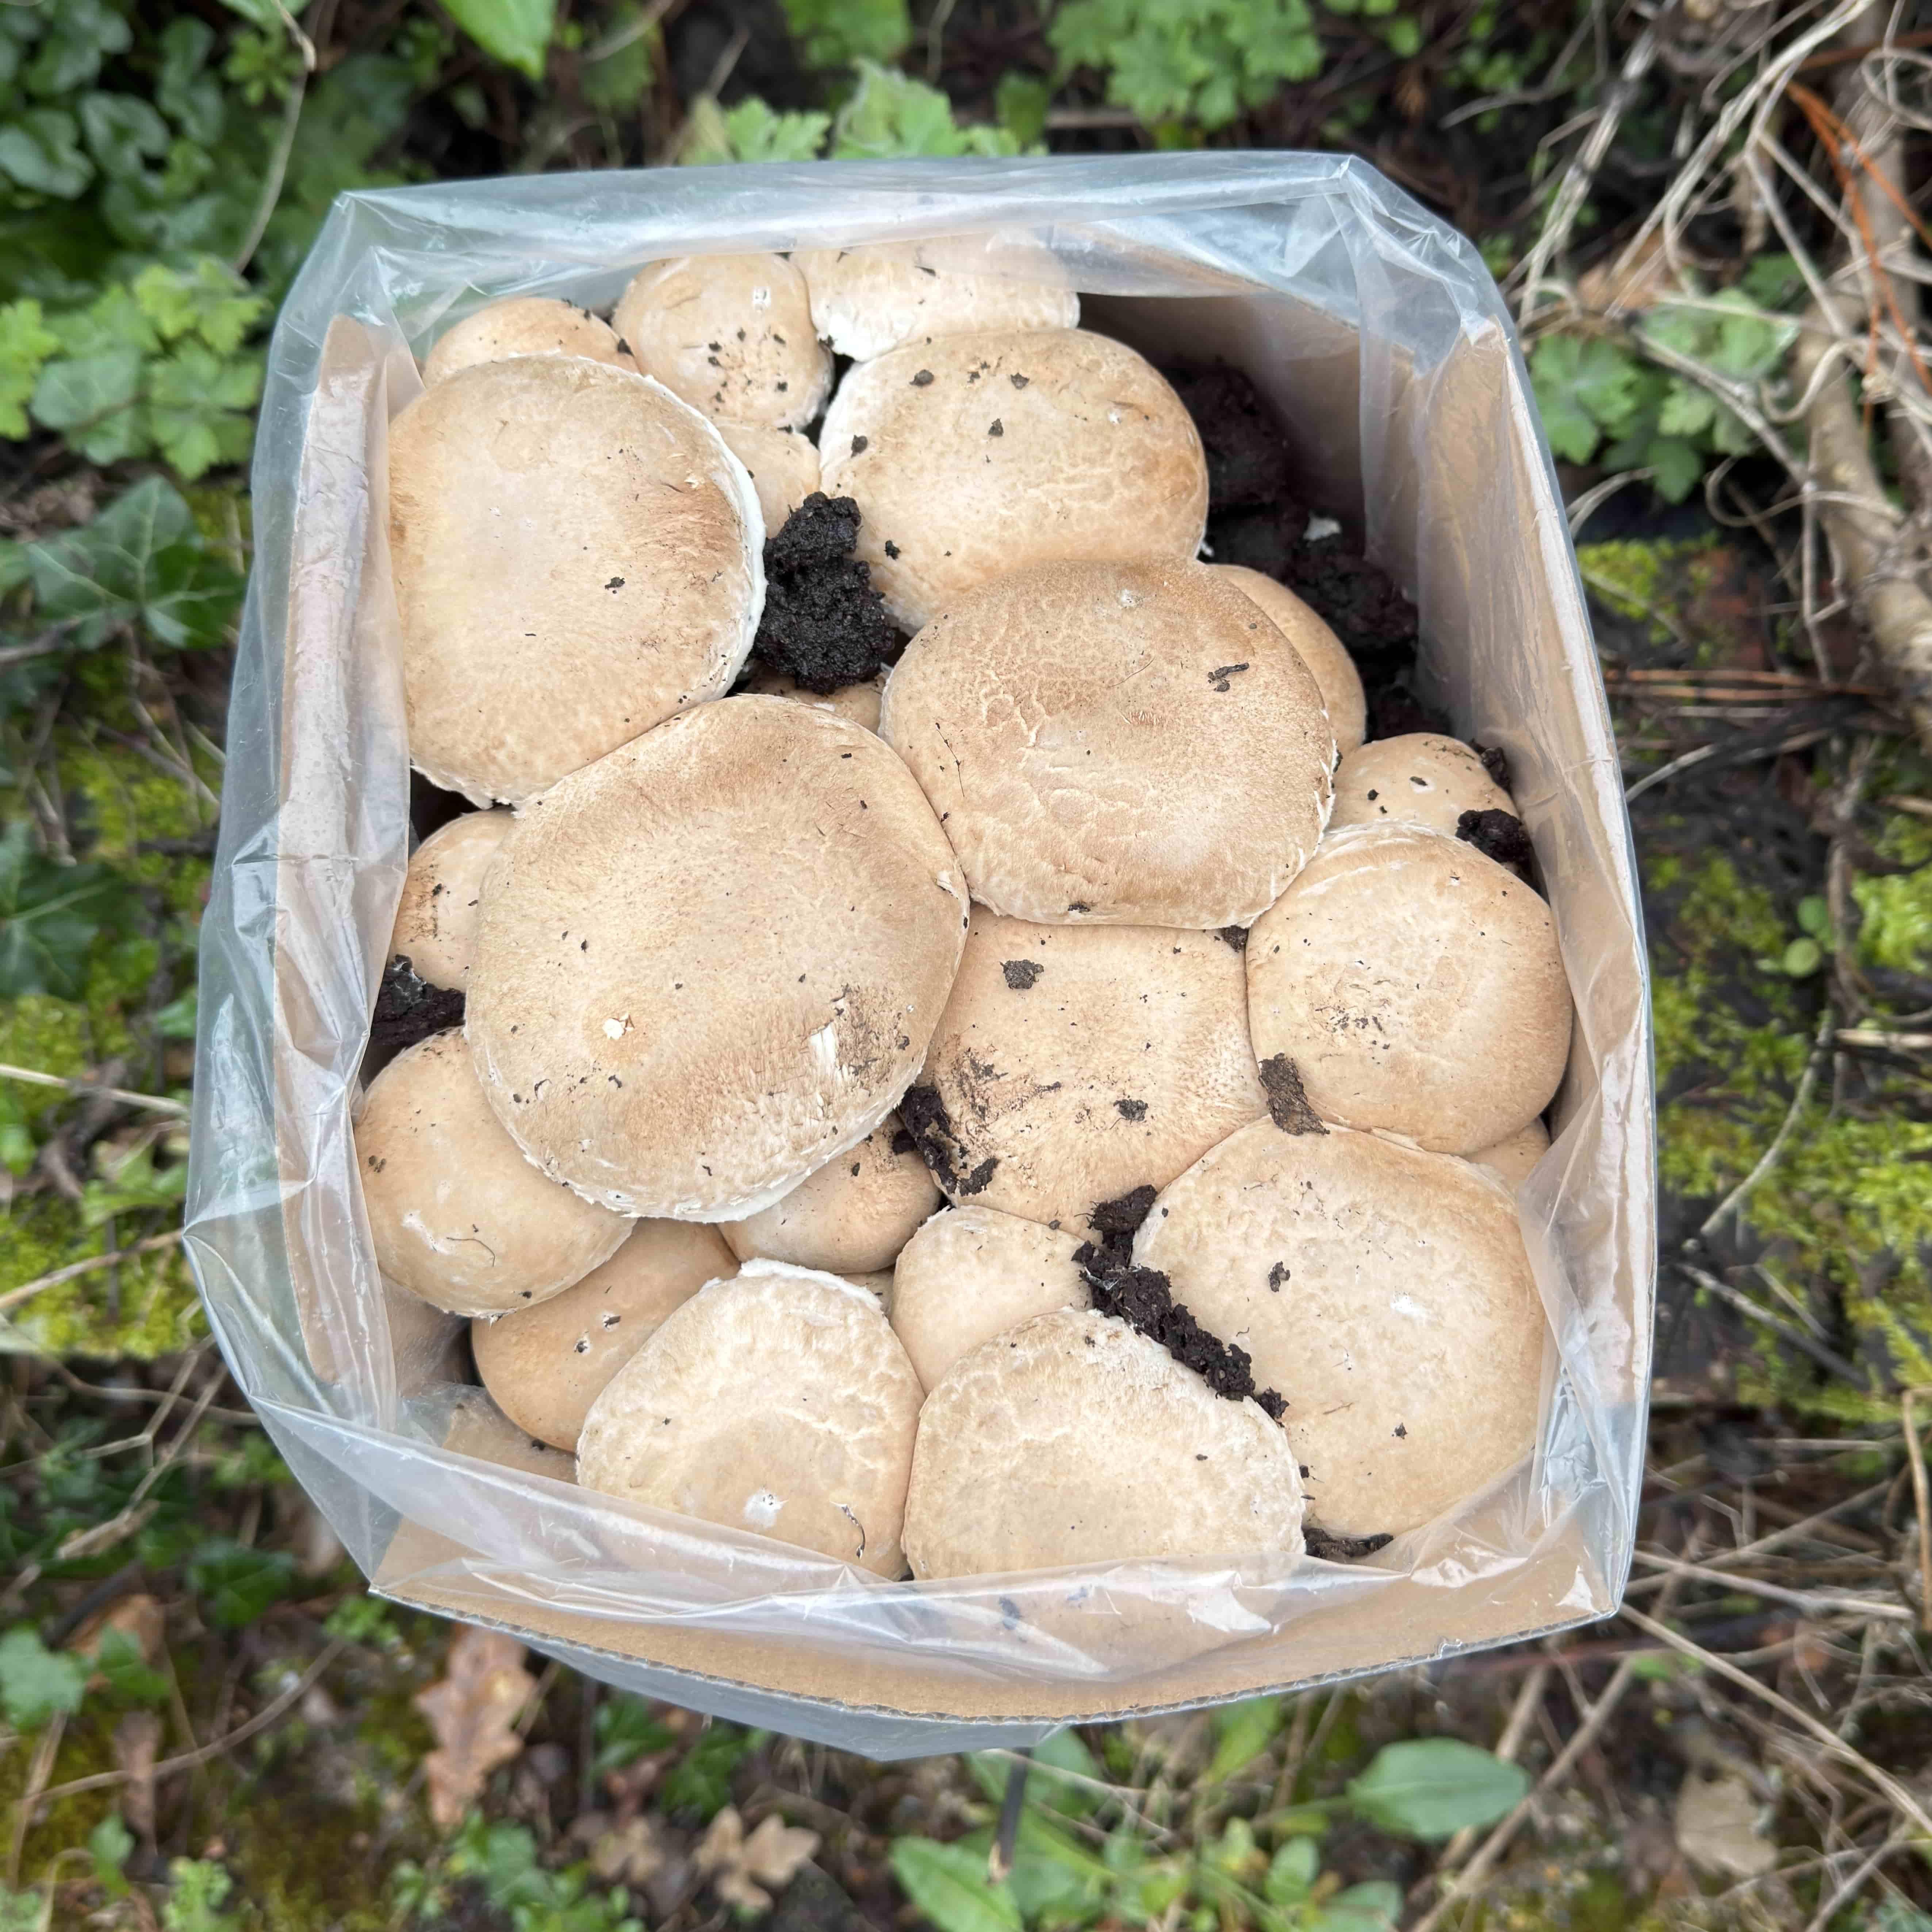
Days 16-24 - First harvest
Harvest timing depends on room conditions and variety pace, but the first flush usually lands within this range. Mushrooms should be picked before the cap edges turn upward too far. A full twist-and-pull removal helps clear the base properly for later flushes.
What should you check if your mushroom growing kit is behind the timeline?
Growth delays usually come from home conditions rather than from the kit itself. Humidity, temperature, and airflow should be checked first because those three factors explain most slow progress. Being a day or two behind is normal. If your kit is significantly behind or growth has stalled completely, check these three things first.
Is low humidity slowing the kit down?
Humidity problems often show as a dry, dusty, cracked, or firm surface. Dry indoor air is common in UK homes during colder months, especially near central heating. Increase misting frequency when the surface dries too fast, but avoid turning the block soggy.
Is room temperature outside the working range?
Temperature problems can stop fruiting or slow it sharply. Warm spots near radiators, cold garages, sunny windowsills, and draught-heavy spaces all create stress for the mycelium. Most Merryhill Mushrooms kits perform best between 14 and 21 degrees Celsius, while Lion's Mane usually prefers the cooler side of that range.
Is poor airflow causing overgrowth instead of mushrooms?
Airflow problems can make the surface look overgrown with mycelium while fruiting stays weak or absent. Stale enclosed air often leads to slow development because mushrooms need oxygen exchange to form properly. Move the kit into an open room with gentle natural air movement if the growing space feels sealed.
When should you ask for support?
Support becomes sensible when the kit has seen no real change after around 10 days despite good humidity, stable temperature, and decent airflow. Photos help the Merryhill Mushrooms team judge the issue faster, especially when the image shows the kit, the room placement, and the day count. Contact the Merryhill Mushrooms support team with a photo of the kit, the room it is in, and what day you are on. The team can usually identify the issue quickly.
Choose Your Variety
Every Merryhill Mushrooms growing kit arrives fully colonised and ready to fruit. Pick the variety that suits your taste and watch it grow.
Shop All Growing KitsRelated reading
Published by Merryhill Mushrooms
Sussex, UK | Six generations of mushroom growing excellence